|
|
|
#1
 07-01-10, 02:27
|
||||
|
||||
|
Hey Fellas,
Taking Clives hint, i'm going to start a new thread dealing with the restoration of my Canadian M151A2. I started this project by purchasing 2 x M151A2 donors. One came from Mike McKinley which originated with 422 Tactical Helicopter Squadron and retired with 403 Helo Operational Training Squadron in CFB Gagetown.  The other came from a farmer in Red Deer Alberta which spent its career with 1 Service Battalion as C/S 9A.  I ended up using a bit of both in order to build a good runner with restoration potential. The 1 Svc Bn Jeep had a very decent (but sadly demilled) body, but the powerpack and most everything else mechanical had been butchered. Mikes 422 THS Jeep was a tad on the rusty side, but had proven provenance, an excellent original unmolested low mileage powerpack (26k miles), and lots of usable mechanicals. So I went ahead and "temporarily" put it together in order to get the ownership sorted out and some Licence Plates. I enjoyed driving it for a summer racking up nearly 800 miles of local driving to learn the quirks and assess the condition of the components.  Scott Bentley
__________________
Gone but never forgotten: Sgt Shane Stachnik, Killed in Action on 3 Sept 2006, Panjwaii Afghanistan Last edited by Scott Bentley; 19-03-12 at 03:03. 
|
|
#2
10-01-10, 17:55
|
||||
|
||||
|
So, after a week or two of poking around i've finally put this thing an a position to go to work on it. Remarkably, it only really took 2 days at a very relaxed pace to get it from "streetable" into the position you see here. Nice thing is I can move it around and flip it over fairly easily solo.
    The pics don't really do any justice. I'm still shocked at the lack of rust on this nearly 40 year old Jeep. Aside from a 6" x 2" area in the hat channel under the drivers side floor, there is no appreciable rust on this little fella. The Ziebart obviously did a great job protecting it. Everything you see is very light surface rust. Sadly the bulk of my work is focused on fixing the back corners where some bozo used the lifting rings to recover it (with impunity) and bent the corners out, and a split in rear corner seam from what looks like some damage from jack knifing a trailer. The rest is really cosmetic, like straightening the lip along the lower edge of the body and cleaning up where the "Re-mil" repair took place. Now comes the problem. At this point in my career, postings seem to be measured more in months rather than years. Talking with another friend in exactly the same boat, its scary trying to undertake a detailed project knowing that DND is not going to move your hulk of a Jeep and its 50 boxes of components. I think at last look in the Treasury Board Guidelines on move expenses, "hobby" materials are limited to 500lbs. As it was, I had to U-Hual this thing down in complete form and beg the Movers to to take my M416 Trailer as it technically was over the limits for size. So, don't mistake me as whining that my job is getting in the way of my hobby, but more of a case of having to balance time and economics. I've some other threads on restorations, and noticed that it wasn't uncommon for people to take in excess of 5 years to restore a "relatively simple" MB/GPW with a Repop Tub to boot. That being said, I would imagine if I was retired, i'd be looking at this in a different light. So, back on topic. I've tried nearly every paint removal technique known to man. Heat gun is nice, but very very time consuming. I've chose to use it in areas where i'd imagine I may find markings. I also gave chemical paint stripper a go, and although it is a bit quicker, the fumes are not kosher while doing it in an attached garage. This really only leaves me with power sanding/brushing or sandblasting. Having really had a hard look at the underside of this thing. Wire wheeling the bottom of this is going to take a heck of a long time, with some areas not even accessable, and create a hell of alot of lead dust in my pristine garage. After batting this around for nearly a year now, I think i'm going to have no choice but to send this out for sand blasting and primer. From re-reading advice and looking at other resto's, seems the best thing to do would be to do as many of the body repairs as I can now, then send it out for blasting an epoxy primer with the hopes that some new trouble spots don't pop up. Anyone want to take stab at what the sand blasting and priming costs would be for this before I pick up the phone and a box of kleenex? Scotty
|
|
#3
11-01-10, 06:11
|
|||
|
|||
|
the guy i use charges around 375.00 for the blast and primer.it does a good job.he is mobile also but i think you are a just a little to far from arnprior.lol.regards jim.
__________________
,3-m38,1-m38a1,1-,2-mb,2-cj2a.mbt,m100.
|
|
#4
13-01-10, 01:42
|
||||
|
||||
|
not sure if there is anyone up your way who does this, but there is macdonald applicators and jamac in saint john.btw...welcome to new brunswick, where our claim to fame is that you can walk to the top of a mountain, and still find a mosquito infested swamp!!! mike
|
|
#5
13-01-10, 02:05
|
||||
|
||||
|
Well, turns out I have a few options...
I may actually be able to do the blasting myself in a booth at work that they use for stripping and painting heavy equipment parts. But, there is also a shop that will do chemical/acid dipping for a really good price as well. Been doing a lot of reading though on the dip, sounds like it may be a bad idea with all the overlapping sheet metal on this thing. I'm going to see how this pans out. If your ever up this way Mike, shoot me a PM and drop by. Scotty
|
|
#6
29-06-10, 20:41
|
||||
|
||||
|
Well, lots has happened since I started this thread.
So fast forward a few months. After I stripped the Tub, I rolled it forward and went to work on the underside. The metal underneath was pretty good and still had the healthy remains of alot of Ziebart. I cleaned it all up with a wire wheel and hit it with flexible non-ashphalt undercoating:  I didn't exactly kill myself trying to hide the cut. It is what it is.... remilitarized. My concern here was getting the integrity of the Body back.  
|
|
#7
15-07-10, 09:47
|
|||
|
|||
|
Hi Scotty,
As per your request, here are a couple of photos of my next project:74-09397. The body was stripped by either chemical or sandblasting (I suspect the former) and is in very good condition - thankfully, most of the grunt work is already done. The underside appears rust free and would be perfect except for the weld -ugh! This is where I will probably spend a good chunk of my time as I am a sucker for punishment... Your question about fasteners is a good one, prime and paint only to have them get chewed up during installation or paint in place. I guess the ideal would be the way some WWII vehicles were done - paint all the parts, assemble them then give the entire vehicle an overall spray. I noticed most of the NOS hardware that I have been getting from various M151 suppliers happens to be the gold coated grade 8 or better stuff which survives nicely without paint although it may not go well on a camo jeep. Darcy
|
|
#8
16-07-10, 04:28
|
||||
|
||||
|
Quote:
Quote:
|
|
#9
16-07-10, 04:32
|
||||
|
||||
|
This portion of the resto is proving to be the time consuming part. I spent most of the morning reassembling the Master Cylinder and Pedal Assembly. I'm happy with how it turned out, and everything is cycling much smoother than before:
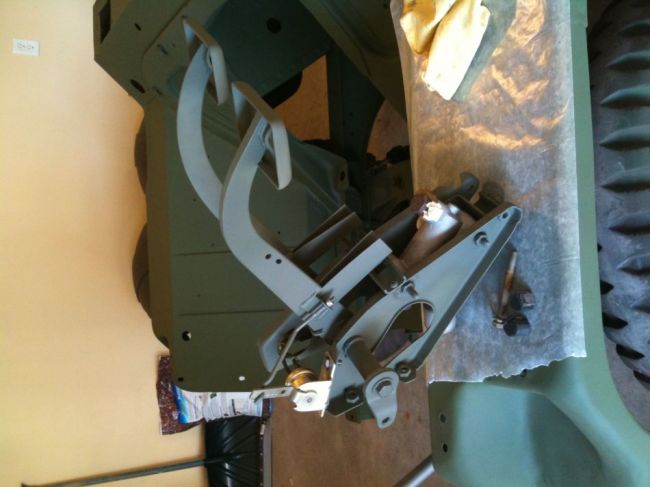 Fortunately, thats about the only "complex" item of equipment in the interior. The Heater will be next....
|
|
#10
19-07-10, 03:59
|
||||
|
||||
|
Well, finally wrapped up the weekend.
Lots of time spent sandblasting and painting small parts. I'm sure i'm not the first one who has thought of this, but for blasting my fasteners I used a scrap piece of Fence Board and drilled holes in it for the bolts to drop in to. It may seem strange to go to this effort to save bolts, but I always read about guys and "F" script bolts etc on their GPWs. The AM General built M151A2s all have "D" scripted bolts throughout, so I figured, why not clean them up and reuse them. Time consuming yes, but i'm sure its quicker than trying to inventory all of the correct bolts, grades etc, and then gather them all up at Fastenal, plus save a ton of money in the process. None of these will be exposed to the element without paint, so i'm not too worried:  Once I got all of my bolts done, I started installing items inside the dash. This is probably the hardest part of the assembly, and really, its still quite easy compared to a modern vehicle. I'm top coating most of the primed items with Krylon Camo spray bomb. It will all be painted again in 383 Green, but in case a spot gets missed, this will blend much better than Red Primer. The M Series wiring system is brilliant. I bought a NOS harness last year, so everything went together in a matter of minutes:    Unfortunately, I can't go any further in the Engine Compartment until I get some Semi-Gloss OD paint. My main effort is to get everything above the "Frame" reinstalled, then move on to the Suspensions, Brakes etc. When its all together, it will get the final coat of 383 Green. I'll start working on the Powerpack while the painted Jeep is curing.
|
|
#11
19-07-10, 04:41
|
|||
|
|||
|
really nice work!
|
|
#12
22-07-10, 21:20
|
|||
|
|||
|
Hi Scotty,
How much work do you have on the power pack? Total rebuild or just gaskets/seals? What about the suspension? I know that the bushings on the rear suspensionn is a weak area. Is your steering box good? Questions, questions, Darcy
|
|
#13
22-07-10, 22:11
|
||||
|
||||
|
Quote:
 In the mean time, if the weather is still cooperating when everything else is done, i'm going to use the Powerpack in the scrap Jeep. Yes it runs Transmission/T-Case is a different story. I currently have 4 trannies, and I don't think even one of them is very decent. That being said, I will most likely frankenstein one of them together to put behind the scrap Jeep Power Pack. As for the Suspension etc, i'm going to tackle that once the Frame Up portion is completely finished, including the final coat of paint. I'll bring it home and put it back up on jackstands and do one end at a time. I have a complete set of new Control Arm Hangers, Bushings, Shocks, Bearings & Seals, Brakes and Wheel Cylinders. This will be installed once i've sandblasted and repainted all of the Control Arms and lower components. My Rear Bushings actually didn't look too too bad, as well as the mounting holes in the hangers which tend to elongate. Steering Box.... Hmm, now that you mention it. It seems OK. It was fine last summer when I was driving it and it doesn't appear to be leaking. I'll probably just clean it up, change the oil and reinstall it. Through all of my researching and nosing around, I rarely see or hear any complaints about them. Brand new ones from TRW are available on Ebay for around $100 USD, so its another option if it went belly up.
|
|
#14
22-07-10, 22:48
|
||||
|
||||
|
Update:
Well, after alot of humming and hawing, I chose to rehash the Heater Kit rather than just buying a new kit. I did buy a new Heater Motor for the huge sum of $10, but just sandblasted and repainted all of the other kit parts. All in all they turned out nice:   I am going to cheat a little bit when I re-install it. I always hated those fabric duct hoses that are part of the kit. They are a bitch to install and attract dust. I'm going to just buy some plastic duct/hose from Home Depot. You would have to bend yourself into a human pretzel in order to even see that i've changed them anyway as they are completely buried behind the dash panel.
|
 |
|
|


 Hybrid Mode
