|
#11
 20-01-10, 03:15
|
||||
|
||||
|
Been awhile since I've been able to tinker with the T-16 due to other projects. Over the summer I'd had some issues with the engine seeming to flood while under a load. It would start, idle and rev fine but driving up hill in 95-105 degree heat once warmed up caused problems. The engine would choke down and applying more throttle in an attempt to increase power would have the opposite effect. Did some research and found things related to my issue on some of the rat-rod sites. Long story short it would appear my fuel pump was providing too much pressure for the carburetor and flooding it while running. Reasons could have included the length of the lift rod that operates the fuel pump, the lobes raising the lift rod, the thickness of the gaskets under the fuel pump and manifold, and the length/tension of the spring in the fuel pump. To compensate for too much pressure, you have to get into the carburetor which still wouldnt be a guarantee of anything.
And for whatever reason, the factory WWII fuel pump delivers 4psi and the carburetor is designed for 3.5psi. Maybe not an issue with everything spot on but just one more concern when things arent working as planned. After a lot of experimenting and testing different configurations, I decided to try some modern accessories. Figure I could always take them off. Plus I was looking for a solution to the heat saturation that can affect the fuel pump on Fords where it is mounted high in a closed environment as on the T-16. So in an effort to keep things visually correct, I put all of the goodies inside the locker above one of the fuel tanks. Essentially ran rubber lines into the locker and up to an electric fuel pump. Added an in-line fuel filter which then leads to a Holley fuel pressure regulator set to 3.5psi. Then back out of the locker and connects back to my metal lines between the locker and fuel tank. From there it goes through the rest of the system as normal. I removed the lift rod from under the original fuel pump and the fuel simply is pushed up the lines and through it when everything is running. The little black box contains a fusible link and an idiot light along with a manual override switch. This way if the light is on, I know the fuse is good and power is on at the instrument panel. Flipping the switch will disable the electric fuel pump in the event that I need to crank the engine to clear it out and dont want fuel. So far everything works great. Ran the carrier up and down the street yesterday. Started off in 2nd and needed to shift to 3rd while accelerating uphill within a few feet. It now has the performance of a regular vehicle as it should. As it now stands, I may just leave it this way. 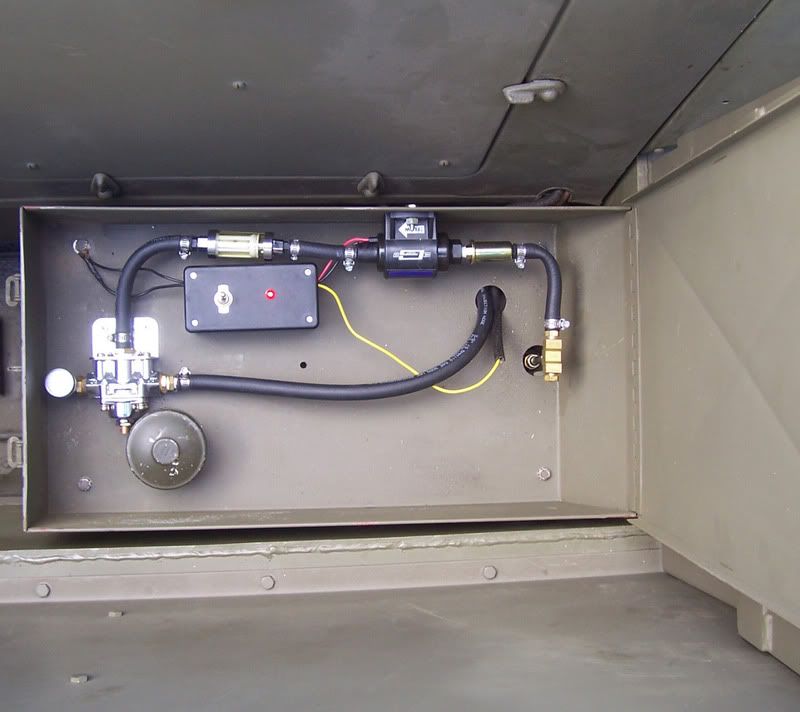
__________________
David Gordon - MVPA # 15292 '41 Willys MB British Airborne Jeep '42 Excelsior Welbike Mark I '43 BSA Folding Military Bicycle '44 Orme-Evans Airborne Trailer No. 1 Mk. II '44 Airborne 100-Gallon Water Bowser Trailer '44 Jowett Cars 4.2-Inch Towed Mortar '44 Daimler Scout Car Mark II '45 Studebaker M29C Weasel |
| Thread Tools | |
| Display Modes | |
|
|
 Similar Threads
|
||||
| Thread | Thread Starter | Forum | Replies | Last Post |
| my C15 restoration | rampant rivet | The Restoration Forum | 111 | 26-12-19 14:46 |
| M38 CDN Restoration | donjunior | Post-war Military Vehicles | 1 | 08-07-13 03:25 |
| 4.5 Restoration | James Shopland | The Gun Park | 7 | 18-03-13 17:38 |
| F8 for restoration | david moore | The Softskin Forum | 32 | 21-06-05 15:47 |
| Restoration tip........ | Bob Carriere | The Restoration Forum | 3 | 09-08-03 17:50 |


 Threaded Mode