|
#1
 03-01-10, 23:14
|
||||
|
||||
|
2009 was a great year (particularly for those with a HUP fetish...), and now we get to celebrate 2010 in fine style - a new Hammond Barn Thread! Today, Bob, Grant, Guy and I met at the barn for some much needed holiday maintenance. While Bob attended to the snow-blowing, Grant and I took care of the shelters, shovelling and removing the icy overhangs from the barn roof. We did not spark up Lucifer as we had only planned a short day at the barn.
Bob getting into his work:  Joyce got Bob some jewellery: [  We spent some time catching up on events that happened over the holidays. Grant dropped off some of the manuals that he and I bought from Peter S (thanks Peter, keep 'em coming). After some more chit-chat we made our way to Mike's Place in Hammond for lunch. After lunch, we played a game of "where the hell is the (insert tool name here)", and did a little maintenance on my car (she's turned into a tempermental lil gal...). Our first real session at the barn did not accomplish a hell of a lot, but as always, it was fun getting together with the boys. I am sure 2010 will be a banner year. 
__________________
RHC Why is it that when you have the $$, you don't have the time, and when you have the time you don't have the $$? Last edited by RHClarke; 11-01-10 at 02:13. 
|
|
#2
04-01-10, 19:44
|
|||
|
|||
|
Hi Bob, Rob and the rest of the Crew
Just had to claim the privilege of the first response. Phil
__________________
Phil Waterman `41 C60L Pattern 12 `42 C60S Radio Pattern 13 `45 HUP http://canadianmilitarypattern.com/ New e-mail Philip@canadianmilitarypattern.com Last edited by Phil Waterman; 04-01-10 at 19:46. Reason: correction
|
|
#3
04-01-10, 19:47
|
||||
|
||||
|
any barn related new years resolutions?
|
|
#4
04-01-10, 20:43
|
|||
|
|||
|
Quote:
Come to Gracies tonight at 5 and find out.. Alex
__________________
Alex Blair :remember :support :drunk:
|
|
#5
04-01-10, 21:02
|
||||
|
||||
|
ahh it will have to be next time.. tonight i have already committed to working for my in-laws redoing a bathroom
....next time
|
|
#6
11-01-10, 02:32
|
||||
|
||||
|
I arrived just after lunch to a deserted barn. Lucifer was roaring full blast, but no one was around. So, I headed out to the Prototype shelter to work on the removal of the window frames. After a few minuites, Bob arrived after fueling up his truck. Grant and Guy were busy, so it was just Bob and me at the barn today.
Maintenance was the order of the day. The first task was to manage the garbage, which I took care of. Next was to change the oil on Bob's diesel. That took about 20 minutes in -13oC weather (wind chill was about -25oC). The next task was to clean out the sandblasting cabinet. This involved removing and cleaning the vacuum system and removing and filtering the blasting grit. The vacuum was blasted clean by high pressure air hose and it needed a good cleaning out. Bob reloaded the grit, set up the vacuum and I gave the system a workout cleaning my Prototype HUP's front window frames. Bob then got on to twisting, bending and heating his nuts. Such agony! Bob was testing out his latest acquistion - a tap to clean the threads of his wheel nuts. Bob doing the twist:  The tap was secured in the vice and Bob threaded one after one wheelnut onto it. The sound a nut makes when it is getting cleaned out was eerie...anyone standing outside of the barn would have thought some depraved lunatic was torturing an animal inside the barn. Nuts so clean... 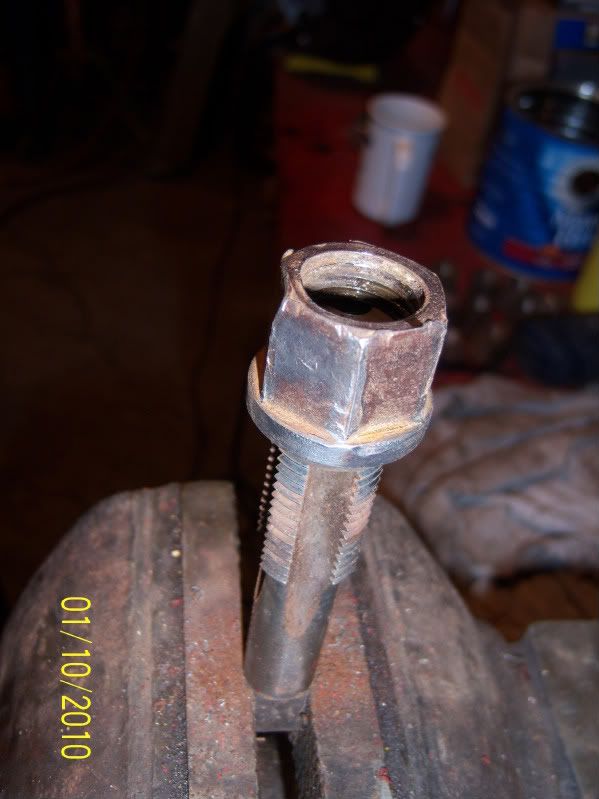 After a spot of cocoa and tea (thanks, Joyce!) Bob finished up the nut cleaning. Lucifer was then starved of fuel, and we closed up shop. The fun never ends at the Hammond Barn!
__________________
RHC Why is it that when you have the $$, you don't have the time, and when you have the time you don't have the $$?
|
|
#7
25-01-10, 18:33
|
|||
|
|||
|
Bonjour Mike
I am just about ready to mount the new 10:50 tires on clean rims.... sandblasted and painted in POR..... rim nuts are being cleaned up..... We did a very preliminary trial fit then gave up..... The new tires are very tight..... how tight....well that's why I am asking you guys. I have the option of going tothe tire shop....pay the fiddler and bring them back home all done...... but being sadistic we would like to do it ourselves. Now our first try we did not use any water.soap lubricant..... tire bead stuck very early to the rim..... Do you have any wisdom to share on how to fore them on far enough to get the long rim bolts to thread....... did you press the tires on the rim ? I have been thinking of designing and building a 20 ton jack powered device to push the tires in place....... not very keen on using only air pressure when we have only two bolts in place..... We have even considered having a glass of red wine available for inspiration... Awaiting your advice...... Boob
__________________
Bob Carriere....B.T.B C15a Cab 11 Hammond, Ontario Canada Last edited by Bob Carriere; 26-01-10 at 04:19.
|
|
#8
28-01-10, 03:02
|
|||
|
|||
|
Hi Bob,
No boob don't you remember that they don't / won't fit on those rims..  ok enough joking....I see you POR'd the rims...I did not POR the inside where the rubber meets the steel...I spray painted with glossy tremclad. As you know POR can be quite thick and textured. The glossy assisted with the sliding of the rubber against the steel. I used dish soap for lube...no KY available in sufficient quantity. Naval "arselene" was out of the question. I was able to snug up 2 nuts on the two longest studs as each rim had. Once a couple of threads were on the nuts I started with an impact wrench on each alternately and brought the rim together a bit. Stop here and have a glass of wine. Then I started other nuts and added air to expand the tire...be careful not to pinch the flap. If when you lay the first rim and the floor and place the tire on it and you cannot get the second half of the rim to "reach" the studs of the bottom rim try pounding on the bead to slide it down the rim...stop and have a glass of wine and then add the flap and top rim. If it still does not quite reach have Rob or Grant to add their weight to the rim and start the threads....once the air is added and the loud "POP" happens have another glass of wine and call it a job well done. IF this does not make sense I will call you ...cheers Myke aka frack
|
|
#9
28-01-10, 05:07
|
|||
|
|||
|
.....not sure if we have enough wine.
What you described is what we did on old Michelin casings that we installed on what we call YARD tires..... not fit for the road. We even forced the Michelin bead to start using a 2x4 and worked only on the bottom longer half....once the bolts were within reach the rest was easy. The new tires did not seem to want to fit or stretch to fit...... maybe the casings were too cold....... Like Gord Yeo told me you need to shove a thin piece of wood in between the both halves before doing the full tightening sequence to insure the flap and tubes are not pinched. Will renew our efforts but this time will get a suitable supply of proper tire lube and wine......... Will keep you posted. Boob
__________________
Bob Carriere....B.T.B C15a Cab 11 Hammond, Ontario Canada
|
|
#10
28-01-10, 05:13
|
|||
|
|||
|
When i accumulated all my spares a few years back i had about 16 different 9x16 tires of all different makes and styles. military and civvy. i never saw any sign of machining on any of the rims.
I've mounted a full set of 9x16 Denmans myself and had a shop labor over the 10.50x16 Chevron's but in both cases it was by hand. We just stuffed the tube and liners inside with baby powder spread liberally and the used some rubber lube assembly grease on the edges of the tires. (it was the lube used when assembling the brake cylinders) We pulled the rims together a bit with the long studs(2) and put some pressure in to settle the tube and liner in place. Let the air out and used a smooth ended stick to make sure the tube and liner was back in the tire by poking inwards from the center of the wheel. Pulled the rims together with the nuts on the studs a little at a time checking regularly with the stick from time to time that the tubes are still in place. when it seemed as close as it could get without actually pinching the tire I hooked on the air pressure (remove the valve) and at between 60 and 90 PSI we had lift off when the tires blew out to the edge of the rim and were seated. Some took a lot less pressure and a beating with a big rubber mallet helped but have a clear work area. let the air out now that the tires are seated. undo all the nuts and pull the rim apart sticking progressively bigger blocks in to hold them apart. (this is how to change a tube if you have a hole in your tube later) Make sure that the liner and tube are free and clear, put the halves back together and cross torque the nuts, fill with air and away you go. if you have the Chevrons be aware of the direction of rotation and don't worry about the spare as no matter which direction you put it on the flat will be the other way! 
|
|
#11
28-01-10, 05:53
|
|||
|
|||
|
damn, just the thought of cold casings gives me the chills...
good point about the cold rubber...ahem... myke
|
|
#12
29-01-10, 01:03
|
|||
|
|||
|
Quote:

|
|
#13
03-02-10, 06:27
|
||||
|
||||
|
Speaking for myself only, there has not been too much going on at the Barn HUP-wise. The frau kept me on a short leash to prepare our townhome for sale and to shop for new digs. Her efforts paid off as we now have a new home (one block over) and we have a conditional sale on our house. Now the legal folk are lining up the ducks and with any luck, we will be moving in March - just before "mud season".
My one trip to the barn in the past month was last weekend. Bob and Grant were torturing metal trying to replicate the bottoms of Cab 11 doors. I got some photos on my Blackberry, but they did not turn out too well. Grant had his camera, and perhaps later we will see some photos of the event. I took some time off tonight to put together a slide show on the HUP chain locker - or as Bob puts it, the wine and cheeze storage locker for the ossifer's staff car...it never ends. I forgot to get a few measurements, but will amend the slides when I get the proper details. Click on one of the images (which for some reason are out of sequence) and then use the navigation bar to the upper left to advance the slides. Enjoy! clicky: http://s143.photobucket.com/albums/r...HAIN%20LOCKER/
__________________
RHC Why is it that when you have the $$, you don't have the time, and when you have the time you don't have the $$?
|
|
#14
03-02-10, 18:32
|
|||
|
|||
|
Trying to mount or dismount tires like these military tires, the temperature of the tires is a very good point. I tried to mount some used 9:00x16 on the original rims from my C60L as work tires while I was restoring it. It was in the winter and the tires had been sitting in the shop which when I'm not working in it is 35-40 F just enough heat to keep the plumbing from freezing. Tires didn't want to seat at all, finally put one up on the platform lift in front of the outlet from the propane furnace. Let it get nice and warm, warm to the touch not hot. Then tried mounting it and though still took force it did seat without to much difficulty.
Did the same thing when I mounted new 11:00x20 the rims Bob brought down to me a couple of years ago and on the the rims for my C60S. I did have an advantage with the 8 11:00x20 tires though they were all brand new freshly made tires. Cheers Phil
__________________
Phil Waterman `41 C60L Pattern 12 `42 C60S Radio Pattern 13 `45 HUP http://canadianmilitarypattern.com/ New e-mail Philip@canadianmilitarypattern.com
|
|
#15
03-02-10, 18:49
|
|||
|
|||
|
I had a chance to chat with the rural tire shop near Hammond.....
....he tells me the Winter cold rubber will slide easier than a Summer hot tire when the beads are soft and sticky..... bead may be harder to fit properly especially with the big tubeless tires...... they use gasoline to soften the rubber bead...... he should know he makes a living changing large tractor tires on location in the field...Summer or Winter.... alone!!! Mind you he has the back and arms to prove it...... I did manage to get a 1/3 5 gal. bucket of the paste lubricant they use on larger tires...... he did not recommend the more liquid stuff usually intended for tubeless tires as it runs offs and is really intended to seal beads on tubeless tires. The "stuff" I got is like a light colored grease that can be washed away with soappy water....... and contains some anti corrosive chemicals to protect rims.....very useful when doing farm tires filled with calcium chloride for weight..... and apparently very messy to use but works well..... I suspect as soon as I get both hands fully greasy my nose will hitch and willneed to pee!!!! He also told me how to build a simple device to get the bead started.... which I will be building this weekend...... drawings, photos and measurements to follow as well as a report on our (anticipated) success..... no big muscle required...... why did we not think of that....!! Grant/Rob..... first thing Saturday I am going to the metal shop to get material....... Hang in there. Boobee
__________________
Bob Carriere....B.T.B C15a Cab 11 Hammond, Ontario Canada
|
|
#16
03-02-10, 20:42
|
|||
|
|||
|
Hi Bob
It is amazing what you will find talking to some of these guys with more years of experience. But one of the big problems I've always had with really cold tires is even getting them to open up enough to get the inner tube and flap in to lay smooth. The guys with the tools of course have nice handy tools for spreading the beads apart. I guess the only way to find out if cold or hot is the best way is for you to do one when it is well below Zero F and then one when it is a warm 95 F in the shade and see which is quicker. I've heard this gas trick before but I'm afraid of what the modern gas does to rubber. Wonder if they are actually using something like Colman Fuel or white gas? Cheers Phil
__________________
Phil Waterman `41 C60L Pattern 12 `42 C60S Radio Pattern 13 `45 HUP http://canadianmilitarypattern.com/ New e-mail Philip@canadianmilitarypattern.com
|
|
#17
03-02-10, 20:53
|
|||
|
|||
|
From what I have seen while in the shop...... a coffee can of gas that was probably used to wash parts with....... I am particularly concerned with gas poured on the tire floor when Lucifer is hummming 15 feet away..... or one of us grinding away at the work bench.
I have been inside a single car garage that flashed and buckled the large garage doors.......lasted 2 seconds ...just a woosh of pale blue flame across thefloor ....... and had us running out the side door..... never again!!! If we get the rig built this weekend will try it out cold or warm..... will probably leave the tire in the top of the barn stairs where all the heat rises... Bob C.
__________________
Bob Carriere....B.T.B C15a Cab 11 Hammond, Ontario Canada
|
|
#18
06-02-10, 15:39
|
|||
|
|||
|
The rebuild on the door frames started last year as an experiment to see if Bob and assistants could repair/rebuild the rusted bottoms of 11 cab door frames since it's tough to find NOS ones without making a road trip to the Netherlands. The first one worked out quite well using sheet metal bent into a shallow channel form. The original channel had an extra fold on one face that is intended to fold the outer door skin around. Bob is planning to make the skin anchor part as a separate piece and weld it onto the channel as we weren't sure we'd be able to bend the combined section as easily as the simple channel. In hindsight, it might well have been made to work as a single piece given the ease of bending the simple channel (once the flanges were heated). Bob was content with the result of last year's frame (shown hanging on the chair) so we went to work on the matching frame for the second door. Bending the curve was easy, so was notching and bending the corners. Then we noticed that the shop had only bent one channel to the size Bob had asked for and that that channel had been used last year. Bob was depressed thinking that he'd have to wait another week while he got a new one bent up. I was more optimistic and started pounding on the channel to reduce the oversize. A bit later, after hammering, squeezing in the vice and torquing with an adjustable wrench the new part seemed to be either bent or straight where appropriate and match the profile of the original frame so Bob zapped it in place and I ground down the welds. The final photo shows Bob admiring the frame. We still need to add the reinforcement plate at the bottom of the second door, add the reinforcing channel to box the frame at the point the restraining strap had distorted the frame and add the skin securing flanges. The bottom of the second frame looks distorted in the photo but didn't seem to be bent when working on it. This will be checked and if needed fixed. If a small hammer applied gently won't fix it, a larger hammer will be tried, if that fails, heat it and beat it.
|
|
#19
06-02-10, 21:16
|
|||
|
|||
|
Looks like good detailed work. Are you going to glue or spot weld the skins on? Remember if you are going to spot weld don't paint steel until after you have bent the skin on an welded it, do degrease all the steel first. I then poured paint into the door thinned down so it would run into the seam and kept rotating the door unit the paint was well worked into the seam. (tape up any holes). When re-skinning or stopping the rust Pat 13 doors I remove the latch assemble tape up the holes and pour in a quart of POR-15, tape the last hole and just keep rotating door in all directions until I'm pretty sure to have actually covered all the interior. Then drain and strain the excess paint, and do the next door.
Cheers Phil
__________________
Phil Waterman `41 C60L Pattern 12 `42 C60S Radio Pattern 13 `45 HUP http://canadianmilitarypattern.com/ New e-mail Philip@canadianmilitarypattern.com
|
|
#20
06-02-10, 21:23
|
|||
|
|||
|
The Hammond Tin Bashers.
Guys! Want too knock off two frames for my #12 Cab while your in the mood? Gord
|
|
#21
07-02-10, 05:59
|
|||
|
|||
|
Hi Gord
Bring your doors to Acton...... let me have a look..... it's a little intimidating to do your doors when I have seen some of the tin bashing you have done.... .....almost like Michael Angelo ordering a paint by number kit.... I will repair the frame and you can install a perfectly straight skin..... ....but I am willing to give it a try. Bob
__________________
Bob Carriere....B.T.B C15a Cab 11 Hammond, Ontario Canada
|
|
#22
07-02-10, 06:18
|
|||
|
|||
|
Hi Phil
The doors I am working on are actually my practice doors..... they come from the cab 12 that I refer to as "Ted's truck"..... my cab 11 doors are not as bad but will need redoing also. Turns out my first pair of doors will probably look very good..... it just takes time. I also have a very miticulous and patient assistant in Grant.... he will not let me get away with short cuts. I have the spot welder and now know how to use it.... I also have the special sheet metal glue/epoxy and the required gun...... and I am wavering. WE have done so well so far with traditional heat, weld, grind, etc. I am now unsure what process I will use for the skin. Being practice doors..... I may go ahead with the glue process..... may have to check ambient room temperature requirement or delay until Spring. I may try the spot welder for the cab 11 original doors ... who knows.... Presently the doors have been heavily sandblasted and threated with Phosporic acid.... nice gray blush. My ppans are along your line of thinking...glue or spot weld I will sloosh POR 15 on the inside of the doors and have it flow into every crack possible...... spray with a binder coat then OD. I have the advantage on the cab 11/12 door of having a removable inner skin so I can literally waterproof the doors while the lock is still out..... I just recently found a stash of flat head...pan head..slot type screws for the skin of the door...... I welcome any comments...suggestions on the finish process...glue or spot weld. I had a discussion with a bodyman a while back..... he tells me that the glue joint is so resistant that when they patch up panels that are supposed to crush to absorb impact that they are instrcuted to use no more than a half inch overlap or the panels that are suppposed to deform in an accident will deform and crush properly. He also mentioned that set time is flexible based on ambient temp. and setting can be speeded up in body shop by using heat lamps. It would certainly make sense for reskinning the back of the cab where I have to remove the stiffenning ribs and re-install on the new skin..... gluing would not risk warping the new skin....... Ever wonder why we are spending $$ and time fixing a truck door that survived, on its own, nearly 70 years even though it was designed to last just a few years..... and survived even though the design was far from perfect and really had a lot of flaws that encouraged trapping moisture.... Once finished our trucks should last at least 120 years..... and that is just half life. Boob
__________________
Bob Carriere....B.T.B C15a Cab 11 Hammond, Ontario Canada
|
|
#23
07-02-10, 13:58
|
|||
|
|||
|
Quote:
To keep your skin from warping when welding,clamp it to the frame and spot weld it ,in a fashion ,like torquing head bolts..once it it tacks straight on the frame skip weld (Short runs..3/8"-1/2") using the same location varying technique , leaving time for the metal to cool.... Don't over weld your skin to the frame..enough to keep it there and from rattling..and don't worry about the "Crush"absorbing safety factor..you won't need it if you hit anything head on..The steering column will make you forget all about the fancy welding on the door skin..   
__________________
Alex Blair :remember :support :drunk:
|
|
#24
07-02-10, 15:14
|
|||
|
|||
|
Bob
I was sure you would say I don't need any help with door frames and too bugger off. We'll have too have a chat again this year at Acton. I used the bonding adhesive on the car fenders and floor pans and was quite pleased with the results. It takes time and quite a few clamps to prepare and fit things to be bonded, thats about it for the down side. Bonding eliminates the heat distortion and metal clean up from a mig, I don't have the luxury of a spot welder. The bonding adhesive is easy to apply and work with and is not as toxic as POR in a closed work area ( no disrespect intended to POR , I've used it too). It also leaves a seal between the two layers of steel that is water proof. That is a huge bonus as that is usually where rust starts out off. The adhesive is expensive, but I found it easier and quicker to work with than welding, with a better finished product.
|
|
#25
07-02-10, 17:42
|
||||
|
||||
|
Alex, if you hit a modern vehicle with a CMP, it's the one that would be doing the crush absorbing anyway.
__________________
1940 Cab 11 C8 Wireless with 1A2 box & 11 set 1940 Cab 11 C8 cab and chassis 1940 Cab 11 C15 with 2A1 & Motley mount & Lewis gun 1940 Cab 11 F15A w/ Chev rear ends 1941 Cab 12 F15A 1942-44 Cab 13 F15A x 5 1942 cab 13 F15A with 2B1 box 1943 cab 13 F15A with 2H1 box 1943 Cab 13 C8A HUP 1944 Cab 13 C15A with 2C1 box 1943 Cletrac M2 High Speed Tractor MkII Bren gun carrier chassis x 2
|
|
#26
08-02-10, 04:32
|
|||
|
|||
|
Gord
You ninnie....... I am just surprised that you would ask me...after I have seen what you are capable of doing...... I will gladly do what I can to help you out. Bring your doors down to Acton and remove the inner skin first so we can see the guts of things.... Hang in there. Boob
__________________
Bob Carriere....B.T.B C15a Cab 11 Hammond, Ontario Canada
|
|
#27
08-02-10, 05:15
|
|||
|
|||
|
Well after listening to all the good advice...... and the nay sayer who said the 10:50 Chevron tires would not fit a CMP rim.....and not knowing any better.... we did it.....
Pictures will follow from Grant and Rob. The tire shop guys said to me the last time I was over begging for tire lube.... "Why don't you guys use threaded rods to get the rim together if you can't reach the two long studs......? That set my mind to thinking how to build a device that would not damage the painted rims.... and safe and easy to use... Well I built two steel tubing crosses.... drilled for the drum bolt pattern... got 36 inches of 3/4 threaded rod and nuts......cut the rods in 4 pieces a bit of welding and whalla!!! The pictures will show you what I mean. The device is intended to install the tire bead on the lower and longer half of the rim. The messy tire lub they sold me worked like K-Y jelly on a new bride..... smissshh !!! One cross fits the under side of the lower half of the rim....tire is expended and held open with square pieces of two x four lumber....... remember I am only instaling the tire bead on the lower half of the rim.... Phil.. tire was cold... the lube was like crystalized snoot.... the upper cross is 18 inches across and spans the tire bead... we added cut off pieces of 1x2 steel left over from the ends of the crosses to push the bead down enough so we coiuld remove the inner cross...... so when you screw the 4 large bolts the bead is forced evenly over the edge of the lubed rim with hardly any hesitation. Once the tire bead is properly installed on the lower half.... we removed the rig and inserted the tube and flap..... partly inflated the tube... enough to position the tube BUT not enough to bulge the flap between the rim. We did use a flat stick to make sure everything was in the right place. The top half of the rim was then applied....even forgot to lube the top half... by now the two longer rim studs reched and allowed to install the nuts.... the rest is nuts on..... tighten evenly..... inflate deflate.. reinflate. At 30 psi the tire was fully seated and not even a "pop" was heard....just slipped in place like nothing. Now we have 3 more to do for mine..... plus dozen more to come. It sure beat the hell out of trimming beads, hammering the bead on the rim, cursing...... Now if the casing had been softer with mild weather it would have been even easier. Every garage should have one....cost about $20 of steel and $20 for rod and nuts...... getting tire done at the tire shop.... $20 + pick up and delivery time..... the experience of doing it yourself...safely and without breaking into a sweat....priceless. Having Grant and Rob to help is a luxury!!! Boob
__________________
Bob Carriere....B.T.B C15a Cab 11 Hammond, Ontario Canada
|
|
#28
08-02-10, 14:51
|
||||
|
||||
|
Wave a red flag. Say it can't be done. Then watch Bob. Our fearless leader put together a very practical tire/rim mounting rig. He has already explained how he put it together. Here are some shots showing the construction phase.
Grant has some more shots of the process and the finished product. Bob gives me way too much credit on this project - all I did was watch, take photos and ask the dumb questions while working on my 45 HUP.
__________________
RHC Why is it that when you have the $$, you don't have the time, and when you have the time you don't have the $$? Last edited by RHClarke; 08-02-10 at 14:59.
|
|
#29
08-02-10, 14:58
|
||||
|
||||
|
This little device probably could have been made up, painted and mounted by an expert in 20 minutes. It took me a bit longer (OK, all morning). Any ideas of what it is? A free beer at BBB4 is the prize - Bob and Grant you can't play.
__________________
RHC Why is it that when you have the $$, you don't have the time, and when you have the time you don't have the $$?
|
|
#30
08-02-10, 15:28
|
|||
|
|||
|
Before the shots of the tire rig - one of the inside of Lucifer, the other of the thermometer showing the result...
|
 |
| Thread Tools | |
| Display Modes | |
|
|
 Similar Threads
|
||||
| Thread | Thread Starter | Forum | Replies | Last Post |
| 2016 at the Hammond Barn | RHClarke | The Restoration Forum | 83 | 08-01-17 19:22 |
| 2014 at the Hammond Barn | RHClarke | The Restoration Forum | 63 | 01-01-15 22:50 |
| 2013 at the Hammond Barn | RHClarke | The Restoration Forum | 85 | 06-01-14 00:29 |
| 2011 at the Hammond Barn | RHClarke | The Restoration Forum | 328 | 01-01-12 22:09 |
| Hammond Barn Visit | Wpns 421 | The Softskin Forum | 1 | 15-12-09 04:17 |


 Linear Mode

