|
#1
 07-01-10, 02:27
|
||||
|
||||
|
Hey Fellas,
Taking Clives hint, i'm going to start a new thread dealing with the restoration of my Canadian M151A2. I started this project by purchasing 2 x M151A2 donors. One came from Mike McKinley which originated with 422 Tactical Helicopter Squadron and retired with 403 Helo Operational Training Squadron in CFB Gagetown.  The other came from a farmer in Red Deer Alberta which spent its career with 1 Service Battalion as C/S 9A.  I ended up using a bit of both in order to build a good runner with restoration potential. The 1 Svc Bn Jeep had a very decent (but sadly demilled) body, but the powerpack and most everything else mechanical had been butchered. Mikes 422 THS Jeep was a tad on the rusty side, but had proven provenance, an excellent original unmolested low mileage powerpack (26k miles), and lots of usable mechanicals. So I went ahead and "temporarily" put it together in order to get the ownership sorted out and some Licence Plates. I enjoyed driving it for a summer racking up nearly 800 miles of local driving to learn the quirks and assess the condition of the components.  Scott Bentley
__________________
Gone but never forgotten: Sgt Shane Stachnik, Killed in Action on 3 Sept 2006, Panjwaii Afghanistan Last edited by Scott Bentley; 19-03-12 at 03:03. 
|
|
#2
10-01-10, 17:55
|
||||
|
||||
|
So, after a week or two of poking around i've finally put this thing an a position to go to work on it. Remarkably, it only really took 2 days at a very relaxed pace to get it from "streetable" into the position you see here. Nice thing is I can move it around and flip it over fairly easily solo.
    The pics don't really do any justice. I'm still shocked at the lack of rust on this nearly 40 year old Jeep. Aside from a 6" x 2" area in the hat channel under the drivers side floor, there is no appreciable rust on this little fella. The Ziebart obviously did a great job protecting it. Everything you see is very light surface rust. Sadly the bulk of my work is focused on fixing the back corners where some bozo used the lifting rings to recover it (with impunity) and bent the corners out, and a split in rear corner seam from what looks like some damage from jack knifing a trailer. The rest is really cosmetic, like straightening the lip along the lower edge of the body and cleaning up where the "Re-mil" repair took place. Now comes the problem. At this point in my career, postings seem to be measured more in months rather than years. Talking with another friend in exactly the same boat, its scary trying to undertake a detailed project knowing that DND is not going to move your hulk of a Jeep and its 50 boxes of components. I think at last look in the Treasury Board Guidelines on move expenses, "hobby" materials are limited to 500lbs. As it was, I had to U-Hual this thing down in complete form and beg the Movers to to take my M416 Trailer as it technically was over the limits for size. So, don't mistake me as whining that my job is getting in the way of my hobby, but more of a case of having to balance time and economics. I've some other threads on restorations, and noticed that it wasn't uncommon for people to take in excess of 5 years to restore a "relatively simple" MB/GPW with a Repop Tub to boot. That being said, I would imagine if I was retired, i'd be looking at this in a different light. So, back on topic. I've tried nearly every paint removal technique known to man. Heat gun is nice, but very very time consuming. I've chose to use it in areas where i'd imagine I may find markings. I also gave chemical paint stripper a go, and although it is a bit quicker, the fumes are not kosher while doing it in an attached garage. This really only leaves me with power sanding/brushing or sandblasting. Having really had a hard look at the underside of this thing. Wire wheeling the bottom of this is going to take a heck of a long time, with some areas not even accessable, and create a hell of alot of lead dust in my pristine garage. After batting this around for nearly a year now, I think i'm going to have no choice but to send this out for sand blasting and primer. From re-reading advice and looking at other resto's, seems the best thing to do would be to do as many of the body repairs as I can now, then send it out for blasting an epoxy primer with the hopes that some new trouble spots don't pop up. Anyone want to take stab at what the sand blasting and priming costs would be for this before I pick up the phone and a box of kleenex? Scotty
|
|
#3
11-01-10, 06:11
|
|||
|
|||
|
the guy i use charges around 375.00 for the blast and primer.it does a good job.he is mobile also but i think you are a just a little to far from arnprior.lol.regards jim.
__________________
,3-m38,1-m38a1,1-,2-mb,2-cj2a.mbt,m100.
|
|
#4
13-01-10, 01:42
|
||||
|
||||
|
not sure if there is anyone up your way who does this, but there is macdonald applicators and jamac in saint john.btw...welcome to new brunswick, where our claim to fame is that you can walk to the top of a mountain, and still find a mosquito infested swamp!!! mike
|
|
#5
13-01-10, 02:05
|
||||
|
||||
|
Well, turns out I have a few options...
I may actually be able to do the blasting myself in a booth at work that they use for stripping and painting heavy equipment parts. But, there is also a shop that will do chemical/acid dipping for a really good price as well. Been doing a lot of reading though on the dip, sounds like it may be a bad idea with all the overlapping sheet metal on this thing. I'm going to see how this pans out. If your ever up this way Mike, shoot me a PM and drop by. Scotty
|
|
#6
29-06-10, 20:41
|
||||
|
||||
|
Well, lots has happened since I started this thread.
So fast forward a few months. After I stripped the Tub, I rolled it forward and went to work on the underside. The metal underneath was pretty good and still had the healthy remains of alot of Ziebart. I cleaned it all up with a wire wheel and hit it with flexible non-ashphalt undercoating:  I didn't exactly kill myself trying to hide the cut. It is what it is.... remilitarized. My concern here was getting the integrity of the Body back.  
|
|
#7
29-06-10, 20:52
|
||||
|
||||
|
So, after going to all that work on the underside, an opportunity came up for some low budget Sand Blasting and Priming.
After giving it some long thoughts, I figured that rather than attacking the underside again, i'd just have outer Body and Interior/Floors etc Sand Blasted. Besides, this allowed me to leave the suspension installed which made it rolling on and off of trailers much easier. Luckily, there were no huge surprises as far as holes appearing.   Back home again, and collecting the remaining sand in it for my portable blaster. 
|
|
#8
29-06-10, 21:08
|
||||
|
||||
|
So, after getting it home from Sand Blasting, I went to work tidying up the body, fixing some dents etc. I have come to the conclusion that no matter what I do, this Jeep is going to have some "character" left over. I tried to concentrate on the offensive larger repairs and left the odd ding and small dent that would have otherwise been covered over with body filler. My goal here was severely limit the use of any fills on the body and I ended up only having to smooth over where the "Cut" was. Aside from that, I used the Mig Welder and reversed a bunch of holes that were either left over from approved mods like Fender Mounted Mirrors (yuck) or other "Field Mods".
After this was all complete, I rolled it back in for another quick Sand Blast over the weld repair areas, and then it went in for Primer. Now its starting to look much better. All of this banging away feels like it is paying off:      Tomorrow the Base Coat of paint goes on......
|
|
#9
29-06-10, 21:21
|
||||
|
||||
|
Some other little developments along the way. A short while back, Mike McKinley was kind enough to inform me of a well worn but complete M151A2 that was going to be scrapped not far from him. We promptly went down and collected it.
The timing was quite impeccable really. As I was preparing to start re-assembling this resto, I was getting concerned about the whole "where does that part go again" phase of things. Although this new to me M151A2 is way beyond repair, it will be invaluable for use as a living guide as to what goes where and donate a few items as well.   As an interesting side note, this other M151A2 belonged to 2 RCHA Petawawa, and then W Battery, RCA, Gagetown. Having looked at all of the markings on it and all of the Radio Frequency/Call Sign info labelled on the dash, it appears to have been a FOO/FAC Vehicle.
|
|
#10
08-07-10, 18:44
|
||||
|
||||
|
I can finally see some light at the end of the tunnel...
I've got the MUTT body home today sporting a fresh paint job. So far it has been Sandblasted, welding repairs, lightly Sandblasted a second time, Red Oxide Primed, very miniscule of Body Filler applied, Red Oxide Primed again. It was then given two coats of the Base Coat Color. For the Base Coat I ended up going with 383 CARC Green from Tempo Paints. I want to commend Matt B for all of his work on sourcing the correct colors for the CF 3 Color Cam Pattern from the 70-80s. Having spent quite a while comparing paint chips and actual items painted in both colors, it was a real tough decision to make. When the 383 Green starts to oxidize in the sun, it begins to look a great deal like the Field/Pea Green in the old pattern. As I drove down the road between the CTC Schools here on Base Gagetown, I had a long stare at all the vehicles in the compounds. There are plenty in the old 3 Color Cam Pattern as well as in the current mono-tone 383 Green. The big thing I noticed is that there is NO consistency to any of the paint jobs, wether old or new pattern. I begin to wonder why the hell I was getting so frantic with my own paint. In my case it ended up being much more economically viable to go with the 383 CARC Green as a replacement for the Field Green as the Base Color for my M151A2. So here are the results:    This is a snap that has an item (ROPS ID Tag from the other 151) in the old Field Green laid on top of the 383 CARC Green. Keep in mind that the ID Tag was painted over 30 years ago and has been stored outside ever since, and the paint on my MUTT is two days old and has never seen sunshine other than 15 minutes today.  The remainder of the large items will be painted separately. Once everything is reassembled, it will go back for a 3rd coat of paint, to get all of the fasteners and small parts matching. Lastly, according to my painter, I should be able to put the other paint over the base coat after it has cured for a month. At that time I will paint the Engine Compartment and under the Hood in Semi Gloss OD, and apply the Black and OD portions of the Cam Pattern.
|
|
#11
13-07-10, 07:31
|
|||
|
|||
|
Congratulations on the great job you're doing. You are absolutely right in not beating yourself up over colour matching as the colour will start changing the minute it's exposed to the elements.
Keep up the great work and have fun!
__________________
.50 Cal Ammo Can
|
|
#12
14-07-10, 02:55
|
|||
|
|||
|
Hi Scotty,
I too have been following your restoration with great interest. I purchased 74-09397 about two years ago and have been collecting parts for a total restoration. I will be going through the same steps as you (hopefully this fall). After wrestling with paint colors, I have decided to go with the semi gloss od as it was first delivered. Looking forward to your continued posts - Darcy
|
|
#13
14-07-10, 04:47
|
||||
|
||||
|
Thanks for all of the kind words guys.
I'm getting lots of work done now that the revolving door of summer visitors is over. One of the toughest things about restoring this thing is the fact that nearly everything down to the last original nut, bolt and washer is available NOS. I guess this is thanks to the fact that the lions share of spares went surplus, and 99% of the vehicles were destroyed. The pain here is avoiding the urge to just replace anything that looks like it needs some work.   So, i've decided to just Sandblast all of the small parts in the Cabinet, and then rebuild them. If anything is BER, i'll replace it. Having this extra MUTT here is really worth its weight in gold now. Takes the fear out of pulling every little item completely apart. Its remarkable how many parts have no paint on the back sides, and i'll be sure to rectify this, even if its just a coat of primer. What do you guys do with your fasteners? Do you paint the heads prior to reassembly? I'm reusing nearly all of the original fasteners (except for suspension and steering) and I don't want to install them bare.
|
|
#14
14-07-10, 04:49
|
||||
|
||||
|
Quote:
|
|
#15
15-07-10, 09:47
|
|||
|
|||
|
Hi Scotty,
As per your request, here are a couple of photos of my next project:74-09397. The body was stripped by either chemical or sandblasting (I suspect the former) and is in very good condition - thankfully, most of the grunt work is already done. The underside appears rust free and would be perfect except for the weld -ugh! This is where I will probably spend a good chunk of my time as I am a sucker for punishment... Your question about fasteners is a good one, prime and paint only to have them get chewed up during installation or paint in place. I guess the ideal would be the way some WWII vehicles were done - paint all the parts, assemble them then give the entire vehicle an overall spray. I noticed most of the NOS hardware that I have been getting from various M151 suppliers happens to be the gold coated grade 8 or better stuff which survives nicely without paint although it may not go well on a camo jeep. Darcy
|
|
#16
16-07-10, 04:28
|
||||
|
||||
|
Quote:
Quote:
|
|
#17
16-07-10, 04:32
|
||||
|
||||
|
This portion of the resto is proving to be the time consuming part. I spent most of the morning reassembling the Master Cylinder and Pedal Assembly. I'm happy with how it turned out, and everything is cycling much smoother than before:
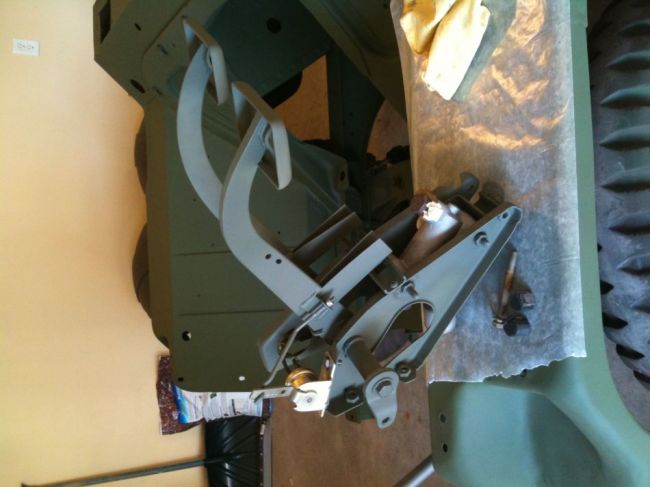 Fortunately, thats about the only "complex" item of equipment in the interior. The Heater will be next....
|
|
#18
19-07-10, 03:59
|
||||
|
||||
|
Well, finally wrapped up the weekend.
Lots of time spent sandblasting and painting small parts. I'm sure i'm not the first one who has thought of this, but for blasting my fasteners I used a scrap piece of Fence Board and drilled holes in it for the bolts to drop in to. It may seem strange to go to this effort to save bolts, but I always read about guys and "F" script bolts etc on their GPWs. The AM General built M151A2s all have "D" scripted bolts throughout, so I figured, why not clean them up and reuse them. Time consuming yes, but i'm sure its quicker than trying to inventory all of the correct bolts, grades etc, and then gather them all up at Fastenal, plus save a ton of money in the process. None of these will be exposed to the element without paint, so i'm not too worried:  Once I got all of my bolts done, I started installing items inside the dash. This is probably the hardest part of the assembly, and really, its still quite easy compared to a modern vehicle. I'm top coating most of the primed items with Krylon Camo spray bomb. It will all be painted again in 383 Green, but in case a spot gets missed, this will blend much better than Red Primer. The M Series wiring system is brilliant. I bought a NOS harness last year, so everything went together in a matter of minutes:    Unfortunately, I can't go any further in the Engine Compartment until I get some Semi-Gloss OD paint. My main effort is to get everything above the "Frame" reinstalled, then move on to the Suspensions, Brakes etc. When its all together, it will get the final coat of 383 Green. I'll start working on the Powerpack while the painted Jeep is curing.
|
|
#19
19-07-10, 04:41
|
|||
|
|||
|
really nice work!
|
|
#20
19-07-10, 10:54
|
||||
|
||||
|
Looking good, Scotty!
When reassembly time comes, consider hiring these guys - they will have it up and running for you in a matter of minutes  Hanno
__________________
Regards, Hanno --------------------------
|
|
#21
22-07-10, 21:20
|
|||
|
|||
|
Hi Scotty,
How much work do you have on the power pack? Total rebuild or just gaskets/seals? What about the suspension? I know that the bushings on the rear suspensionn is a weak area. Is your steering box good? Questions, questions, Darcy
|
|
#22
22-07-10, 22:11
|
||||
|
||||
|
Quote:
 In the mean time, if the weather is still cooperating when everything else is done, i'm going to use the Powerpack in the scrap Jeep. Yes it runs Transmission/T-Case is a different story. I currently have 4 trannies, and I don't think even one of them is very decent. That being said, I will most likely frankenstein one of them together to put behind the scrap Jeep Power Pack. As for the Suspension etc, i'm going to tackle that once the Frame Up portion is completely finished, including the final coat of paint. I'll bring it home and put it back up on jackstands and do one end at a time. I have a complete set of new Control Arm Hangers, Bushings, Shocks, Bearings & Seals, Brakes and Wheel Cylinders. This will be installed once i've sandblasted and repainted all of the Control Arms and lower components. My Rear Bushings actually didn't look too too bad, as well as the mounting holes in the hangers which tend to elongate. Steering Box.... Hmm, now that you mention it. It seems OK. It was fine last summer when I was driving it and it doesn't appear to be leaking. I'll probably just clean it up, change the oil and reinstall it. Through all of my researching and nosing around, I rarely see or hear any complaints about them. Brand new ones from TRW are available on Ebay for around $100 USD, so its another option if it went belly up.
|
|
#23
22-07-10, 22:48
|
||||
|
||||
|
Update:
Well, after alot of humming and hawing, I chose to rehash the Heater Kit rather than just buying a new kit. I did buy a new Heater Motor for the huge sum of $10, but just sandblasted and repainted all of the other kit parts. All in all they turned out nice:   I am going to cheat a little bit when I re-install it. I always hated those fabric duct hoses that are part of the kit. They are a bitch to install and attract dust. I'm going to just buy some plastic duct/hose from Home Depot. You would have to bend yourself into a human pretzel in order to even see that i've changed them anyway as they are completely buried behind the dash panel.
|
|
#24
22-07-10, 23:23
|
||||
|
||||
|
Quote:
|
|
#25
24-07-10, 03:21
|
||||
|
||||
|
Heater is in... Along with a few other small items.
Finally have a Speaker for the Dash. Thought i'd test fit it. Only the Steering Column, Gauge Panel, Washer Pump, and Choke/Throttle Cables left and the Dash portion is done.....  I'm hoping to have the rest of the large parts (Hood, Windshield Frame, Gas Tank) back from the Painter late next week so I can get it back in for the final paint job mid August. The scrap Jeep is really coming in handy as I've officially borrowed some small parts from it now
|
|
#26
27-07-10, 03:27
|
||||
|
||||
|
Not a huge update, as i'm back to work again, so i'm only able to pick away at this thing when a few spare minutes pop up.
Spent a bunch of time getting the power supply and battery box sorted out. I'm making one deviation from "As Issued" with this thing, and it came in the form of a Master Switch/Battery Cut-Off. The Dash Switch on these things isn't really a Master Switch, as a bunch of things still work when its switched off (Starter, Lights... etc etc), and most 151 Owners complain of the batteries going flat when its been sitting for a while, most likely from a small power draw somewhere in the system. Anyway, I spent nearly an hour trying to figure out where I could mount this thing in manner that looks somewhat correct and is functional. I'm not worried about hiding it, thats what the SWR Cable through the Steering Wheel and Clutch Pedal is for I ended up putting it within the seat riser on passenger side, as this puts the connections right in the battery box and out of the elements, so I don't have to start fooling with running cables all over the place:   Lastly, since i'm always worried about wether or not I got the paint right, I finally got some validation today. I took the empty instrument cluster from the old 1 Svc Bn 151 and just gave it a real quick scrub (in the middle) with some soap and water and let it dry..... Not bad at all. I think i'll be able to live with my 383 Green base coat 
|
|
#27
05-09-10, 23:05
|
||||
|
||||
|
Update,
Well I haven't had any spare time lately. Work is eating up most of my energy these days, so I haven't been making a whole lot of progress. I did however go crazy so far this weekend. So, I managed to get the paint to do my Engine Compartment. So here is where i'm cheating when it comes to painting. Rather than painting this entire thing in Semi-Gloss OD, and then top coating it with the Cam Pattern, I took a short cut. I still wanted the Engine Compartment to be in the OD, as almost every CDN 151 I have seen, still had the original paint under the hood. What I did here was set the Hood down on the Tub and traced around the outside, masked, and then hit it in the Semi-Gloss OD. When it goes back in for the final exterior coat of Cam, that should knock down the sharp edges where I masked it:    I did finally get the Main Suspension Assembly dropped off for sandblasting and primer. I hope to have them back this coming week. While they are gone, I went ahead and blasted the Knuckles, Spindles etc:   Just need to get the Brake Backing Plates and a few of the smaller Suspension Parts done over the weekend, and I should be nearly complete removing paint.
|
|
#28
14-09-10, 14:21
|
||||
|
||||
|
One more question on the never ending topic of paint....
This time regarding Comms Stuff in the 3 Color Cam/Pre-CARC Era (1970ish - 1987ish). I'm under the impression that when vehicles went in for a Second Line Paint Job, the Comms Installs were removed. What i'm trying to figure out is what parts of the Comms Installs would have been left in the vehicle when they were painted, and what parts would have remained Semi-Gloss OD? For example, I know that the Radios should (and are) be Semi-Gloss OD, but what about the MT-1029 Power Trays and the AMU's? My good ones are from the CARC Era, but i've got another older MT-1029 Tray and an AMU that are still Semi-Gloss OD. Also, what about the AMU Utility Brackets on the ROPS and the Power Tray Support Brackets on the rear Fenderwells? Would these have been removed prior to Painting, or just left in the Vehicle? Again, some of mine are Pea Green and others are Semi-Gloss OD.
|
|
#29
14-09-10, 16:56
|
|||
|
|||
|
There was no standard. The radios were never left in the vehicles to prevent theft. But anything left bolted in the vehicle would get sprayed over. This included trays, cables, remote speakers, cockpit map lights. Of the 30 vehicles I got from shilo in the late 80s, they all sufferred from the overspray. They would paint the rollbars, but just to the point where the tarp was left on the roof. Remember that the vehicles I bought were primarily artillery, and they were nuts about making things look spiffy, with no regard to the long term effects of the paint on vinyl, plastic or rubber.
On the bases I worked on, painting was usually done at the unit level, by the combat arms guys themselves. If they managed to get a hold of a paint gun, then away they would go. If there was a paint party going on (ie, a change of command parade coming up) then the vehicles would go through an assembly line process, with some guys greasing the lenses and headlamps, then one guy painting the black, one the light green, and one the dark green. They would overspray the seat cushions, the turn signal controller, and just about anything else in the way. When I got to the artillery in 96, they actually had a section in transport that was supposed to paint vehicles. But by then the CARC warnings were coming in so they became redundant. I remember getting flack from them for painting my M113, cause that was supposed to be their job.
|
|
#30
14-09-10, 18:58
|
||||
|
||||
|
Quote:
|
 |
| Thread Tools | |
| Display Modes | |
|
|


 Linear Mode

