|
#152
 08-04-11, 21:15
|
||||
|
||||
|
Hi Richie,
Finally an update on your Carrier resto. I was afraid you had been slacking on the work  But you are making progress But you are making progress  It is looking good indeed. Do you reckon it will be ready in September? It is looking good indeed. Do you reckon it will be ready in September? Never mind Martyn's remark about the colour. It's primer anyway for the nice green paint  Cheers mate,
__________________
Marc van Aalderen Daimler Dingo Mk1B 1941 Daimler Armoured Car Mk1 1943 Daimler Ferret Mk1/1 1959 Ford Universal Carrier No2 MkII* 1944 Ford GPW British Airborne 1944 Lightweight 10 Cwt Trailer SS Cars Ltd 1944 Anti-Tank Gun 6 Pdr 7 Cwt MkII 1942 Austin Tilly 1943 Austin K6A Breakdown 1944 Daf Trailer AT16-24-1NL 1977 Daf 2100Turbo 1982 
|
|
#153
08-04-11, 21:23
|
||||
|
||||
|
i will teflon coat the paint so the green nasty stuff just runs off
 i had to replace all my lifting eye bolts with new high tensile bolts which cetainly came in handy today... i am happy that the carrier can be Hi Ab'd or hoisted on her eyes without them being torn from the hull. September....Hmmm tall order ! i have to build a carrier and a garage in that time and leave time to test so i dont know... i will keep the throttle open on full and see where we are end of july into August and i should know from there. it would look very very out of place for the Bridge runs as she is without a doubt staying sicily / desert colours for now.
__________________
is mos redintegro __5th Div___46th Div__ 1942 Ford Universal Carrier No.3 MkI* Lower Hull No. 10131 War Department CT54508 (SOLD) 1944 Ford Universal Carrier MkII* (under restoration). 1944 Morris C8 radio body (under restoration).
|
|
#154
08-04-11, 21:32
|
||||
|
||||
|
Aargh, now I will have to look for special sticky green paint
 I know the feeling, not enough hours in a day, days in a week, weeks in a month.... And the bloody job keeps interfering with the spare time too! Well, if you feel odd one out in your sand coloured Carrier maybe Martyn is coming too and you can hitch a ride? At least you will experience the enthousiasm of the Dutch people. Cheers,
__________________
Marc van Aalderen Daimler Dingo Mk1B 1941 Daimler Armoured Car Mk1 1943 Daimler Ferret Mk1/1 1959 Ford Universal Carrier No2 MkII* 1944 Ford GPW British Airborne 1944 Lightweight 10 Cwt Trailer SS Cars Ltd 1944 Anti-Tank Gun 6 Pdr 7 Cwt MkII 1942 Austin Tilly 1943 Austin K6A Breakdown 1944 Daf Trailer AT16-24-1NL 1977 Daf 2100Turbo 1982
|
|
#155
08-04-11, 21:46
|
||||
|
||||
|
i would love to come over carrier or otherwise so if folk do need an observer / top cover let me know
but who knows i may get mine done in time...it will be a push but it is dooable
__________________
is mos redintegro __5th Div___46th Div__ 1942 Ford Universal Carrier No.3 MkI* Lower Hull No. 10131 War Department CT54508 (SOLD) 1944 Ford Universal Carrier MkII* (under restoration). 1944 Morris C8 radio body (under restoration). Last edited by RichardT10829; 08-04-11 at 23:49.
|
|
#156
09-04-11, 00:04
|
|||
|
|||
|
Richie, that text made me laugh with the number on the side. coming on well boy !
Come to Arnhem mate 10th -20th September, we are aiming to have so manny carriers there we could recreate grandfathers NI photo, now that would be cool.
__________________
Shaun Hindle Morris C8 Ford GPW jeep 1945 Morris 1000 (ex mil) SAS LSV Harley Davidson MT 350 motor cycle Universal carrier MK 1*1943 Ronson (under restoration) Universal carrier MK 2* 1944 (Puddle Jumper HSK 345) Ferret MK 1/1 1956 Ferret MK 2/4 1958 CVR(T) Scorpion 432 MK2 Daimler MK1 armoured car 1943 (winner best wheeled armour W&P show 2011) Daimler Dingo MK2 1944 (awaiting restoration, aquired 11/12/2011) Fordson WOT 3 D 1940 (awaiting restoration )
|
|
#157
09-04-11, 00:06
|
||||
|
||||
|
yeah deffo 2RSF HOOHAR ! would be awesome to say the least
__________________
is mos redintegro __5th Div___46th Div__ 1942 Ford Universal Carrier No.3 MkI* Lower Hull No. 10131 War Department CT54508 (SOLD) 1944 Ford Universal Carrier MkII* (under restoration). 1944 Morris C8 radio body (under restoration).
|
|
#158
09-04-11, 00:15
|
|||
|
|||
|
Kevin is coming and will need a crewman !
__________________
Shaun Hindle Morris C8 Ford GPW jeep 1945 Morris 1000 (ex mil) SAS LSV Harley Davidson MT 350 motor cycle Universal carrier MK 1*1943 Ronson (under restoration) Universal carrier MK 2* 1944 (Puddle Jumper HSK 345) Ferret MK 1/1 1956 Ferret MK 2/4 1958 CVR(T) Scorpion 432 MK2 Daimler MK1 armoured car 1943 (winner best wheeled armour W&P show 2011) Daimler Dingo MK2 1944 (awaiting restoration, aquired 11/12/2011) Fordson WOT 3 D 1940 (awaiting restoration )
|
|
#159
09-04-11, 00:47
|
||||
|
||||
|
well my offer stands guys
__________________
is mos redintegro __5th Div___46th Div__ 1942 Ford Universal Carrier No.3 MkI* Lower Hull No. 10131 War Department CT54508 (SOLD) 1944 Ford Universal Carrier MkII* (under restoration). 1944 Morris C8 radio body (under restoration).
|
|
#160
09-04-11, 02:43
|
|||
|
|||
|
Richard,
Only the brave takle that kind of resto. I can just imagine having to move it around in the garage and the wife wanting to get the car in the garage when it rains. What a great project to get done and only the vision of the final result should be in your mind. Go man!! Marcel
|
|
#161
09-04-11, 09:01
|
||||
|
||||
|
Thanks Marcel it is really a labour of love... i nearly did not get this carrier out of fear but when i saw the projects that Jordan, Shaun, and Martyn had all completed this one seemed a tad easier ! the metal work is fairly straight forward and due to the thickness of the steel it is more forgiving if a mistake is made..... its just the lifting etc... for the better part i have done this on my own (pretty much like the rest of the guys) but a fellow brickie "Fraz" who is a time served engineer and helped construct the Ark Royal has helped me with the drilling etc etc.
__________________
is mos redintegro __5th Div___46th Div__ 1942 Ford Universal Carrier No.3 MkI* Lower Hull No. 10131 War Department CT54508 (SOLD) 1944 Ford Universal Carrier MkII* (under restoration). 1944 Morris C8 radio body (under restoration).
|
|
#162
09-04-11, 11:40
|
|||
|
|||
|
good on yer mate, looking really well and it's nice to see someone who isn't painting their carrier green
your oil cooler looks good, ive got one just like it ") eddy
__________________
_______________________ 1941 mk1 mortar Carrier 1941 Mk1* Carrier 1942 Mk1* Carrier 1943 T16 Carrier 1945 Mk3 Dingo 1941 Mk3 Covenanter 1941 Mk4 Churchill AVRE (now sold) 1944 Mk6 Cromwell (now sold) 1952 Mk3 Centurion 1952 ARV Centurion 1952 ARV Centurion 1953 Mk3 Centurion (breaking)
|
|
#163
09-04-11, 18:16
|
|||
|
|||
|
Congratulations on a great job .It makes the rest of us feel better after reading about all your troubles and yet the restoration goes on .We all have trouble finding time .I have a good shop , a loader and lot's of room and I wonder how you fellows make out in the city .Calgary has a bylaw that you can't have a vehicle on you place if it doesn't have a license on it .The Government spends money on alot of recreation, why not have a place where you can rent a stall inside and have access to tools and hoist for doing our hobies. Reg Hodgson ,editer of Army Motors for the MVPA has a yellow carrier . If we wern't so far apart we could gang up on these green guys .You could have used my drill press it can drill those holes in 6 seconds with two fingers ,faster then you can put the bolts in .Your rivets look great .Gota go and work on my No 3 Mk1
__________________
George is hooked on OD 5 window DT969 8 ton Fruehauf trailer M2A1Halftrack ,CMP #11 F15A1 #13 F15A1 RAF Fordson Tractor, 42 WLC HD No.2MK11 CT267514 center CB24713 bottom hull25701 ,No.2 MK2 parts MK1 10128 ,(2) MK1 ,Parts Hull9305 .Hull 10407 Hull plate # 7250 all have walk plate on back steps 1917 Patent modle amphibious army tank
|
|
#164
09-04-11, 19:21
|
||||
|
||||
|
well the garage it was in you could just squeeze up each side of the carrier and finding space for toolage was a nightmare.... 8 - 10 weeks should hopefully see the new workshop built then i can get on with it ! just busy looking for a lathe and some nice bits and bobs to go back in when its built !
the project is approaching the nice stage of the build ie clean restored bits can start going back on shortly and i am sure the project will pick up speed
__________________
is mos redintegro __5th Div___46th Div__ 1942 Ford Universal Carrier No.3 MkI* Lower Hull No. 10131 War Department CT54508 (SOLD) 1944 Ford Universal Carrier MkII* (under restoration). 1944 Morris C8 radio body (under restoration).
|
|
#165
09-04-11, 23:17
|
|||
|
|||
|
Looking good,Richard,thanks for the pics.The neat thing I like is the stuff I learn from others like you.Every time I see a posting I learn things.
Keep up the good work!
|
|
#166
10-04-11, 00:21
|
||||
|
||||
|
Awsome job Richard, been watching your progress and the stages that you have done your carrier to get an idea as to how to go at my unit. Im hoping to get heavy into my project with in a few weeks as the weather is getting warmer now, the motor is almost done now, I did that over the winter. Thanks for sharing
__________________
Carl Dressel Port Colborne, Ontario. UC2 MK1-1942,SER 10217, H#CB9208, LH 9233 CT-113184 M38A1,1/4 Ton, 1952, ORD. 630 M135-CDN, 2 1/2 Ton, 1953, ORD. 2720
|
|
#167
10-04-11, 04:37
|
||||
|
||||
|
Hi Rich, Carrier is looking good, Will you be working on it in that lock up?. You done the rivets using the screw method?, if you did I'm guessing you will need some recovery time. Whats next, are you going to have it grit blasted?, its worth doing as it will key up the new steel and blend it all in to make it look weathered. Are you going to put the canadian hammer marks on it?.
kev.
__________________
2pdr Tank Hunter Universal Carrier 1942 registered 11/11/2008. 3" Mortar Universal Carrier 1943 registered 06/06/2009. 1941 Standard Mk1 stowage Carrier, Caunter camo. 1941 Standard Mk1 stowage Carrier, light stone. 10 cwt wartime mortar trailer. 1943 Mk2 Daimler Dingo. 1943 Willys MB. 1936 Vickers MG carrier No1 Mk1 CMM 985.
|
|
#168
10-04-11, 12:01
|
|||
|
|||
|
kevin, what are the Canadian hammer marks? If you are refering to the (chisel like marks) they are on most armour British as well (including Ferrets, 432 Saladin etc). its part of the process for straightening the armour plates after production to remove any distortion.
__________________
Shaun Hindle Morris C8 Ford GPW jeep 1945 Morris 1000 (ex mil) SAS LSV Harley Davidson MT 350 motor cycle Universal carrier MK 1*1943 Ronson (under restoration) Universal carrier MK 2* 1944 (Puddle Jumper HSK 345) Ferret MK 1/1 1956 Ferret MK 2/4 1958 CVR(T) Scorpion 432 MK2 Daimler MK1 armoured car 1943 (winner best wheeled armour W&P show 2011) Daimler Dingo MK2 1944 (awaiting restoration, aquired 11/12/2011) Fordson WOT 3 D 1940 (awaiting restoration )
|
|
#169
10-04-11, 12:14
|
|||
|
|||
|
there's been a few discussions on the "chisel marks" on armour plate some of the ideas were, descaling or hardness testing. do you know for a fact shaun that it was straightening ?
eddy
__________________
_______________________ 1941 mk1 mortar Carrier 1941 Mk1* Carrier 1942 Mk1* Carrier 1943 T16 Carrier 1945 Mk3 Dingo 1941 Mk3 Covenanter 1941 Mk4 Churchill AVRE (now sold) 1944 Mk6 Cromwell (now sold) 1952 Mk3 Centurion 1952 ARV Centurion 1952 ARV Centurion 1953 Mk3 Centurion (breaking)
|
|
#170
10-04-11, 12:40
|
||||
|
||||
|
Quote:
You will often find these marks on hull plates that have apertures cut into them for ports, etc. During the heat treatment process, distortion can occur and the hammering is to relieve it. It is definitely not hardness testing, that is done more accurately, by grinding a small part of the surface and then doing the Brinell test or similar, where the surface is indented and the depth of indent is measured to ascertain the hardness.
__________________
Richard 1943 Bedford QLD lorry - 1941 BSA WM20 m/cycle - 1943 Daimler Scout Car Mk2 Member of MVT, IMPS, MVG of NSW, KVE and AMVCS KVE President & KVE News Editor
|
|
#171
10-04-11, 13:37
|
|||
|
|||
|
thanks guys for the info, it's nice to have another puzzle answered.
the pic is my cromwell drivers compartment and clearly shows the hammering marks. cheers eddy
__________________
_______________________ 1941 mk1 mortar Carrier 1941 Mk1* Carrier 1942 Mk1* Carrier 1943 T16 Carrier 1945 Mk3 Dingo 1941 Mk3 Covenanter 1941 Mk4 Churchill AVRE (now sold) 1944 Mk6 Cromwell (now sold) 1952 Mk3 Centurion 1952 ARV Centurion 1952 ARV Centurion 1953 Mk3 Centurion (breaking)
|
|
#172
10-04-11, 13:47
|
||||
|
||||
|
Shaun, Yes the chisel like hammer marks, when I made my gunners front plate i devised a method of applying those marks, get a fairly large size quality new hardedend allen key, hold the short bent over end in your hand and lay the other end against the plate with one of the allen key ridges touching the plate, hold it at angle and hit the opposite allen key ridge with a good size lump hammer once only. What you get then on the plate is a triangle indent mark, do the same thing 180 degrees round from your first mark, carefully aligning the allen key to the first mark. What you end up with is a almost exact replication of those marks, practice first on a piece of metal to perfect it, where gloves when doing it, the allen key will be no use after making say 20 marks but you can then use the remaining ridges on it until all the allen key points are peaned over and then it's no use for anything.
Go to a car boat sale and get aload of allen keys for next to nothing. A little time consuming but it is the detail in a restoration that matters. Kevin.
__________________
2pdr Tank Hunter Universal Carrier 1942 registered 11/11/2008. 3" Mortar Universal Carrier 1943 registered 06/06/2009. 1941 Standard Mk1 stowage Carrier, Caunter camo. 1941 Standard Mk1 stowage Carrier, light stone. 10 cwt wartime mortar trailer. 1943 Mk2 Daimler Dingo. 1943 Willys MB. 1936 Vickers MG carrier No1 Mk1 CMM 985.
|
|
#173
10-04-11, 15:12
|
|||
|
|||
|
Good method Kevin, they are not accutaly hammer marks, the process uses a very large press with a row of finger like tools prushing down and supports below. the sheet of armour is slid into the press by hand and the skilled operator eyes up the high spots and then places it under the fingers, he then brings the tool down on that area, some times the plate will need to be turned a little to get a different area, hence the differt angles and spacing of the marks.
__________________
Shaun Hindle Morris C8 Ford GPW jeep 1945 Morris 1000 (ex mil) SAS LSV Harley Davidson MT 350 motor cycle Universal carrier MK 1*1943 Ronson (under restoration) Universal carrier MK 2* 1944 (Puddle Jumper HSK 345) Ferret MK 1/1 1956 Ferret MK 2/4 1958 CVR(T) Scorpion 432 MK2 Daimler MK1 armoured car 1943 (winner best wheeled armour W&P show 2011) Daimler Dingo MK2 1944 (awaiting restoration, aquired 11/12/2011) Fordson WOT 3 D 1940 (awaiting restoration )
|
|
#174
10-04-11, 19:45
|
||||
|
||||
|
yes i do want to do it, i was going to ask one of our Canadian cousins or someone on our rock to take a rubbing on grease proof paper for me (for each pannel) then tape this to the plate and hammer a special chisel i am making over each mark until the entire plate is done
as for the rivets the bottoms ones you see are screw type as per previous discussions... however a pal of mine as a chicago pneumatic rivet gun so i may go back to solid riveting pending on a few things i have to iron out as yet. i can turn the rivets out quickly on the lathe drilling them then running an m6 tap down them. The lathe i had access to was at a college and they are running night classes now so cant get access again (hence my advert wanting a lathe)
__________________
is mos redintegro __5th Div___46th Div__ 1942 Ford Universal Carrier No.3 MkI* Lower Hull No. 10131 War Department CT54508 (SOLD) 1944 Ford Universal Carrier MkII* (under restoration). 1944 Morris C8 radio body (under restoration).
|
|
#175
02-05-11, 00:40
|
||||
|
||||
|
well now that the carrier is out of the way and i cant do much with it i have started to clean and degrease my engine. usually i like to send these off for steam clean and chemical clean but this time around i went for gizer and preasure wash... the block came up rather nice.. the mains are shot (well the center and front main) the crank has been reground so just need to get some shells sortid for it i am still trying to figure out which engine it is, it appears to have the 81A heads.... there is 99 embossed in the block which i am unsure of ?
one thing i have found out is the 1060 number i queried on the top of the pistons is also in the block and i have noticed that this refers to the job number which was put in by Torgis engineering march 1945 this is also on the brass plate on the bell housing. i have yet to extract the studs using a stud box (i despise seeing stilsons being used to take studs out) that will be done tomorrow followed by some rubbing down and then painting ready for when its rebuilt. there is a small hole in the sump tray in the bellhousing section and although it does not need to contain oil it looks unsightly so will weld it up. 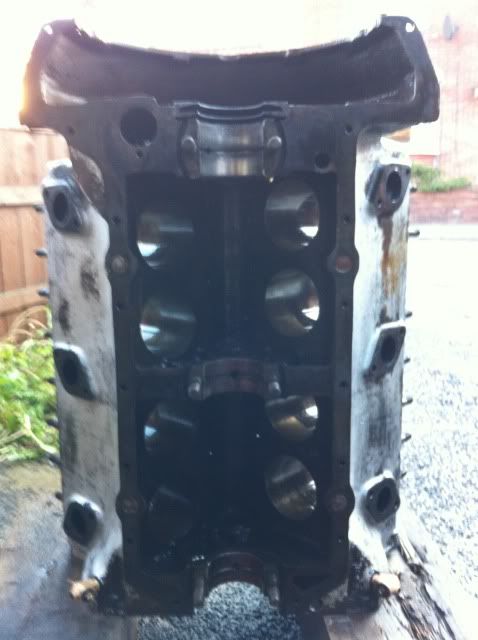  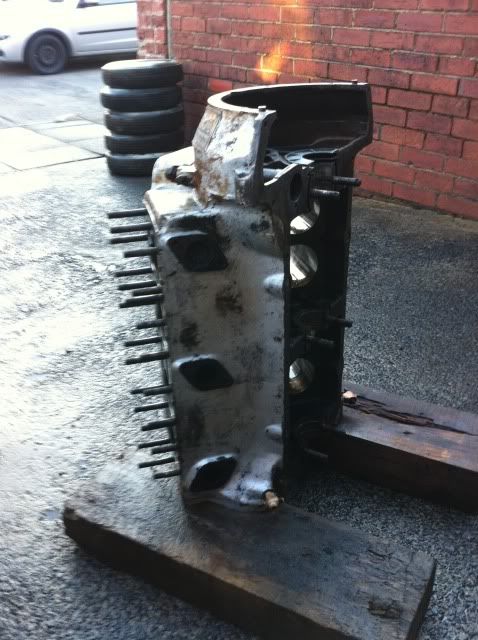 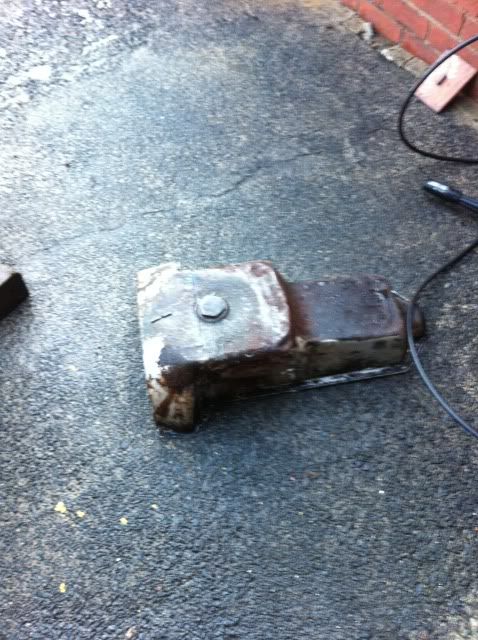 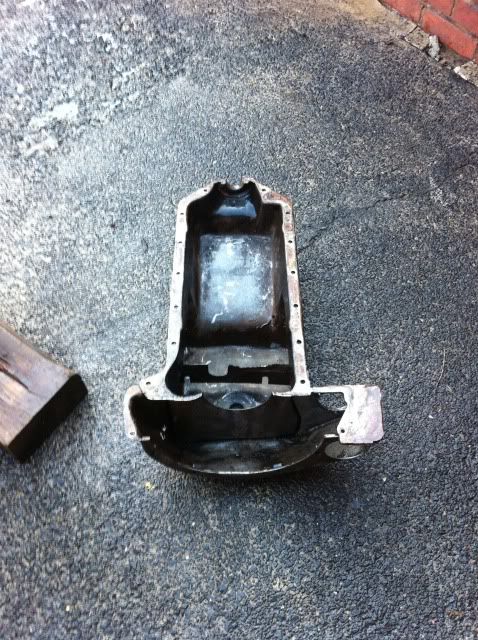
__________________
is mos redintegro __5th Div___46th Div__ 1942 Ford Universal Carrier No.3 MkI* Lower Hull No. 10131 War Department CT54508 (SOLD) 1944 Ford Universal Carrier MkII* (under restoration). 1944 Morris C8 radio body (under restoration).
|
|
#176
02-05-11, 03:17
|
|||
|
|||
|
If you mean the hole with the splitpin. Its to let the oil out if any small leak develops in there. It stops it pooling, and then being picked up in the clutch.
99T is a 1939 to 41 100 hp block. How about a close up picture of the fittings at the back of the block, for the oil cooler.
__________________
Bluebell Carrier Armoured O.P. No1 Mk3 W. T84991 Carrier Bren No2.Mk.I. NewZealand Railways. NZR.6. Dodge WC55. 37mm Gun Motor Carriage M6 Jeep Mb #135668 So many questions.... Last edited by Lynn Eades; 02-05-11 at 04:02. Reason: Have now checked a web site.
|
|
#177
02-05-11, 06:13
|
||||
|
||||
|
Quote:
A handy way to get the studs out is simply to put two nuts on the same stud and do them up so they are together. This has the effect of 'locking' them onto the stud. Then put the ring spanner (dont use and open ender or a shifter) on the bottom one and start to undo. Should get em out with no marks and no hassles.
__________________
Pax Vobiscum.......may you eat three meals a day & have regular bowel movements.
|
|
#178
02-05-11, 10:45
|
||||
|
||||
|
Richie,
Any idea of the year of production? The block has the core plugs in the bottom of the block which was dropped quite early on in the war, so could be a good match for your carrier. Is it also a Canadian unit? My crank is 0.030" on mains and big ends, but is rather deeply scored so will have to go 0.060", yesterday I took the crank from the Loyd range wreck, it turned out to be again a 30 thou job, but as it was virtually never run following rebuild it can be used as is!
__________________
Alastair Lincoln, UK. Under Restoration: 1944 No2 MK2 Loyd Carrier - Tracked Towing 1944 Ford WOT6 Lorry The Loyd on Facebook
|
|
#179
02-05-11, 11:05
|
||||
|
||||
|
Quote:
__________________
is mos redintegro __5th Div___46th Div__ 1942 Ford Universal Carrier No.3 MkI* Lower Hull No. 10131 War Department CT54508 (SOLD) 1944 Ford Universal Carrier MkII* (under restoration). 1944 Morris C8 radio body (under restoration).
|
|
#180
02-05-11, 11:09
|
||||
|
||||
|
engine is canadian built 24 stud unit and was last serviced in 1945 so methinks it may be an earlier one.
the mains and big ends were on 010 thou and the bore is 030 oversize using a three ring piston. Lynn i will get some close ups. it is not the pin where the hole is mate, that is bit is ok its up one side and has rotted through i could weld it up or tidy the mess into a nice hole for further drainage.....will most likely weld it though.i think i managed to reveal bits of the original paint which i can only describe as a very dark grey...may not be original but it was like a hard enamel and there was nothing else under it ?
__________________
is mos redintegro __5th Div___46th Div__ 1942 Ford Universal Carrier No.3 MkI* Lower Hull No. 10131 War Department CT54508 (SOLD) 1944 Ford Universal Carrier MkII* (under restoration). 1944 Morris C8 radio body (under restoration). Last edited by RichardT10829; 02-05-11 at 11:18.
|
 |
| Thread Tools | |
| Display Modes | |
|
|


 Linear Mode

