|
#331
 24-03-12, 13:25
|
||||
|
||||
|
Had a few things to do in town this morning. The bolts still haven't arrived and the shop didn't seem too worried about it. I managed to get them a little more motivated, after a brief chat.
 As previously mentioned, I have become increasingly interested in trialling use of molasses. I priced it today at the local rural supplies store, and was very pleasently suprised to hear it is 66c/litre! Pity the car won't run on the stuff  After a brief search around Gympie, a suitable storage container was bought, and I now have 20L of the stuff ready to use. I wish I had the trailer on, I could have had a 44gal drum to use as the dipping tank too. If only I had a Leyland P76, I could have brought it home in the boot of the car. At some point tomorrow, I'll mix up a batch to dip the two shackles from front bumper, which are well & truly frozen solid. If it frees them up, I will be very impressed. After a brief search around Gympie, a suitable storage container was bought, and I now have 20L of the stuff ready to use. I wish I had the trailer on, I could have had a 44gal drum to use as the dipping tank too. If only I had a Leyland P76, I could have brought it home in the boot of the car. At some point tomorrow, I'll mix up a batch to dip the two shackles from front bumper, which are well & truly frozen solid. If it frees them up, I will be very impressed.With insufficient day left to set-up and start welding, I settled for a trial fit of the nose panel to cab frame. After a little manipulating, it's sitting OK for a first attempt, but I have marked several areas for slight adjustments and the odd hammer blow to get better final fit. Any welding needed on the nose was done weeks ago, so now it only requires cosmetic touches prior to painting and fitting. Welding & repair work will commence on drivers door tomorrow. If lucky, that work may be completed by stumps. I won't be watching the clock though.
__________________
Ford CMP, 115" WB,1942 (Under Restoration...still) Medium sized, half fake, artillery piece project. (The 1/4 Pounder) 
|
|
#332
25-03-12, 12:00
|
||||
|
||||
|
It took 6 hours, but the door is almost done. I still have to apply some filler to outside skin, where I welded up 6 holes. The poorly repaired section on hinge inside edge was worse than I had expected. Once the old 'repair' was removed, the full extent was seen. I considered replacing the whole strip along this side, but settled for a massive amount of re-welding, inserting two patch plates and a light skim of body filler to cover some grinding lows. More to come!
__________________
Ford CMP, 115" WB,1942 (Under Restoration...still) Medium sized, half fake, artillery piece project. (The 1/4 Pounder)
|
|
#333
25-03-12, 12:25
|
||||
|
||||
|
This tiny little countersunk hole caused me the most pain today. I attempted to just apply weld to create the rough profile and finish with a good filing. Every time I touched the area with MIG, I blew the hole bigger, so that method ended fast. Finally settled for manufacturing a new countersunk hole (or 1/2 of one). The shape was easily formed using a broken flathead V8 intake valve head placed onto a pre-drilled piece of sheet metal, and belted repeatedly into a length of soft wood, until a 'countersink' was created. A small magnet inserted into door, held the patch in place for welding. Welding it on wasn't as hard as I had expected, but here's where the pain comes in. A weld spark managed to get into my welding helmet, bounce off that, and into my ear! I promptly exclaimed 'oh darn!', or perhaps something ever so slightly more ribald. To be honest, the actual comment contained a reference to the son-of-god and a speculation on potential dubious parentage. Oh well! What doesn't kill you.........makes you angrier. The hardest part of this repair, was in flattening the weld back to panel level. The grinder couldn't be used because the area is too tight. More to follow.
__________________
Ford CMP, 115" WB,1942 (Under Restoration...still) Medium sized, half fake, artillery piece project. (The 1/4 Pounder)
|
|
#334
25-03-12, 12:35
|
||||
|
||||
|
Tony, enjoying your enthusiasm, great work and the dedicate to take pictures and share them with us.

__________________
Film maker 42 FGT No8 (Aust) remains 42 FGT No9 (Aust) 42 F15 Keith Webb Macleod, Victoria Australia Also Canadian Military Pattern Vehicles group on Facebook https://www.facebook.com/groups/canadianmilitarypattern
|
|
#335
25-03-12, 12:52
|
||||
|
||||
|
The sandblasting revealed a dent along to lower part of lock edge. With time getting away from me, I decided against my original idea to weld a plate to the low spot and lift this out with a dent-puller. A 4 inch strip of body filler had to do in this instance. I don't like doing that and am trying not to dwell on it, or I might be tempted to grind it out and go with original plan. Every corner of the lock access opening was cracked, in some places very badly. The missing bit remained missing, despite a lengthy search in my original shed. If you remember, I removed that piece when door hardware was stripped months ago and put it in a 'safe place'. It is still safe! In it's absence, I had to make a new piece to weld in. The middle two holes are a minor design improvement I added for strength. Through these holes I welded the repair patch to the door frame, making the area a little more rigid. I also applied a small spot of weld around the corner, in hope of holding the little 'flap' a little more firmly also. Last part to follow.
__________________
Ford CMP, 115" WB,1942 (Under Restoration...still) Medium sized, half fake, artillery piece project. (The 1/4 Pounder)
|
|
#336
25-03-12, 13:14
|
||||
|
||||
|
Jeezus, I hate panelbeating! The inside of door is now all primed, with spray putty & stop putty applied sparingly. The outside will be to primer stage next Saturday, and weather permitting, door will be painted on Sunday. Hinges are the next thing to tackle. They will need fresh pins. I am considering sending the roof for blasting soon, to see what evils lay in store there. No plans to start work on that yet, but pays to be fore-warned with these things! The door curtain frame jig is now finished. There will be a smaller, less complex jig made, for positioning of the flat metal plate at rear of the frame. That jig will also setup location of support legs for passenger side door as well as location for a small metal 'catch' that the access flap closes onto. Well....thats it for today.
__________________
Ford CMP, 115" WB,1942 (Under Restoration...still) Medium sized, half fake, artillery piece project. (The 1/4 Pounder)
|
|
#338
25-03-12, 13:30
|
||||
|
||||
|
Quote:
I can't bring myself to try Oxy. I could do great damage with one of those. The bottles alone cost a fortune! Yes, thats the reason, bottle price, not that those bloody things scare the hell out of me
__________________
Ford CMP, 115" WB,1942 (Under Restoration...still) Medium sized, half fake, artillery piece project. (The 1/4 Pounder)
|
|
#339
25-03-12, 19:35
|
|||
|
|||
|
Hi Tony
As you have figured out fatigue failure of the front doors of Patter 13 are extremely common. What is even more annoying is when they reoccur several years later. Hope to have found two of problems causing the occurrence: Welding up the crack on the outside doesn't really get the inner plate well attached. The inner plate were originally spot weld in place before the out side door skin was applied. One solution to this is to drill through the outer skin but not through the inner plate then plug weld the drill holes which welds the inner and outer layers together. The other cause of the re-occurrence of the fatigue crack or a loose feel to the door is a little strange, failure of the spot welds of outer skin where it is folded around the inner door panel. Tried rewelding with a pinch spot welder no good, just enough rust in the folded edge to prevent good weld. Solution was again to drill and plug weld the three layers of steel as both sides are exposed, drilled 1/4" through all three layers every two inches near the hinge. Then with a brass heat sink against one side just welded the holes up and ground them smooth. Re-occurrence of cracks also seems to happen when a fatigue crack is just welded up. I've been told that with cracks it is important to actual terminate them by drilling a small hole just past the end of the visible crack and then to actually cut the crack open to a with of 1/16 or even 1/8 of an inch then weld the joint up. This is supposed to be particularly important if the crack is to be ground smooth on one side. What has peoples experience been with this approach? Cheers Phil Cheers Phil
__________________
Phil Waterman `41 C60L Pattern 12 `42 C60S Radio Pattern 13 `45 HUP http://canadianmilitarypattern.com/ New e-mail Philip@canadianmilitarypattern.com
|
|
#340
25-03-12, 23:20
|
||||
|
||||
|
Thanks Phil,
That had not occured to me. Next weekend I will sand back around both hinges and follow your advice. Does the thick plate extend to whole size of the door edge? Is there a possibility of drilling through where the plate isn't? T.
__________________
Ford CMP, 115" WB,1942 (Under Restoration...still) Medium sized, half fake, artillery piece project. (The 1/4 Pounder)
|
|
#341
26-03-12, 17:32
|
|||
|
|||
|
Hi Tony
Just went out to the shop and looked in the doors of the HUP through the lock assembly hole. Both doors have full length plates which is much heavier gage steel than the door shell. One of mine my backing plates was loose enough that when drilling the holes it started pushing the backing plate away, so stuck the hinge in place with the bolts to hold the layers tight together while drilling and welding. Fix the front hinge area on my HUP for the first time some 25 years ago, so if the 2nd repair last as long I won't complain much. The loading on the hinges of the front door of the Pattern 13 are ridiculous because they are placed so close together. Interestingly the side and rear doors of the HUP have a hole at the bottom of the door that would allow you to slide a new or additional plate in. Not sure what that would do to the hinge alignment though. In the picture below you can see cracks in mine drivers side door, you are looking at the lower hinge are, if you look at the where the outer skin is folded over you can just see a little line of rust which is the area of movement between the outer skin and the inner door panel. 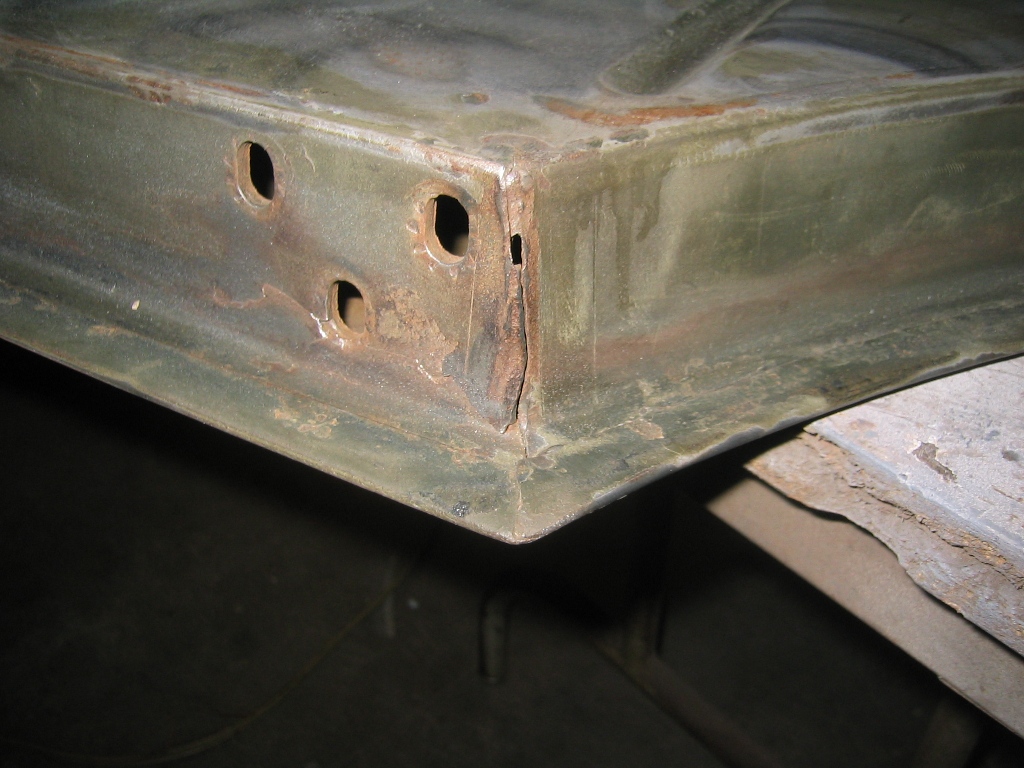 I'll try to remember to gather all of the door hinge before and after photos an post them on my web site. Hope this is of help to you and others at this point in their Pattern 13 restorations or ongoing maintenance. Cheers Phil
__________________
Phil Waterman `41 C60L Pattern 12 `42 C60S Radio Pattern 13 `45 HUP http://canadianmilitarypattern.com/ New e-mail Philip@canadianmilitarypattern.com
|
|
#342
27-03-12, 05:22
|
||||
|
||||
|
Thanks for the depth of info, Phil.
I'm glad you spoke up about this when you did, otherwise I would have been in for another repair far too soon. Pity we can't have better acces to the inside without major surgery, we could make the design virtually 'bullet proof'.........perhaps literally! 
__________________
Ford CMP, 115" WB,1942 (Under Restoration...still) Medium sized, half fake, artillery piece project. (The 1/4 Pounder)
|
|
#343
27-03-12, 11:20
|
||||
|
||||
|
The second (passenger side) door has now been collected. I had always considered this door the worst condition, and while it is certainly in a bad way, I don't look at it with the same anxiety I did with driver side door. Still needs its share of working though! This one has a small but quite defined dent on the outside, about 1/3 down from the top. This I will certainly lift out part way with a welded stud and slide hammer (or whatever I can find to use). When applying filler to a flat panel, it is best to try to support from the inside to stop the flexing that occurs. Repair work is more likely to be without a visible border once painted. Because the door lock access opening is not the full size of door cross section, I will use/insert a wheelbarrow tube and inflate to fill the space. An old panelbeaters trick, tought to me by an old panelbeater! Jeezus I hate panelbeating I will also incorporate Phil's Technique to stabilise the inner hinge plate. Speaking of hinges, the 2 from this door are in great shape, and wil not need to have any attention.
__________________
Ford CMP, 115" WB,1942 (Under Restoration...still) Medium sized, half fake, artillery piece project. (The 1/4 Pounder)
|
|
#344
27-03-12, 12:17
|
||||
|
||||
|
I have these three damaged doors for parts or donor metal, such as the piece that will be needed to re-plate a section of passenger door arch. I just checked, and do have a pair of replacement hinges for driver side, so won't need to re-pin the originals. I do still need the bolt-on plate around driver side catch release lever. If anyone has one for sale I would like to hear from you.
__________________
Ford CMP, 115" WB,1942 (Under Restoration...still) Medium sized, half fake, artillery piece project. (The 1/4 Pounder)
|
|
#345
27-03-12, 16:11
|
|||
|
|||
|
Hi Tony
I wish I had the skills of some of the "old line panelbeaters" I've got one friend who fits this description. I've worked on panels with dents or creases with no visible progress, Larry will come into the shop pick up body hammer and mandrel give the panel couple of hits and its done. Drives me crazy. Another thing I can't do is body filler, takes me way to many tries to get it smooth. Think this is why I enjoy body work on CMPs nobody expects them to be smooth. Cheers Phil
__________________
Phil Waterman `41 C60L Pattern 12 `42 C60S Radio Pattern 13 `45 HUP http://canadianmilitarypattern.com/ New e-mail Philip@canadianmilitarypattern.com
|
|
#346
29-03-12, 12:22
|
||||
|
||||
|
I had a phone call this morning from the shop which had been acquiring my floor bolts. They said they had been trying to source them, but have had no luck getting them with the flat screwdriver head. They offered ones of correct size but with hex key head instead. I deferred my decision to commit to purchase.
This afternoon I sought a second opinion, and this company concured that they also could not get them in. I really don't want to use anything but the original specs, but bought 65 of the correct size with phillips head instead of slot and nuts & split washers. These all cost $5.00 in total! Thats why I got em, and they are as a plan 'B'. I started looking on internet tonight, and have already found a few places that have the right ones in their online catalogue. Whether these are actually in stock will be discovered tomorrow.
__________________
Ford CMP, 115" WB,1942 (Under Restoration...still) Medium sized, half fake, artillery piece project. (The 1/4 Pounder)
|
|
#347
30-03-12, 11:53
|
||||
|
||||
|
In contradiction to local shops (x2), I have now found and ordered the correct Ford Cab Floor Bolts from: http://www.statewidefastener.com.au/
They have cost me the grand total of $22.00, including GST & Delivery! That is for 70 bolts and 70 nuts. If you remember, some time ago I removed the floor bolt caged nuts due to 'poor health'. Thats why the 70 nuts!
__________________
Ford CMP, 115" WB,1942 (Under Restoration...still) Medium sized, half fake, artillery piece project. (The 1/4 Pounder) Last edited by Private_collector; 30-03-12 at 12:02.
|
|
#348
31-03-12, 17:03
|
||||
|
||||
|
Its rather late to be posting, but my son just got off bloody facebook!
This afternoon I was making the remedial repairs to drivers door hinge side, as recommended by Phil. I drilled a total of 9 holes to strengthen the door from future cracks, and also made three spot welds along the edge of the skin where it overlaps the inner frame. While doing this, I was thinking through the forces & mechanics that would have caused the original cracks (now repaired). I kept coming to the conclusion that there must be more to the problem than I already understood. While pondering, I began to examine the hinges themselves. Thats when I discovered a rather devious little flaw with the hinges, or top hinge to be more specific. Consider the upper hinge as three parts, one that bolts to the cab frame, one that bolts to the door, and the hinge pin as third. I found that when I moved the upper hinge to the 'door closed' position, the two parts came to end of travel BEFORE the door would have been closed. Only just before, but the hinge parts met in a certain place and would go no further, no matter how much force was applied. This would mean that the door itself would have had a load force placed on the frame to complete the close. I checked another door (also cracked) and saw that it too had this issue. I checked a third door, that did not have any cracks, and the hinge pin was worn to the extent that more movement was possible between the two main hinge parts. This hinge did NOT butt up in the same place as the others had because the worn pin permitted additional movement. I had initially intended to replace the pin on the drivers door (passenger side was OK) but found a good set on another door in my spares. On the top hinge that will now be for drivers side, I used the angle grinder to remove a little of the height that caused the binding I had described above. This hinge now has a travel of another few degrees. I suspect this may relieve one of the contributing factors to future fatigue of the door frame. I will know more once the door is painted and fitted to the cab itself. Drivers door and hinges will be painted tomorrow (weather permitting) and I will let you know how things go once hung in place. I made the repairs to door outer surface this afternoon as well, and must say I am somewhat disappointed to find the door skin had a slightly dished in appearance that I don't believe I can remedy! It is not a dent as such, but may be a result of years of slamming the door. I will have to live with this unless I get brave enough to go ahead with an idea I had to have pressure applied from the inside to force the skin permanently out. It wouldn't take much, and I considered using a small amount of expanding foam in a plastic bag to do this. This would be sound in principle, but theory doesn't always hold in practice. I'll wet sand the door and see how it looks after that. Excuse typographical errors, it's late, i'm tired and about to hit the hay!
__________________
Ford CMP, 115" WB,1942 (Under Restoration...still) Medium sized, half fake, artillery piece project. (The 1/4 Pounder)
|
|
#349
31-03-12, 21:49
|
||||
|
||||
|
Quote:
__________________
Robert Pearce.
|
|
#350
01-04-12, 00:41
|
||||
|
||||
|
Quote:
What do we call it now? "Social Media"! Antisocial media!!!!! 
__________________
Ford CMP, 115" WB,1942 (Under Restoration...still) Medium sized, half fake, artillery piece project. (The 1/4 Pounder)
|
|
#352
01-04-12, 01:52
|
|||
|
|||
|
Hi
There was also a good discussion of the hinge issue back last spring in the 2011 at Hammond Barn when the guys were working on fabricating non-existent hinges http://www.mapleleafup.net/forums/sh...ad.php?t=15944 then do a search this thread on the word "hinge" shows some useful information. The other bane of Pattern 13 door hinges is they get bent, because they don't have hold back straps. The Boys at the Hammon Barn CMP Overhaul Center (HBCMPOC) have tried straightening hinges to reset them to the proper angle. My approach has been to use wedge shims to adjust for the bending. Cheers Phil
__________________
Phil Waterman `41 C60L Pattern 12 `42 C60S Radio Pattern 13 `45 HUP http://canadianmilitarypattern.com/ New e-mail Philip@canadianmilitarypattern.com
|
|
#353
01-04-12, 11:34
|
||||
|
||||
|
Cheers guys! Im grateful my hinges aren't bent. Thats something I suppose. Both my doors (ones being used) also had the stop straps with them. They are old and hard, so I will look for something to replace them at the local rubber & foam shop.
The day was clear and sunny, so I got the door painted. Despite the strong breeze and painting outdoors, I couldn't find any contaminants inthe paint! Also painted the hinges, headlight rims, fire extinguisher bracket.............. I have since misplaced the hat. Bloody camo paint! More to come.
__________________
Ford CMP, 115" WB,1942 (Under Restoration...still) Medium sized, half fake, artillery piece project. (The 1/4 Pounder)
|
|
#354
01-04-12, 12:11
|
||||
|
||||
|
Pedal plate has been beaten back into shape, ready for blasting. A minor rust repair job will be done at same time as I do the passenger door. Today was the first time I have looked critically at the engine hatch. There are two cracks at top corners and a hole has been cut in the passenger side. Apart from that, it's in really great shape. Whoever cut the hole was then followed by someone who wanted it gone again, because a patch had been screwed in place at some point. I will weld this up once blasted. I think I will send these pieces for blasting either tomorrow or Tuesday. To top off an already satisfying day, a friend of mine phoned late this afternoon to say he had found a Ford CMP brake booster (in the box) at a garage sale, and asked if I would like him to buy it on my behalf. You can guess the answer to that one! The passenger door repairs and these other little welding jobs will happen some time over the Easter break. 
__________________
Ford CMP, 115" WB,1942 (Under Restoration...still) Medium sized, half fake, artillery piece project. (The 1/4 Pounder) Last edited by Private_collector; 01-04-12 at 12:28.
|
|
#355
01-04-12, 18:31
|
|||
|
|||
|
Hi
Glad you found the correct or visual match for the floor bolts, yes it is hard to find them now that are not philipshead. I was going to suggest Fastenal http://www.fastenal.com/web/location...on=selectStore But the nearest international one of their distribution points to you is Singapore, I've had pretty good luck get stuff though some times it takes awhile. The other thing is they only sell in bulk usually 100 in the smaller sizes like the 1/4-20 1/4"-20 x 1" Zinc Plated Slotted Flat Head Machine Screw local cost $13.91 for 100 better that $0.30 each the local hardware store. The other one that I just ordered and got was 1/4"-20 x 1/2" Slotted Oval Head Zinc Machine Screw which are used on the doors. Only problem is that the are Zinc plated, to make the paint stick I dip the heads in metal prep used before painting bare steel, then wash. It takes the shine off and helps the paint really stick. I only dip the heads now dumped a bunch in one time let them sit for 1/2 hour and then washed the off, heads painted great but the threads rusted. So now I just put a small amount of the metal prep in a shallow pan and stand the heads in it or just soak a section of cloth and and stand the heads on that. By the way your doors came out looking great, I had to redo mine because I ended up with sanding scratches showing through the paint. Cheers Phil
__________________
Phil Waterman `41 C60L Pattern 12 `42 C60S Radio Pattern 13 `45 HUP http://canadianmilitarypattern.com/ New e-mail Philip@canadianmilitarypattern.com
|
|
#356
01-04-12, 23:33
|
|||
|
|||
|
Hi Tony I would not blast your roof, they warp up pretty quick from the heat and hammering from the sand blasting
To do the roof lay a plastic sheet down and fill will water and molasses or caustic soda and cook off the rust .It does a much better job but takes a little longer Phil you are lucky to be able to get your floor bolts from Fastenal , here in Canada we have to order them from the good old US of A , even the other bolt suppliers bring them in from the US Cheers boys keep up the good work!
|
|
#357
02-04-12, 00:07
|
|||
|
|||
|
Quote:
I'm surprised and a little disappointed in Fastenal they list a 182 outlets in Canada http://www.fastenal.com/web/location...nal&country=CA see if any of these are in your area give them a call and see if they can access the same stock I can down here. If they can not then I'll stop suggesting them as a source. Cheers Phil
__________________
Phil Waterman `41 C60L Pattern 12 `42 C60S Radio Pattern 13 `45 HUP http://canadianmilitarypattern.com/ New e-mail Philip@canadianmilitarypattern.com
|
|
#358
02-04-12, 00:16
|
||||
|
||||
|
Actually it's similar in a lot of ways to what we're doing now...
Quote:
__________________
Film maker 42 FGT No8 (Aust) remains 42 FGT No9 (Aust) 42 F15 Keith Webb Macleod, Victoria Australia Also Canadian Military Pattern Vehicles group on Facebook https://www.facebook.com/groups/canadianmilitarypattern
|
|
#359
02-04-12, 00:49
|
|||
|
|||
|
Quote:
|
|
#360
02-04-12, 05:08
|
|||
|
|||
|
Phil ; I have tried to buy the slot head flats countersunk here at Fastenal and as Grant said they will bring them in from the US for a big fee most time the bolts are cheaper than the shipping now I just wait until my stock of any slot head screws or bolts run out then make a trip
I don,t mean to step on your toes but in Canada we cannot buy old style slot head bolts anymore any where thayt I know of Nut and Bolt, Stelco, Brafsco etc etc.
|
 |
| Thread Tools | |
| Display Modes | |
|
|


 Great work Tony, I haven't progressed to MIG yet I'm still stuck in the oxy era.


 Linear Mode

