|
|
|
#2
 25-03-12, 13:30
|
||||
|
||||
|
Quote:
I can't bring myself to try Oxy. I could do great damage with one of those. The bottles alone cost a fortune! Yes, thats the reason, bottle price, not that those bloody things scare the hell out of me 
__________________
Ford CMP, 115" WB,1942 (Under Restoration...still) Medium sized, half fake, artillery piece project. (The 1/4 Pounder) 
|
|
#3
25-03-12, 19:35
|
|||
|
|||
|
Hi Tony
As you have figured out fatigue failure of the front doors of Patter 13 are extremely common. What is even more annoying is when they reoccur several years later. Hope to have found two of problems causing the occurrence: Welding up the crack on the outside doesn't really get the inner plate well attached. The inner plate were originally spot weld in place before the out side door skin was applied. One solution to this is to drill through the outer skin but not through the inner plate then plug weld the drill holes which welds the inner and outer layers together. The other cause of the re-occurrence of the fatigue crack or a loose feel to the door is a little strange, failure of the spot welds of outer skin where it is folded around the inner door panel. Tried rewelding with a pinch spot welder no good, just enough rust in the folded edge to prevent good weld. Solution was again to drill and plug weld the three layers of steel as both sides are exposed, drilled 1/4" through all three layers every two inches near the hinge. Then with a brass heat sink against one side just welded the holes up and ground them smooth. Re-occurrence of cracks also seems to happen when a fatigue crack is just welded up. I've been told that with cracks it is important to actual terminate them by drilling a small hole just past the end of the visible crack and then to actually cut the crack open to a with of 1/16 or even 1/8 of an inch then weld the joint up. This is supposed to be particularly important if the crack is to be ground smooth on one side. What has peoples experience been with this approach? Cheers Phil Cheers Phil
__________________
Phil Waterman `41 C60L Pattern 12 `42 C60S Radio Pattern 13 `45 HUP http://canadianmilitarypattern.com/ New e-mail Philip@canadianmilitarypattern.com
|
|
#4
25-03-12, 23:20
|
||||
|
||||
|
Thanks Phil,
That had not occured to me. Next weekend I will sand back around both hinges and follow your advice. Does the thick plate extend to whole size of the door edge? Is there a possibility of drilling through where the plate isn't? T.
__________________
Ford CMP, 115" WB,1942 (Under Restoration...still) Medium sized, half fake, artillery piece project. (The 1/4 Pounder)
|
|
#5
26-03-12, 17:32
|
|||
|
|||
|
Hi Tony
Just went out to the shop and looked in the doors of the HUP through the lock assembly hole. Both doors have full length plates which is much heavier gage steel than the door shell. One of mine my backing plates was loose enough that when drilling the holes it started pushing the backing plate away, so stuck the hinge in place with the bolts to hold the layers tight together while drilling and welding. Fix the front hinge area on my HUP for the first time some 25 years ago, so if the 2nd repair last as long I won't complain much. The loading on the hinges of the front door of the Pattern 13 are ridiculous because they are placed so close together. Interestingly the side and rear doors of the HUP have a hole at the bottom of the door that would allow you to slide a new or additional plate in. Not sure what that would do to the hinge alignment though. In the picture below you can see cracks in mine drivers side door, you are looking at the lower hinge are, if you look at the where the outer skin is folded over you can just see a little line of rust which is the area of movement between the outer skin and the inner door panel. 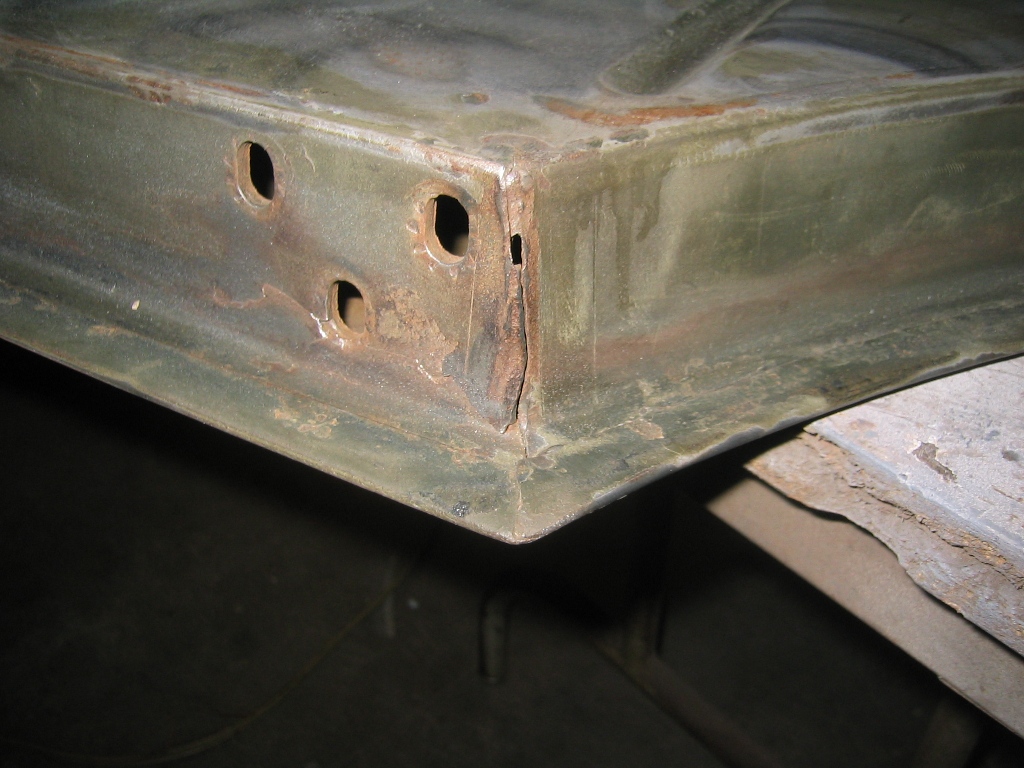 I'll try to remember to gather all of the door hinge before and after photos an post them on my web site. Hope this is of help to you and others at this point in their Pattern 13 restorations or ongoing maintenance. Cheers Phil
__________________
Phil Waterman `41 C60L Pattern 12 `42 C60S Radio Pattern 13 `45 HUP http://canadianmilitarypattern.com/ New e-mail Philip@canadianmilitarypattern.com
|
|
#6
27-03-12, 05:22
|
||||
|
||||
|
Thanks for the depth of info, Phil.
I'm glad you spoke up about this when you did, otherwise I would have been in for another repair far too soon. Pity we can't have better acces to the inside without major surgery, we could make the design virtually 'bullet proof'.........perhaps literally! 
__________________
Ford CMP, 115" WB,1942 (Under Restoration...still) Medium sized, half fake, artillery piece project. (The 1/4 Pounder)
|
|
#7
27-03-12, 11:20
|
||||
|
||||
|
passenger door damage 1.jpg passenger door damage 2.jpg passenger door damage 3.jpg passenger door damage 4.jpg passenger door damage 5.jpg
The second (passenger side) door has now been collected. I had always considered this door the worst condition, and while it is certainly in a bad way, I don't look at it with the same anxiety I did with driver side door. Still needs its share of working though! This one has a small but quite defined dent on the outside, about 1/3 down from the top. This I will certainly lift out part way with a welded stud and slide hammer (or whatever I can find to use). When applying filler to a flat panel, it is best to try to support from the inside to stop the flexing that occurs. Repair work is more likely to be without a visible border once painted. Because the door lock access opening is not the full size of door cross section, I will use/insert a wheelbarrow tube and inflate to fill the space. An old panelbeaters trick, tought to me by an old panelbeater! Jeezus I hate panelbeating I will also incorporate Phil's Technique to stabilise the inner hinge plate. Speaking of hinges, the 2 from this door are in great shape, and wil not need to have any attention.
__________________
Ford CMP, 115" WB,1942 (Under Restoration...still) Medium sized, half fake, artillery piece project. (The 1/4 Pounder)
|
 |
| Thread Tools | |
| Display Modes | |
|
|


 Great work Tony, I haven't progressed to MIG yet I'm still stuck in the oxy era.


 Hybrid Mode
