|
#511
 08-06-12, 11:14
|
||||
|
||||
|
Hi Tony,
Your large fishplates were posted today. Unfortunately I don't have the little brackets for the top. Evidently they didn't come with the pintle hook assy I bought. I must have been imagining them. However it looks like you have a pair on your F15 chassis, judging by pic 1 below. You could pinch those ones, although it would probably be less work to copy them and leave that crossmember undisturbed. You'll note on your F15 chassis that the rivets holding the rear spring hangers also hold the little top brackets in place. It's the same on all CMPs, even though the F15 springhanger itself is different from 4x4 models. This will give you the correct position for your rear crossmember. Depending where the previous owner drilled the spring hanger holes, you may not have enough chassis rail sticking out past the rear crossmember. Correct length is 13 1/2 inches from the rear edge of the spring hanger to the tip of the chassis rail (measured at the lower edge of the rail). This is more than just a cosmetic consideration - if you ever want to fit a pintle hook you'll need enough chassis rail sticking out (see pic 2). You can get by with as little as 7 inches (no wonder my girlfriend left me  ) if you're prepared to butt the pintle hook mount hard up against the rear spring hanger. Personally I'd prefer to drill new spring hanger holes to get the full 13 1/2 inches, for the sake of appearance. I imagine your chassis repair mob could do a good job, and maybe even rivet everything instead of using bolts. ) if you're prepared to butt the pintle hook mount hard up against the rear spring hanger. Personally I'd prefer to drill new spring hanger holes to get the full 13 1/2 inches, for the sake of appearance. I imagine your chassis repair mob could do a good job, and maybe even rivet everything instead of using bolts. Good luck with it all Tony, I look forward to seeing the result. Cheers
__________________
One of the original Australian CMP hunters. 
|
|
#512
08-06-12, 11:52
|
||||
|
||||
|
Hi again Tony,
It has just occurred to me that this pic demonstrates clearly why you'll need a fatter rear crossmember. Imagine sliding this F15 rear crossmember forward inside the chassis rails, to a point underneath the tyre somewhere. As you can see it would be very sloppy inside the chassis rail channel, because it's much wider there, due to the taper. This is exactly what you are doing by shortening your F60L chassis by a massive 43". Remember that the rearmost 7 foot or so of a blitz chassis is identical on all models, so in looking at this pic, you are looking at an F60L chassis. I realize it's difficult for you to visualize on your chassis, because the rear section is no longer there. Hopefully this pic helps. Cheers
__________________
One of the original Australian CMP hunters.
|
|
#513
08-06-12, 12:16
|
||||
|
||||
|
Firstly, Tony, NOW I get what you meant, and I am very relieved that I don't have to worry about chassis width. The length is enough of a headache as it is. I have read you PM, and thankyou!
This afternoon I got the canvas side curtains from the upholsterer. I am glad they are back so I don't need to write 'upholsterer' for much longer. I often spell it wrong and have to go back to fix up. Anyhoo, I am pleased with the finished product overall. My only criticism (that word's as bad as upholsterer  ) is that I wish I had asked for a green piping around the access flaps. The originals did have black too, but it seems the black stands out far more when it's new. Maybe I could dull it down with a little brown boot polish? Probably won't do that because I am likely to get some on the canvas. ) is that I wish I had asked for a green piping around the access flaps. The originals did have black too, but it seems the black stands out far more when it's new. Maybe I could dull it down with a little brown boot polish? Probably won't do that because I am likely to get some on the canvas.For those who are overly observant (yes, you Keith!  ), there is one fastener missing on each side of the windscreen support panel. I have two from the upholsterer (oh...that bloody word), but have not put them on yet. ), there is one fastener missing on each side of the windscreen support panel. I have two from the upholsterer (oh...that bloody word), but have not put them on yet.The slight warp of the canvas in front of door won't be as bad once the window support is moved back a little when the roof is to be attached. I measured it, to find it is too far forward, but without the roof to bring it to correct position, I will leave it where it is for now. If the canvas fits alright now, it should fit a bit better with roof on. The magnetic catches for the access flaps work as good as I had hoped. You wouldn't want to have used 'regular' magnets though, they wouldn't have been strong enough. I believe the little metal piece I welded to the frame where the magents are to stick to, caused a nightmare for the guys (notice I didn't use the word upholsterer......oh crap!) to sew around and they had to make a bit of a detour around this with one of the stitch runs. That's my fault entirely, and I will have to live with the result.
__________________
Ford CMP, 115" WB,1942 (Under Restoration...still) Medium sized, half fake, artillery piece project. (The 1/4 Pounder)
|
|
#514
08-06-12, 12:47
|
||||
|
||||
|
This afternoon I received the bridge loading plate I had ordered from Axholme Signs in U.K. See: http://www.axholmesigns.co.uk/
I had ordered a bridge plate, number for same and a reusable stencil for the fuel tanks saying "Caution, Do not overfill, Allow for expansion". The CMPs may or may not have had such a caution, but I will be greatful of the reminder with each filling of fuel. Lets face it, being a V8, it will happen often enough. Axholmes even sent an extra copy of the number sticker for bridge plate, as a spare. My reputation must have preceeded me! The bridge plate is NOS and nearly perfect condition, with only a couple of very small areas of paint chipped around the edges. I will see if I can find a flat yellow paint tomorrow at the paint shop, to touch these areas up. Care to place bets on my chances? Line marker yellow may be suitable. It's only for the damaged bits after all. 
__________________
Ford CMP, 115" WB,1942 (Under Restoration...still) Medium sized, half fake, artillery piece project. (The 1/4 Pounder)
|
|
#515
08-06-12, 13:31
|
|||
|
|||
|
Just a question on the tops , what happens when you open the door since the line through the hinge will cause the top to swing inwards, stretching the top flap. the originals ,with square top frame had a folded flap to allow for movement ?? .
__________________
macca C15 C15A
|
|
#516
08-06-12, 15:53
|
||||
|
||||
|
Helllo Bob,
That is an excellent question, and it was something I had worried about the whole time these things were under construction. Because of the chain of events as they transpired, I had no opportunity to test fit the old canvas. If you recall, I had taken the curtains in for a quote, accepted the quote, had the guys remove the steel frame for me to 'clean-up', and then found that the two original frames were different. At that point I called a stop to any potential work on the canvas until I could make new frames. In order for this to happen I had to have the doors on the cab to test frame fit. I figured I might as well finish doors completely, which meant lots of work, and considerable delay. In that whole time, I was fully aware I would not have any chance to test the fit of the canvas itself (they were already cut off the frames before this). For some reason I had felt it would be the design for the canvas tops to go a little slacker with door opening, but I was wrong entirely. In order for the guys to make these tops, they required some measurements from me. That being, distance of canvas from front edge of the steel frame of the curtain to corner of the windscreen support frame. Also needed to know the spacing of the fasteners along the windscreen support front edge. In my usual style, I gave them very precise measurements because I didn't want the thing to look loose once fasteners were clipped into place. Oh boy! By now I should have realised nothing is precise on these vehicles, and allowed additional length to be sure, but I calculated what I though was the exact size then added a 1/2" for good measure. I'm very pleased I did too. When the doors are opened, not only does the whole thing NOT loosen, it actually tightens up a little bit! Not enough to cause any problems or damage paint or canvas, but it can be felt if you push on the canvas before and after opening the doors. Here's where serendipity stepped in on my side. You may remember I indicated the window support panel sits slightly too far forward at the top? As luck /gods would have it, that is the reason why the tightening of the canvas occurs to the extent that it does now. The window panel top needs to be moved to the rear approx 1-2cm for roof to fit properly, perhaps even a little more. I have worked out that once this has occured, the tightening of the canvas should not occur anywhere near the extent it does now. Bearing in mind that it is quite OK now, the whole scenario should be almost entirely resolved with roof on and the windscreen panel in the propper place. Here's where you can learn from my mistakes. Always allow more than the 'minimum' when measuring anything like this on a CMP, and try to make sure you always have the opportunity to test fit anything before disassembling for repair. I should have known from the fitting of the doors some weeks ago, that NOTHING is precise in fit or construction. To attempt to make something so precise that it is at risk of failing is just asking for trouble. In this case I got away with it, but it could easily have gone the other way if I had, by pure chance, managed to have the windscreen support panel sitting in the correct position at time of measuring, or worse, if it had been sitting too far back. In that case the curtains would need to have the front strip cut off and a new bit added for extra length. Wouldn't that have looked great?
__________________
Ford CMP, 115" WB,1942 (Under Restoration...still) Medium sized, half fake, artillery piece project. (The 1/4 Pounder)
|
|
#517
09-06-12, 11:54
|
||||
|
||||
|
As usual, it was into town this morning, despite the rain & cold!
Did manage to find two suitable yellows at paint shop, so I can now touchup the paint chips on the bridge plate. Speaking of bridge plate, it's finished now. So is D ^ D markings on door tops. All signage on cabin now completed, thank goodness. Apart from a thorough tidy of the workshop, that's the sum total of todays output. I still have to finish the repair work on radiator air duct, after that its about time to return focus of attention back to chassis work. Tomorrow I am on the road to retrieve some parts a couple of fellows are holding for me. Into Brisbane first and then up to Warwick way. From memory, it's a 8-10hr round trip from home, so don't expect to hear from me tomorrow, unless I show the bits I have brought back
__________________
Ford CMP, 115" WB,1942 (Under Restoration...still) Medium sized, half fake, artillery piece project. (The 1/4 Pounder)
|
|
#518
09-06-12, 12:50
|
||||
|
||||
|
Tony,
I have a few sets of side curtains and the ww2 set has a bit of freedem to allow the door to open. Most blitz only need a LH side curtain as its only required to keep the driver mate happy. Check out Keiths site for more pics. http://www.oldcmp.net/canvas.html Cant wait ot see engine in and running.
__________________
Euan McDonald 4? C-GT (Aust) #8 44 C-GT (Aust) #9 42 Jeep, Trailer Aust 3 Welbike MK2 complete Welbike MK2 inconplete under resto C15A x3 C60S x1 ex ambo F60L x3 LP2a carrier SAR #4993. Trailer No27 Limber Trailer, Cario cargo Trailer, Pontoon semi Wiles Cooker 2 wheeled (jnr)
|
|
#519
09-06-12, 13:32
|
||||
|
||||
|
Euan,
Your photo shows one of the very few curtains I have seen which are made with the steel rod instead of the flat bar construction. I note there is also the triangle access flap like mine. I suspect my originals would have had a bit more 'slack' in them too, but the need for them to be disassembled for examination of construction method has now reduced them to a pile of rags. Very old and stinky rags at that. Mind, the the canvas was in dreadful state, so I don't feel any remorse with not being able to keep them as they were. The truly odd thing is that the rod frames were different to each other. One had the angle of windscreen slope, other was a simple rectangle. The rectangle one had a longer portion of canvas at front to accomodate the shorter frame, and still allow it to fit sloping windscreen. very strange! I still have the frames around. They will be kept for "Justin"
__________________
Ford CMP, 115" WB,1942 (Under Restoration...still) Medium sized, half fake, artillery piece project. (The 1/4 Pounder)
|
|
#520
12-06-12, 12:56
|
||||
|
||||
|
Didn't get a lot done yesterday. It was too cold to even put decent primer on the radiator air duct once I got the welding finished. Managed to put a light bit of etch primer, so long as I used the heat lamp to warm the panel before and after spraying. Amongst the things I retrieved Sunday, were two window frames. They both looked to be two of the most inact I had seen..............that was until I pulled one apart and found it completely rotten inside. Still, they didn't cost me anything, and perhaps the other one will be better. If nothing else, it has shown me how to get the glass out without breaking it. Only the bottom portion was rusted badly so I may use these to make one good one from both (they are both passenger side). Further items retrieved include (but not limited to): The 2 window frames, a good brake booster, repro reflectors x 4, Ford generator, some switch plates, brackets for side curtain bag (that hold the bag to cab rear, I think), V8 distributor caps, spark plug conduit tubes x2, Ford gearbox..................and last but not least............a new set of seals for the Ford vacuum brake booster. Not NOS, these were made in last couple of weeks by a company in Brisbane. They were not cheap, but very important to rebuilding the booster! I left home at 0600hrs Sunday and got home again 1900hrs. Took my boys new car and put over 800km on the clock! He wasn't too upset about that, but didn't appreciate the dirty, oily, crud covered gearbox being carried in the boot . Andy, if you are reading this, the rags did the trick. Not one bit of oil on the floor carpet of the car, and I didn't scratch the bumper getting it back out. While travelling one of the back roads 'en route', we 'discovered' an intact and very restorable Cab 11/12 in a paddock. Had intended to go back and call in there, but when we spoke about it to our host, he already knew the vehicle and it's not for sale! Apparently it's a fairly elderly gent that is going to restore it 'one day'.
__________________
Ford CMP, 115" WB,1942 (Under Restoration...still) Medium sized, half fake, artillery piece project. (The 1/4 Pounder)
|
|
#521
12-06-12, 15:31
|
|||
|
|||
|
Hi
Here is what I did when for a replacement windscreen frame rebuild, this was on my Pat 12 but I've been picking up spare M series frames to eventually replace one of the Pat 13 frames. http://canadianmilitarypattern.com/C...Windscreen.htm Cheers Phil
__________________
Phil Waterman `41 C60L Pattern 12 `42 C60S Radio Pattern 13 `45 HUP http://canadianmilitarypattern.com/ New e-mail Philip@canadianmilitarypattern.com
|
|
#522
13-06-12, 11:07
|
||||
|
||||
|
That was a good result not getting any oil leak out in the boot ....... the downside could be a gearbox ran with no lubrication
 On a seperate note, you are doing a superb craftsman's job mate 
__________________
AndyC 1943 Diamond T 969 1960s Land Rover wrecker project 1989 Nissan Cabstar GSTroop Carrier Interested in Bedford RL's, Timber Logging Cranes/Jinkers and Tow Wreckers
|
|
#523
13-06-12, 11:18
|
||||
|
||||
|
forgot to ask you sunday, there is a rear convoy light sat up in my rear chassis crossmember that I think used to shine down on the white paint on the rear axle centre, its no use to me, not sure of condition ..... sat in armchair, not shed at mo but you are welcome to it to refurb or copy etc
Let me know if you want it and I will take it off for you ?
__________________
AndyC 1943 Diamond T 969 1960s Land Rover wrecker project 1989 Nissan Cabstar GSTroop Carrier Interested in Bedford RL's, Timber Logging Cranes/Jinkers and Tow Wreckers
|
|
#524
14-06-12, 10:47
|
||||
|
||||
|
Andy,
Saw your post this morning but didn't have time to reply until now. Yes please to the convoy light! I'm sure I can make it good again with a little work. It's funny you should mention this, because I was following a military convoy earlier this week (Wide Bay Training Area, Camp Kerr) and noticed the truck I was behind had the white paint on diff centre for a 'Follow Me' light too. Wonder what sort of light they use currently. Thanks Andy, i'll get it next time i'm down your way. Some time in near future, you must come up here and I will take you to my 'secret' parts source. Tony, I think the chassis plates may have arrived at the post office today. I got the notice in letter box, and it says "Very Large White env." I'm not expecting anything else so I guess thats them. I'll get those tomorrow afternoon. Thanks heaps. Can you receive paypal $$$? Mike, Photos I took last weekend won't be good enough to send you. Was too overcast for natural light and photos with flash had flare. Expecting good weather this w/e so they will get done then and sent Monday. I haven't forgotten you! Worst case scenario, i'll send the original items for you to get scanned or copied at your end. Phil, I looked at your windscreen info! Had seen that some time ago but forgot about it, so it was good to see it again. At present, I haven't given up on cannibalising a larger number of frames to make two. Also know of someone who is said to have two frames that are without rust at all, so if I get lazy, I may even buy those..............after tax return received!! Sorry I haven't replied individually guys. Not been using computer much in last few days & things got overlooked temporarily.
__________________
Ford CMP, 115" WB,1942 (Under Restoration...still) Medium sized, half fake, artillery piece project. (The 1/4 Pounder)
|
|
#525
15-06-12, 12:37
|
||||
|
||||
|
Tony,
No worries, I thought you might like it so removed it, took pics .... and then forgot to email them to you  Looking at it, it would give a pencil beam effect, thought it was pointing forward along the chassis towards the winch area so dont know if its a convoy light or rigged up for operating the winch at night, it was fitted to the rear chassis crossmember with a domed bolthead, looked exactly like the rivets on the chassis but it was threaded and had a nut underneath.... maybe someone can confirm what it is ?? Sorry Guys, tried uploading pic and would not load, TONY, just emailed you the pic, maybe you can upload it 
__________________
AndyC 1943 Diamond T 969 1960s Land Rover wrecker project 1989 Nissan Cabstar GSTroop Carrier Interested in Bedford RL's, Timber Logging Cranes/Jinkers and Tow Wreckers
|
|
#526
16-06-12, 12:04
|
||||
|
||||
|
Cheers Andy,
As Ringo Starr would say, "Please excuse the lateness of my reply". I was in process of downloading a really interesting and complete manual for repair/maintenance of 40mm Bofors Gun. Finally got it finished at 0130hrs. I would highly recommend this site: http://www.hnsa.org/doc/index.htm for anyone interested in a range of military manuals, mostly naval, but not all. Some interesting photos of refloating the USS Missouri in 1950s. I didn't even know it had been grounded until I saw this website. I have downloaded the convoy light photos. Here they are! This is a photo of a Canadian convoy light I saved some time ago. It looks the same to me! Bracket would be easy to replace. I have written to Dean a little while ago, to thank him for the window frames. I mentioned the first one I started on, a few days ago. That one was disappointing and would require a great deal of remedial work. The second one on the other hand, was an entirely different story, I am pleased to say I will write more about that in next posting. I took photos to post too.
__________________
Ford CMP, 115" WB,1942 (Under Restoration...still) Medium sized, half fake, artillery piece project. (The 1/4 Pounder) Last edited by Private_collector; 16-06-12 at 12:25.
|
|
#527
16-06-12, 12:40
|
||||
|
||||
|
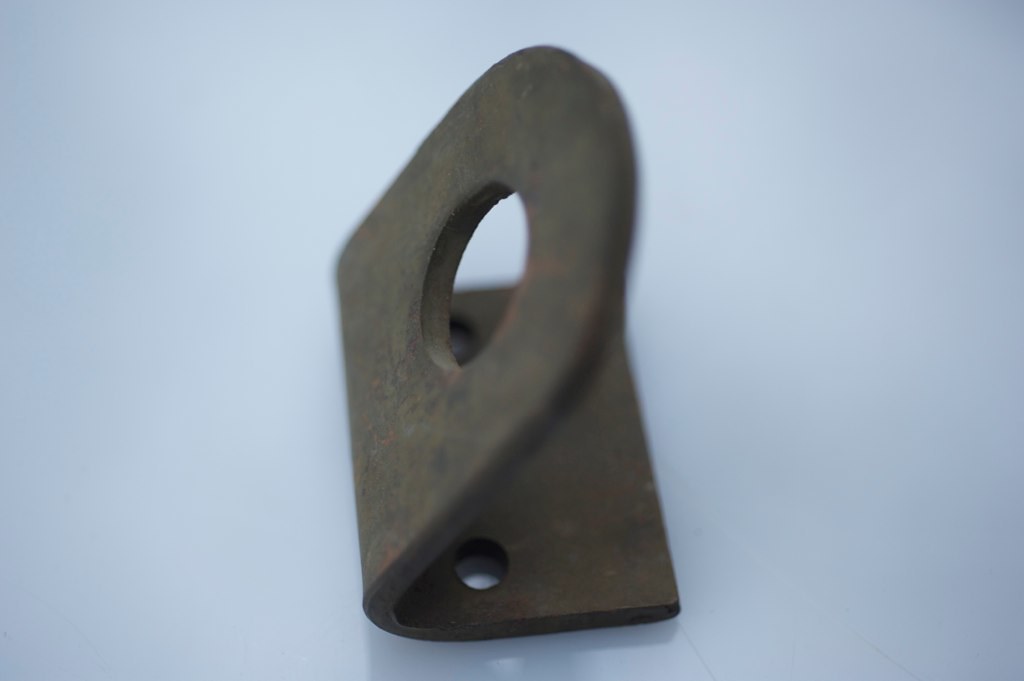
That's a front light bracket. The diff light one is different. I may have one if you're interested.
__________________
Film maker 42 FGT No8 (Aust) remains 42 FGT No9 (Aust) 42 F15 Keith Webb Macleod, Victoria Australia Also Canadian Military Pattern Vehicles group on Facebook https://www.facebook.com/groups/canadianmilitarypattern
|
|
#528
16-06-12, 12:42
|
|||
|
|||
|
Tony if the frames are stuffed have you given thought to making new ones? brass frame material available at Peter Jacksons trading as Old Era Services Ph 02 65582987.
__________________
macca C15 C15A
|
|
#529
16-06-12, 12:45
|
||||
|
||||
|
After a disappointing start last weekend, the second of the window frames picked up, has turned out to be a little treasure. This one has no holes in it anywhere on the outside, and I don't care about the two breaks in the window channel track. They will fill with Butyl sealant
I didn't dare expect anything other than flakes of rust, requiring a bit of welding at best. But I was pleasently surprised. A thorough beating with the wire cup and a few minutes work removing hard silicone sealer from the window channel, showed this to be best one I have gotten to date. Lathered all the rust with a good quality converter and put it to bed for the night. All going well tomorrow (bad weather predicted again), I hope to get the radiator air ducting painted, and should get primer on the window frame. I want to do some plastic filler smoothing along the rough edges of inside bottom track, where modest pitting has occured. If I get this done early and weather holds, I may get the color on window frame too! If I had known this frame would be a goer, I would have bought the rubber seals while in town today. Still, it'll keep for Monday P.M.
__________________
Ford CMP, 115" WB,1942 (Under Restoration...still) Medium sized, half fake, artillery piece project. (The 1/4 Pounder)
|
|
#530
16-06-12, 12:47
|
||||
|
||||
|
This is the one you're after:
 I may also have the original tail light wiring loom for Ford CMPs.
__________________
Film maker 42 FGT No8 (Aust) remains 42 FGT No9 (Aust) 42 F15 Keith Webb Macleod, Victoria Australia Also Canadian Military Pattern Vehicles group on Facebook https://www.facebook.com/groups/canadianmilitarypattern
|
|
#531
16-06-12, 12:48
|
||||
|
||||
|
Quote:
I will write it in my CMP diary & give em a call next week. Do I ask for CMP window frame stock, or what do they know it as? Added later: Here is PJs website http://www.jackson-s.com/olderaservices/
__________________
Ford CMP, 115" WB,1942 (Under Restoration...still) Medium sized, half fake, artillery piece project. (The 1/4 Pounder) Last edited by Private_collector; 16-06-12 at 14:57. Reason: added web address
|
|
#532
16-06-12, 12:53
|
||||
|
||||
|
This is what it should look like:

__________________
Film maker 42 FGT No8 (Aust) remains 42 FGT No9 (Aust) 42 F15 Keith Webb Macleod, Victoria Australia Also Canadian Military Pattern Vehicles group on Facebook https://www.facebook.com/groups/canadianmilitarypattern
|
|
#533
16-06-12, 12:56
|
||||
|
||||
|
Quote:
Re Wiring: Did you forget about looking for the front wiring for me? Remember I have a Cab 12 headlight wiring harness and need a cab 13 set instead. For that matter, I need ALL the wiring for a cab 13 With tax time coming up, i'm sure I can splurge for wiring harnesses!Let me know what you got that's in good condition, and prices please. I'm sure we can come to a deal
__________________
Ford CMP, 115" WB,1942 (Under Restoration...still) Medium sized, half fake, artillery piece project. (The 1/4 Pounder)
|
|
#534
16-06-12, 13:33
|
||||
|
||||
|
Well i'll be damned.
Most times I buy bolts from the local supplier, I pay via EFTPOS. When the total is less than $10, I may buy one of their 'handy' packs of washers, which contain a vast assortment of different sizes and types. This then brings the total above the minimum for EFPOS transaction. Each pack would have around 500 pieces! Anyhow, today I bought a plastic compartmentalised storage box, and planned to sort the washers into the different types. I had brought this box inside and my Wife asked what I was planning to do. Here's the amazing bit. While I have been working on tonights posts, she has been doing the sorting for me. If I sit here now, and look busy, the sorting will be all done by the time I 'get around to it'. Aint that nice? 
__________________
Ford CMP, 115" WB,1942 (Under Restoration...still) Medium sized, half fake, artillery piece project. (The 1/4 Pounder)
|
|
#535
16-06-12, 14:00
|
||||
|
||||
|
I told ya so!
__________________
Ford CMP, 115" WB,1942 (Under Restoration...still) Medium sized, half fake, artillery piece project. (The 1/4 Pounder)
|
|
#536
17-06-12, 12:25
|
||||
|
||||
|
Didn't get color on the window frame, but got to primer stage. I bought a pair of these NOS wiper motors about a year ago. This is the first trial fitting. They will do just fine, and they work too. At least this one does. The other is still sealed in it's wax covered box. David D, those window slides repaired great. Thanks!! Got a whole bunch of little parts painted with the radiator air ducting. Just before coming inside, I cut and cleaned a short length of window frame channel, to take to rubber shop tomorrow, so I get the right size rubber seal. There is a fair chance they will have the right seal stock already in store. I have found an issue with the window frame hinge mechanism. This being that the window does not want to swing to extent required for fully closed position. Something in the two pieces is stopping the free movement. It's not rust in the channel, and the two pieces slide along each other freely because I put a lot of time into the cleaning of the grooves, but window does not want to close fully. I can't see anything bent. Nothing looks out of place but will budge. I have a week to work it out, because it The window WILL be painted next weekend!
__________________
Ford CMP, 115" WB,1942 (Under Restoration...still) Medium sized, half fake, artillery piece project. (The 1/4 Pounder)
|
|
#537
17-06-12, 13:33
|
||||
|
||||
|
Hey Tony,
Never say Never ! I reckon my suggestion of a LRDG Blitz is a good one .... as no doors, no roof, no bonnet or much nosecone .... just think how much less bodywork ... and swearing plus you can cover any dings with a jerrycan or scrim net ... perfect
__________________
AndyC 1943 Diamond T 969 1960s Land Rover wrecker project 1989 Nissan Cabstar GSTroop Carrier Interested in Bedford RL's, Timber Logging Cranes/Jinkers and Tow Wreckers
|
|
#538
17-06-12, 13:43
|
||||
|
||||
|
Sorry Tony & Keith, totally missed the threads on the light, thr bracket on mine has a single hole but they do look very similar, I thought it as an original fitting as the domed nut matched all the chassis rivet heads exactly, its only when I checked underneath that i saw was it was threaded, it shearded as soon as I took a spanner to it, the bracket, casing etc is solid but the bulb holder is toast so will need a new one fitting.
On a seperate note ref the assorted washers box, I bought 2 with washers, small nuts and bolts in seperate compartments to make life easy ...... and then tripped carrying both in the shed ...... ended up scooping them all up and putting in an ice cream box
__________________
AndyC 1943 Diamond T 969 1960s Land Rover wrecker project 1989 Nissan Cabstar GSTroop Carrier Interested in Bedford RL's, Timber Logging Cranes/Jinkers and Tow Wreckers
|
|
#539
17-06-12, 16:37
|
|||
|
|||
|
Hi Tony
Things to check on Windscreen Hinge: Some of them had a soft gasket between the hinge and the frame that moves the hinge out about 1/16 of and inch. There is a notch in the hinge fore the wiper shaft if the notch in the inner and outer don't line up this can cause a problem. Are the screw heads that attach the hinge to the frame sticking up in the hinge when it is closed. I'll look at mine today to see if I can spot any other possible causes. Cheers Phil
__________________
Phil Waterman `41 C60L Pattern 12 `42 C60S Radio Pattern 13 `45 HUP http://canadianmilitarypattern.com/ New e-mail Philip@canadianmilitarypattern.com
|
|
#540
18-06-12, 11:23
|
||||
|
||||
|
Quote:
Have done that twice. Both times with same box of screws. Knocked it off the bench first time, then re-sorted and left on the floor, where I booted it and tipped em all out again.
__________________
Ford CMP, 115" WB,1942 (Under Restoration...still) Medium sized, half fake, artillery piece project. (The 1/4 Pounder)
|
 |
| Thread Tools | |
| Display Modes | |
|
|


 Linear Mode

