|
#781
 12-11-12, 12:12
|
||||
|
||||
|
Quote:
I would ask if it's for sale, but I haven't paid for the last bits yet. Don't forget to tell me how/where to send $$ via EFT. All I know how to do is paypal. Would be hard to wrap for postage too  T.
__________________
Ford CMP, 115" WB,1942 (Under Restoration...still) Medium sized, half fake, artillery piece project. (The 1/4 Pounder) 
|
|
#782
12-11-12, 12:40
|
||||
|
||||
|
Took the scrap cab I got yesterday off the trailer this morning and started removing the sunshine roof frame, Bren Gun mount thingy and some other little but potentially useful parts. The roof frame is in excellent condition. It cleaned up very well, with the wire brush, and I will take it in for blasting later this week. This bracket is not tooooooo bad, I guess. It will need the remains of both the locking bolts to be drilled out and retapped. Also, where there is two layers of steel plate laying together, the rust between em has forced them apart a little. Thats not hard to fix but takes time I don't want to waste now. Onto the parts shelves it goes for later. This is the windscreen frame (passenger side) that I intend to use for driver side. I can't think of any reason why I couldn't turn the lower part of frame around, making the opposite side frame. I did try to drill out the bolts that hold the top and bottom sections together, and that's when I discovered that the drill bit/s I had available would have trouble going through cheese, let alone good steel. New drill set to be bought tomorrow, when i'm in town to dispose of the cab remains.
__________________
Ford CMP, 115" WB,1942 (Under Restoration...still) Medium sized, half fake, artillery piece project. (The 1/4 Pounder)
|
|
#783
12-11-12, 13:06
|
||||
|
||||
|
Got a ratty bumper bar yesterday, I wanted it for the two towing loop brackets that also secure the sprung bumper frame. That spring frame is not bad either, and will be kept. The bar itself is bent like a banana. Useless except for scrap value. The bumper bar brackets are worth keeping, but I don't understand why the larger one (with Y piece) has thick metal spacers between bar and bracket. The other bracket does not. They don't look to have been butchered, and look as if they may have been there from original production?!?!? Reassembled the tyre pump, last Saturday, for something different to do. Advice from the engineering works has it that the chassis should be ready for me to collect tomorrow. I will want to see this for myself before I hire a trailer for return home. Unfortunately 'should' is a very loosely used word.
__________________
Ford CMP, 115" WB,1942 (Under Restoration...still) Medium sized, half fake, artillery piece project. (The 1/4 Pounder)
|
|
#784
12-11-12, 23:49
|
|||
|
|||
|
Quote:
Those spacers are correct according to quite a few Blitzes I have seen including mine. Without them they bumper would be cocked off perpendicular to the frame. Why they are there is the big question? Perhaps a design mistake on the dimensions of the Y bracket from day one fixed with a relatively inexpensive cast iron "dog bone". Maybe someone has the definitive answer out there, but they are correct and do belong there. Brgds, Jacques
__________________
F15-A 1942 Battery Staff Jacques Reed
|
|
#785
13-11-12, 00:17
|
||||
|
||||
|
Yes, they belong there and I think you're right Jacques, but as to why they didn't just modify the brackets to make it fit is a mystery to me.
That bumper is a 44/45 pattern one with the spring bumper (as it's called in the publications of the time) mounted in front rather than behind the bar. It should also have small holes at the ends where the jewels (green reflectors) normally go. Quote:
__________________
Film maker 42 FGT No8 (Aust) remains 42 FGT No9 (Aust) 42 F15 Keith Webb Macleod, Victoria Australia Also Canadian Military Pattern Vehicles group on Facebook https://www.facebook.com/groups/canadianmilitarypattern
|
|
#786
13-11-12, 03:17
|
||||
|
||||
|
Keith, you are correct about the bumper. It does indeed have the small holes on ends. Unfortunately it is way too far gone to be repaired, and as such, it was disposed of as scrap this morning along with the Chev cab remains. Now that I think about it, I have another of the Y shaped bumper brackets where one of the forks is shorter, and other is longer by precisely the thickness of the "dog bone" spacer as Jacques termed it. That is even stranger to understand. That one suggests manufacture in a change over of design??
I have been scouring internet in search of the correct muffler body for exhaust system. Not found one as yet. Are there any suppliers in Australia? After I placed my postings last night, I realised I had made no mention of a curious pair of parts on cab rear panel. One piece being a bracket for securing a round object vertically, which was welded on the line where roof & lower rear panel bolt together. Other part was a strip of metal welded at both ends and bulging out in a curve between the welded ends, of approximately 12" across and bulging roughly 3" out of flat. I take it that these are where a shovel was stored?! These probably wont be mounted on my vehicle. I have no intention of welding onto the now finished cab rear, and I dont think bolting it on would give as good an appearance. Also salvaged a long folded metal strip and some matching smaller brackets that have eyelets for tying the canvas roof to. While scavengong with me on Sunday, Andy spotted and brought to my attention a vintage prime mover turntable which was still mounted on rear of a CMP. I didnt make a serious enquiry about that on the day, mostly because of the excitement of visual sensory overload which comes of trying to scan eyes everywhere, in case you miss something. I intend to speak with the owner in coming days, and will ask about that then. I'm still notconvinced that I want to restore my vehicle as a F60T, but it would be good to keep the option open for now. If I recall correctly, there was a member asking about locating some rifle clips. There were 2 on the scrap cab. Both different, and welded to cab instead of bolted as mine are. I will find out who that was and ask if still looking for some. The smaller of the two clips has me confused as to what it was to be used with. Could it possibly be for a No. 4 L.E.? As far as I know we Australians used either No. 1 Mk. 3* or (in limited numbers) the No. 5 Lee Enfield as the weapons of choice. As Andy pointed out to me, the Bren Gun would bo too long for it to clip there, unless barrel removed possibly. I wouldnt have thought the practice would be to remove a barrel, as requests for enemy to hold fire until barrel reinstalled would almost certainly be met with non compliance.
__________________
Ford CMP, 115" WB,1942 (Under Restoration...still) Medium sized, half fake, artillery piece project. (The 1/4 Pounder) Last edited by Private_collector; 13-11-12 at 03:25.
|
|
#787
13-11-12, 04:56
|
||||
|
||||
|
Tony,
When you scraped the roof remains did you notice the remains of a bracket protruding from the front of the roof? This was a sun compass mount found on sunshine roof's. The sunshine roof's were only found on C15A, F15A and the odd C/FGT#6. Do you have the angle bracket that secures the canvas inside the front of the roof? (I have repos available). You are correct regarding the shovel bracket inside the rear of the cab. I have also see them mounted off the rear of the step / corner of cab.
__________________
Euan McDonald 4? C-GT (Aust) #8 44 C-GT (Aust) #9 42 Jeep, Trailer Aust 3 Welbike MK2 complete Welbike MK2 inconplete under resto C15A x3 C60S x1 ex ambo F60L x3 LP2a carrier SAR #4993. Trailer No27 Limber Trailer, Cario cargo Trailer, Pontoon semi Wiles Cooker 2 wheeled (jnr)
|
|
#788
13-11-12, 08:40
|
||||
|
||||
|
Didn't see any hint of bracket on front outside cab, but there are the two places where canvas attaches inside cab front. At least, I think that is the same thing. I'll get a photo to show you what I have. If it is the same thing, the bolt part is gone on both. I did see a large wing nut amongst the folliage on cab floor. Wished I had kept it now.
I did find a bracket on right side which Has a little piece attached that would hold a sun visor. I'll take photo of that too.
__________________
Ford CMP, 115" WB,1942 (Under Restoration...still) Medium sized, half fake, artillery piece project. (The 1/4 Pounder) Last edited by Private_collector; 16-11-12 at 11:29.
|
|
#789
13-11-12, 11:48
|
||||
|
||||
|
Euan,
Assuming I have photographed the correct piece, this is how the brackets on mine look. Not exactly like your posted photo. I like yours better. Would be keen to see the repro pieces you have. Though this type of roof is not indigenous to my truck, I really like the look and will install one. I have several cab rooves, so I can do one with a hatch as well......later.These are the shovel holder parts I saved. This is the sun visor bracket I removed. Was this original??? If so, I will see that it gets reinstalled on my roof. These are the surviving parts of the canvas tie down at cab rear. I also saved the remains of system of securing what I guess to be a canvas cover for rear window opening. Sorry I didn't take photo of that this evening. When I said 'scrap' for the cab remains after I finished, it really was devoid of anything useful. I even kept the best of the two metal rifle butt blocks. Well, best as far as you can still tell the dimensions and has the original felt lining, which is totally buggered, of course! My Tetanus inoculation is up to date! In my next posting you will see why I got sidetracked just as dusk approached 
__________________
Ford CMP, 115" WB,1942 (Under Restoration...still) Medium sized, half fake, artillery piece project. (The 1/4 Pounder)
|
|
#790
13-11-12, 12:11
|
||||
|
||||
|
Quote:
H.
__________________
Regards, Hanno --------------------------
|
|
#791
13-11-12, 12:15
|
||||
|
||||
|
Just before stumps, I made a start on disassembling the passenger side window frame that I intend to reverse, effectively making the driver side.
The original bolts that hold the two pieces together were intact but would not budge, and needed to be drilled out. Today was the day that my drill decided to drop dead. I was given this drill by my Father on my 16th birthday. I didn't think this tool would ever fail. It's given faultless & faithful service for many a year, and it saddens me that I have lost this piece of history! I will find an identical one some day & fix it! Ran the wire cup over the frame quickly, in the now twilight, using mostly 'The Force' to know when I had removed all the paint. This frame has only ever had the one layer of paint. Olive Drab, and tough as nails. What did they know about paint 70 years ago that we don't know now? I previously described this frame as 'entirely without rust'. That was not exactly correct. This is the patch of rot I found on what will now be the outside of the frame. A tiny smear of filler and a lick of sandpaper will see it to rights. All the rubber seal came away, and didn't put up much of a fight against a screwdriver blade. The glass channel still had the fibre bead bed intact. I couldn't save it all, and wouldn't have used it even if I could get it out undamaged. You can see lengths of that beading in the first two photos.
__________________
Ford CMP, 115" WB,1942 (Under Restoration...still) Medium sized, half fake, artillery piece project. (The 1/4 Pounder)
|
|
#792
13-11-12, 12:27
|
||||
|
||||
|
Quote:
I'll contact the owner of the turntable and ask about a price. It is amongst the wrecks which I have posted about a couple of weeks ago. That's where the window frame came from last weekend too. From what I have been told, those wrecks will go to auction in coming weeks/months. If auction becomes definate, I will advise this on MLU. Here's a heads up: Amongst these trucks, are at least 4 USABLE doors. mostly Chev, but very suitable for rebuilding. In fact, two of em are better than the ones I repaired for my truck!
__________________
Ford CMP, 115" WB,1942 (Under Restoration...still) Medium sized, half fake, artillery piece project. (The 1/4 Pounder)
|
|
#793
14-11-12, 04:30
|
|||
|
|||
|
Quote:
According to an earlier wartime 4 x2 Ford Truck manual I had, the mufflers were 18" long, 6" in diameter with a 2" inlet and a 1-7/8" outlet. Assuming they were standard accross the Ford truck range I obtained an Australian made Redback Muffler, Universal fit No 0544L. Same length and diameter but with both inlet and outlet 2". I worked at Midas muffler as a teenager and was told the main reason inlets and outlet sizes were different was to ensure they went on the correct way round. As long as the Redback goes on the correct way, label to the inlet, there is no problem and no one would notice a 1/8" bigger diameter tailpipe. Cheers,
__________________
F15-A 1942 Battery Staff Jacques Reed
|
|
#794
14-11-12, 07:21
|
||||
|
||||
|
Thanks for the info Jacques. I thought I had seen a diagram with a muffler that bulged out in a dome at each end. No immediate recollection where I thought I saw this, and most likely thinking of another vehicle. I am a little relieved this isn't for CMP. Wasn't looking forward to recreating the domes.
I spent the A.M in workshop (actually outside in the sun) stripping and priming the windscreen frame. Some may recall that when I did the passenger side window, I had trouble getting the hinge to allow window frame back to the closed position. No such problem this time. I beat the snot out of top part of the hinge, effectively allowing easier 'closed' movement. Hope it still opens more that 1/4" now. Andy, if you are reading this, I have made one very good handbrake lever & ratchet/ratshit from one we got Sunday & stuff I had in stores. I'll take photos of todays work when I can. This evening is my Sons graduation, so work ceased early.
__________________
Ford CMP, 115" WB,1942 (Under Restoration...still) Medium sized, half fake, artillery piece project. (The 1/4 Pounder)
|
|
#795
14-11-12, 12:29
|
||||
|
||||
|
__________________
Ford CMP, 115" WB,1942 (Under Restoration...still) Medium sized, half fake, artillery piece project. (The 1/4 Pounder)
|
|
#796
14-11-12, 13:38
|
|||
|
|||
|
Quote:
My low mileage Cab12 is still fitted with its factory fitted muffler and fan belts. The muffler ends are domed a bit but I am sure that straight ends will suffice. I cannot get a photo for you for a few days as that one is stored at a mates place at present and I won't be gong there for a week or two. The fan belts have "Ford" visible on the outer flat. I picked up 8 or 9 mufflers with flat ends at a disposals joint about 8 years ago. Two for the carrier, two for the Ford Lynx one each for the Cab11 and Cab12 and a couple of spares. These are replacement muffler for Ford vehicles. The graduation night looks like it was a great success. Regards Rick.
__________________
1916 Albion A10 1942 White Scoutcar 1940 Chev Staff Car 1940 F30S Cab11 1940 Chev WA LRDG "Te Hai" 1941 F60L Cab12 1943 Ford Lynx 1942 Bren Gun Carrier VR no.2250 Humber FV1601A Saracen Mk1(?) 25pdr. 1940 Weir No.266 25pdr. Australian Short No.185 (?) KVE Member. Last edited by Hanno Spoelstra; 15-11-12 at 08:28. Reason: Formatting
|
|
#797
14-11-12, 22:54
|
||||
|
||||
|
Hi Rick,
Cheers for that. Dont stress about pics too much. Theres no hurry, thats for sure. It's good to know that my memory has not failed me entirely. I had a pipe dream about using two old plow discs welded to the ends of muffler to duplicate the mild doming effect, when I had the additional thought.........Stuff That, it's bound to look like a total bollocks up! My Sons graduation night was certainly a lavish affair. I took that photo while waiting for the meal to be served. We were table 24 of about 30. Meal serving started at table one! I did the posting from my mobile phone, knowing it could be difficult to post, because I never used phone with internet before. Being at table 24, I figured I had the time to figure it out before the food arrived. The reality was that after working out the posting, l still had enough time to write a couple of books, The Underachievers Guide to Extremely Small business, and, I Made a Hundred Dollars in Real Estate. I was part way through a third one, Body Language for Epileptics, when the food arrived
__________________
Ford CMP, 115" WB,1942 (Under Restoration...still) Medium sized, half fake, artillery piece project. (The 1/4 Pounder)
|
|
#798
15-11-12, 01:43
|
||||
|
||||
|
Hey Tony,
Maybe the steering box is like old Land Rovers..... when its not leaking, it means its emply  I always used Robert's method of cereal packets as they are free and once in place absorb the oil, expand and help seal, with this homemade gasket along with the instant gasket I reckon you may crack it ! In this modern day world of Health & Safety .... ''This product will contain Nuts and this method could get you labelled as a Cereal Killer'' 
__________________
AndyC 1943 Diamond T 969 1960s Land Rover wrecker project 1989 Nissan Cabstar GSTroop Carrier Interested in Bedford RL's, Timber Logging Cranes/Jinkers and Tow Wreckers
|
|
#799
16-11-12, 11:28
|
||||
|
||||
|
I had ordered a pair of brake & clutch pedals (Ford) through ebay on Tuesday. They arrived this afternoon, and are a perfect fit!
Initially, I was unsure what style the rubber should be, but saw two vehicles last weekend that still had their originals, albeit badly decomposed and dried rubber. Both matched the pads I have bought. These cost me $12AUD each, and both were shipped from interstate Australia for $9AUD. So for $33 I now have perfect pedals. I'll be spending this evening modifying (cutting) a length of rubber windscreen seal that will be installed on the driver side. Didn't get a chance to do anything today, but should have the window frame sanded, reprimed, and possibly even painted tomorrow. Having said that, weather forcasts foretell heavy thinderstorms over weekend, so these plans may change.
__________________
Ford CMP, 115" WB,1942 (Under Restoration...still) Medium sized, half fake, artillery piece project. (The 1/4 Pounder)
|
|
#800
17-11-12, 23:06
|
||||
|
||||
|
Windscreen frame for driver side is now ready for painting. Sanded the putty yesterday afternoon, and reprimed a single light coat for protection from elements until painting gets done. I had forgotten what a pain it was removing all the paint from wiper motor body. It was original military dark green color, but had to come off as areas were flaking from 70 years of aging. Painting over this, even if I could have sanded edges, would be a very poor decision. For all painted surfaces, my preference is to remove ALL previous paint, no matter how sound it first looks. Some very unusual things can (and do) occur days, weeks, months and even years after finished. Painting is easy, preparation is a pain in the sphincter! Hand brake lever assembly has been stripped, cleaned out and primed, to be painted with the windscreen frame. The lever assembly is a mox of parts from two vehicles. Some of those parts came from last weekends pilgramage to CMP wreck mecca. The new windscreen rubber is now ready. It was created on Saturday night, by modifying an over the counter piece of Ll shaped seal, removing one of the two 'sides', making it an L shape instead. the long side of the 'L' goes on the outside, with butly mastic sealing the inner edge. Gives quite a neat look, but I would remove it in a heart-beat if I could get my hands on some of the original fibre seal. Now that I know what original jointing for screen glass looked like, i'm not surprised the glass channels rusted heavily. I expect the fibrous, almost cardboard, original screen seal would hold moisture very nicely, brining on the oxidising process+++. Still, as the original item, I would prefer it, but have never seen any! I am hoping to get the parts painting done today, but that may not happen if weather does not change. There has been light rain all through the night, and lots of lightning. If not too much rain, it's a good day for mowing. Very little rain has fallen in many weeks and now is best chance to avoid the cloud of dust normally associated with mowing over dry ground.
__________________
Ford CMP, 115" WB,1942 (Under Restoration...still) Medium sized, half fake, artillery piece project. (The 1/4 Pounder)
|
|
#801
18-11-12, 16:06
|
|||
|
|||
|
Hi Tony
How or what method are you going to use to protect the inside of the windscreen frame to prevent this happening again? 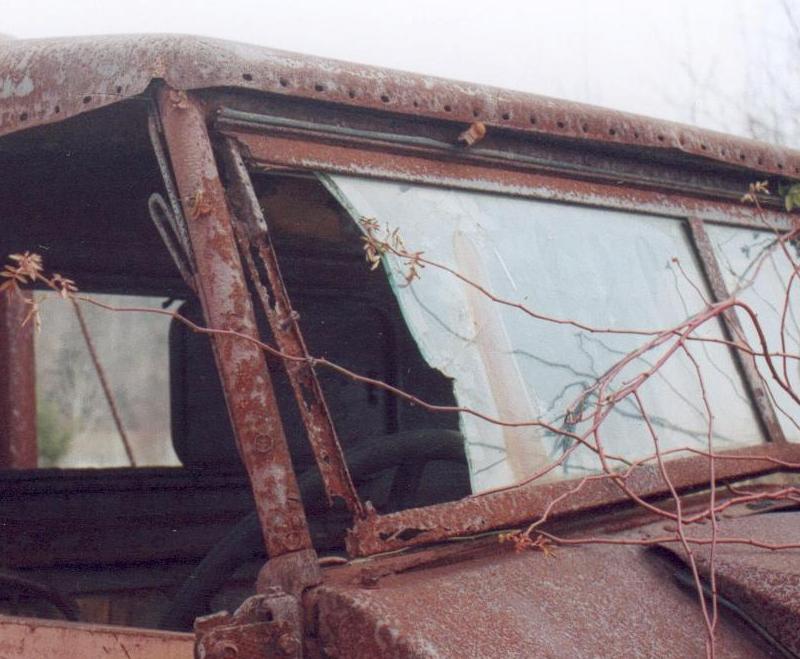 As the frames always seem to rust out or suffer frost expansion if you live in cold climates wonder what you were or are going to do. I've poured paint through mine but I'm think pumping them full of some cosmoline like substance. Though my trucks live indoors most of the time they do get out in the rain enough to have water get into the frames. Any thoughts? As always I enjoy watching your progress and problem solving. Cheers Phil
__________________
Phil Waterman `41 C60L Pattern 12 `42 C60S Radio Pattern 13 `45 HUP http://canadianmilitarypattern.com/ New e-mail Philip@canadianmilitarypattern.com
|
|
#802
18-11-12, 22:04
|
||||
|
||||
|
Hey Phil,
Once the two pieces of frame are together, I spray a rustproofing compound such as Tectyl or Fisholine, in through one of the sliding hinge holes. I don't go overboard with it though, because depending which you use, it can slosh around and seep out. I tilt the frame around, so that the fluid reaches all areas, then angle frame in such as way as to allow excess to drain out. If in any doubt that frame may require welding in future, don't even consider rustproofing. I'm lucky in this part of the world, we don't get snow, rarely get frosts, truck lives undercover and always will. I wont be taking truck out in poor weather for a number of reasons, includingpreventing corrosion. That said, it is gonna get cought out in rain some time! Don't know what types of spray rustproofing you have there, but one of the best penetrating I believe, is Fisholine, a relatively thin compound that gets in seams, crevices etc, and the manufcaturers state it can stop rusting if completely covering the rusted area. I first used this stuff when I was painting classic & vintage cars in 1980s. Back then, Fisholine, as name suggests, had a horrible & almost overpowering fishy smell. Since then, the manufacturers have 'deodorised' the smell away........almost! Fisholine remains fluid consistency for ages, hence the excellent penetration. Tectyl by comparisn, has no offensive odour, is more viscous (spelling?) and forms a skimming surface within hours or days, depending on temp etc. The thicker consistency of Tectyl has created problems when it has been accidentaly sprayed into door window sliding tracks, mechanisms of same, or blocks the drainage channels to doors and such. I will be spraying Fisholine into the doors of my truck, a bit further down the track. I can virtually guarantee it wont interfere with the window glass or winder mechanism.
__________________
Ford CMP, 115" WB,1942 (Under Restoration...still) Medium sized, half fake, artillery piece project. (The 1/4 Pounder)
|
|
#803
21-11-12, 01:00
|
||||
|
||||
|
Just a quick posting to say I visited the engineering works this morning, and they are part way through the job.
Both replacement sections to rear of the rails are fabricated and tacked in place, fish plates are bolted on, and two of the three minor crack repairs are completed. Well, actually there are two cracks & one area requiring patch repair. That one spot is on the transmission cross-member where someone had cut a jaggedy hole. Things are on track for me gettting it back this Saturday!!!!!! I have $10 that i'll bet I can't get a hire trailer for this Saturday.
__________________
Ford CMP, 115" WB,1942 (Under Restoration...still) Medium sized, half fake, artillery piece project. (The 1/4 Pounder) Last edited by Private_collector; 21-11-12 at 11:51.
|
|
#804
21-11-12, 11:48
|
||||
|
||||
|
As they specialise in large truck repairs & body fabrication, I enquired about purchasing a suitable turntable when inspecting my chassis repair progress at the engineering works this morning. I meant to ask about this last week but didn't get an opportunity. My timing is as good as always, because there WERE some tired (read as 'stuffed') units up the back of the yard until a little while ago, at which time they were removed and sent for scrap! Lucky me!
Because they often come across turntables in need of replacement (read again as 'stuffed'), they will have more at some point in the future, and I have asked to be contacted once something suitable turns up. Cost will be negligable on such items. I have no intentions to ever use the vehicle to tow a trailer rig so an old one won't be an issue for me. In fact I would have the damn thing permanently disabled, to avoid having to register as a prime mover, and require an articulated licence. For now, I just wait. I'm used to that. Don't like it, but used to it.
__________________
Ford CMP, 115" WB,1942 (Under Restoration...still) Medium sized, half fake, artillery piece project. (The 1/4 Pounder)
|
|
#805
22-11-12, 12:36
|
||||
|
||||
|
That hand brake lever came up fairly good. Certainly a little better than when you saw it last, I hope. Finished it while doing the windscreen frame painting, to make mixing the paint worthwhile. Yet another part to store carefully until needed in months/years. I reassembled the driver side windscreen this evening. Hmmmm, it's OK I guess, but not perfect. Temporarily installed the outer seal and cut the corners, ready to glue tomorrow afternoon. It's funny to see so many restored vehicles which don't have the outer seal parts joined together, just all sitting there seperately. All for the want of a 'bees' of super glue. Just leave a slight bit more length than minimum. The rubber may shrink over time. From my experiments, the glue wouldn't break though. I did a test on a scrap piece before I did passenger side, and flexed the joint back & forth for a couple of days, until I got sick of that and pulled the bits apart. Glue remained, rubber broke apart. I have booked the car transporter trailer for 0800hrs Saturday A.M, so I am going to get the chassis, one way or another. Not losing my rental money! It better be ready for me, or.........."Don't make me angry, you wouldn't like me when i'm angry"
__________________
Ford CMP, 115" WB,1942 (Under Restoration...still) Medium sized, half fake, artillery piece project. (The 1/4 Pounder)
|
|
#806
25-11-12, 22:19
|
||||
|
||||
|
Saturday morning I got the chassis back. As usual, it wasnt ready when I arrived to get it. One weld repair, and the holes for the two pintle brackets were not done. Despite me providing a photo, the guy that made the cross member fabricated it the way they do for large trucks and not as per the clear photo I had supplied.
I am grateful that all the holes line up, and after I did an awful lot of cleaning, smoothing and etch priming, I tightened the bolts and checked the chassis alignment. Almost dead straight! Photos will follow when I get back to my computer. This portable device doesnt shrink the photo size easily.
__________________
Ford CMP, 115" WB,1942 (Under Restoration...still) Medium sized, half fake, artillery piece project. (The 1/4 Pounder)
|
|
#807
28-11-12, 12:37
|
||||
|
||||
|
Finally back on the computer again. Here are the photos showing current state of chassis. Waited 2 hours while they finished the work that was 'ready' for me to pick up. It did give me opportunity to see how they drill holes, and how they cut larger round holes using the Oxy-Acetyline torch. That was quite impressive to see actually. I took the pintle brackets off before I attempted to trailer the chassis home. They would have been too heavy for me to safely 'wheel' the chassis around on the axle I have temporarily chanied, for mobility. I kept a real good watch on the rail alignment as I torqued each of the bolts around the rear member etc. Pleased to say it wouldn't be more than 2mm out of true! Yay!! You will note that the rear cross member has a cut-out section at each end, unlike original. This annoys me, but in reviewing the photo I had given them, the ends of the rear member are actually VERY difficult to see in the photo, not that I believe the photo ever was shown to the guy that did the work! This method is how they do all replacement cross members for the heavy vehicles they do. It's supposed to give greater ability to flex. I have no plans to alter this now. I will be putting a second bolt on top surface of the cross member, and will need to add another hole underneath, where the spring hanger bolts through chassis base. The new sections of chassis rails look good, too good really, because it's the only part of the chassis that doesn't have a surplus of holes along it. It is ironic that I finally get the bloody thing home, just days before we all depart for annual holiday, so no work will be done for roughly the next 2 weeks. The new security system and neighbour with 12ga will deter would-be thieves in our absence. I will have my tablet device with me on holiday, and hope to be able to post from a 'historically significant' location.....or two
__________________
Ford CMP, 115" WB,1942 (Under Restoration...still) Medium sized, half fake, artillery piece project. (The 1/4 Pounder)
|
|
#809
28-11-12, 13:24
|
||||
|
||||
|
Quote:
Once I actually get the frame painted, a number of things should go straight on. Especially those bits I worked on while without the chassis. Both steps, both tanks, brake master & booster, Pedal levers, etc.. When I get back from the trip, I hope to have enough $$$ left over to buy a wiring harness ASAP. I'm also biding my time, trying to catch a former neighbour who is a retired mechanic. He may be enticed to do the engine rebuild for me. No hurry with that stage, just want it done well.
__________________
Ford CMP, 115" WB,1942 (Under Restoration...still) Medium sized, half fake, artillery piece project. (The 1/4 Pounder)
|
|
#810
07-12-12, 19:47
|
||||
|
||||
|
Good morning, and greetings from Honolulu, on the morning of December 7th, the seventy first anniversary of the bombing of Pearl Harbor.
We arrived here early on December 2nd, local time, and have been touring Oahu and also the island of Hawai'i, known simply as "The 'Big' Island". The morning we checked into our hotel I met a gentleman in the hotel elevator who is one of the dwindling ranks of the Pearl Harbor Survivors Association. He is a tour volunteer at Pearl Harbor, and will be here doing that for the next month. Such a delightfully friendly old chap whose name eludes me for the moment. I see this fellow most days and hope to get his photograph (and name again) soon. Because I am using the 'tablet' device, I dont have easy way of uploading photos to MLU unless they are taken with phone, which is considerably lower quality than the camera I am carrying. It was my desire to attend the commemorations at Pearl Harbor this morning, but now know it is to be a closed program for veterans, families of deceased veterans and of course dignitaries. This afternoon, Pearl Harbor is once again open to the public, and I plan to visis then. I may even see my newly acquired friend then. This evening at 1800hrs there will be a large parade through Waikiki, which leaves Fort Derussy, heading eastward through Wakiki in direction of Honolulu Zoo. From the list of parade participants it seems to be more of a social event as opposed to a historical commemoration, but time will tell if this is indeed the case. Obviously I will watch the parade and take copious photos. I will also carry my phone, to take a few photos for MLU posting. You may recall I posted one photo of my Sons graduation evening some time ago now, and that was primarily to see if phone photos were sufficiently small enough not to choke while uploading to MLU. At time of finishing this post, it is approaching 7:55am, the exact time hell broke loose at Pearl Harbor. I am dissapointed to report that a scan through local television channels has proven fruitless for any coverage of the ceremony which is either in progress or about to commence. In fact, a number of the locals had forgotten the signifigance of today. Not all that is, but some. Lest We Forget.
__________________
Ford CMP, 115" WB,1942 (Under Restoration...still) Medium sized, half fake, artillery piece project. (The 1/4 Pounder) Last edited by Private_collector; 08-12-12 at 10:22.
|
 |
| Thread Tools | |
| Display Modes | |
|
|


 Linear Mode

