|
#91
 06-04-13, 11:33
|
||||
|
||||
|
Hi guys,
Still working on the brakes. All disassembled now, well nearly. What is a good source of Ford Brake cylinder rebuild kits or rubber seal kits? Also, I have 20litres of army green acrylic lacquer which I will be using to paint the old truck. Does anyone know what sort of primer I should use under it? 
__________________
Blitz books. 
|
|
#92
07-04-13, 05:31
|
||||
|
||||
|
Cleaned the brake master cylinder today and was in the process of reassembling it when I broke the retaining internal circlip ( part no. 2174 ).
Can these be bought seperatly?
__________________
Blitz books.
|
|
#93
07-04-13, 12:54
|
||||
|
||||
|
Quote:
Acrylic over enamel will cause the enamel to react very badly to the solvents in the acrylic (thinner). You get a problem known as 'frying', where the enamel will wrinkle dramatically and come away from the surface it's covering. It can be mild, or it can look severe enough to appear as though you have just put a coat of paint stripper on it. Acrylic can be satisfactorily sprayed over previous2 pack, provided certain steps were taken when the previous paint was applied. Best avoided though if at all possible. What type of paint did you apply previously? If you are painting the surface for first time, and if bare metal, use an etch primer before you undercoat. You will achieve a far better adhesion over etch prime, compared with standard primer alone. If surfaces have already been primed, don't stress about it, it won't come tumbling off. Just that optimum grip is achieved with etch first. Incidentally, etch prime is only useful on bare metal. There is virtually nil advantage to using it as a primer unless you run out of primer and just want to finish that last little bit! When you are applying the top coat, make sure you use thinner of the same brand as the paint you are spraying. Many people will say you can use 'general purpose' (G.P) thinner, but while this is OK you will get the very best atomisation and spraying quality with the right thinner. Hope this helps, and if you already knew some of this, excuse me from preaching. It's not always information that people get told when they buy paint. Love ya work  P.S: A good friend of mine, Andy Cusworth, gave me a good tip on how to store leftover paint in he tin. He said to pour a little of the thinner into the can just before you seal the lid again. Pour it gently so it stays on top, instead of mixing into the paint itself. It seals the paint underneath and the paint won't start to dry out. It works really well and was something I had not given any thought to....ever. You can teach an old dog. 
__________________
Ford CMP, 115" WB,1942 (Under Restoration...still) Medium sized, half fake, artillery piece project. (The 1/4 Pounder)
|
|
#94
07-04-13, 13:24
|
||||
|
||||
|
Cheers Tony, thank you for all that, I know bugger all about paint so every bit helps.
I haven't started painting or priming anything yet. Still rubbing back and sanding. Today I started on the nosecone but before that I removed a sidevalve and gearbox from a Canadian F60S wreck. It's got some other bits I'll cut off too later.
__________________
Blitz books.
|
|
#95
07-04-13, 13:41
|
||||
|
||||
|
Any time. Glad to help. Are you blasting the chassis, or are you stripping by another means?
__________________
Ford CMP, 115" WB,1942 (Under Restoration...still) Medium sized, half fake, artillery piece project. (The 1/4 Pounder)
|
|
#97
07-04-13, 19:41
|
||||
|
||||
|
Quote:
I'm afraid you will have to buy the whole kit, or salvage a used one. H.
__________________
Regards, Hanno --------------------------
|
|
#98
07-04-13, 22:45
|
||||
|
||||
|
That's the one Hanno. Bugger.
But then again I do have a truck or two laying around. I'll have a look at the salvage option. Thanks. First morning without daylight savings today, god it's dark!
__________________
Blitz books.
|
|
#99
28-04-13, 11:25
|
||||
|
||||
|
Anybody have any good tips for removing sidevalve v8 heads?
All the nuts are off but I'm having trouble removing them. I guess they are stuck hard via the gaskets but I just don't wont to use too much force as to do damage to anything. What tools are good for getting under the lugs at the front and rear of the heads? Apart from screwdrivers, chisels, crow bars..... Is the a particular point on the head to start from with a hammer?
__________________
Blitz books.
|
|
#100
28-04-13, 11:33
|
||||
|
||||
|
I've often found it's also due to the build up of gunk on the studs. but usually once you manage to break the seal of the gaskets you should be OK. I have resorted to a careful tap under the lugs with hammer and chisel, but being cast iron they can break if you hit them too hard around the edges.
Quote:
__________________
Film maker 42 FGT No8 (Aust) remains 42 FGT No9 (Aust) 42 F15 Keith Webb Macleod, Victoria Australia Also Canadian Military Pattern Vehicles group on Facebook https://www.facebook.com/groups/canadianmilitarypattern
|
|
#101
28-04-13, 11:45
|
||||
|
||||
|
Sorry, no good tips, all I can tell you is I successfully got mine off by tapping between them and the block with a hammer and prybar, and stuffed the gaskets in the process..
Hope this is a big help...
__________________
Pax Vobiscum.......may you eat three meals a day & have regular bowel movements.
|
|
#102
28-04-13, 12:32
|
|||
|
|||
|
if motor turns find cylinder on compression,remove plug, fill with heavy oil, [grease ] bring up and use oil to apply hydraulic force. We once ran an engine with loose head bolts until it popped, took 1/2 hour.
__________________
macca C15 C15A
|
|
#103
28-04-13, 18:01
|
|||
|
|||
|
Hi Ryan
Here is one method I have used with success twice. In one case the engine had no compression on that side because of valve leaks on the other the engine was stuck with no compression. The engine is an Ford truck engine as used in `49 Lincoln and shares the use of studs instead bolts with earlier flathead V8s, later that year they went over to bolts which makes removing heads much easier. I cut a number of wedges of different thickness and worked them in all the way around the head. First a bunch of thin ones giving them each a tap with hammer and working around the block. Then gradually thicker ones, trying to keep the pressure even as I went. What you see in the picture below is thick wedges pushing the head of the top of the studs. 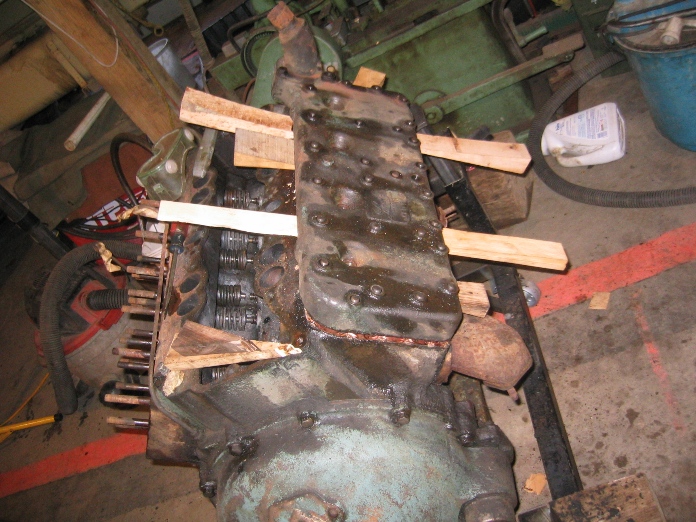 The grease or oil approach should also work as long as you have compression on more than one cylinder. One other obvious point use lots of penetration solution on all the studs I like acetone and ATF. Really let it soak in, there used to be very thing hole saws that were cut the corrosion out between the stud and the head. This was almost a given on the Flathead V8s with aluminum heads. Cheers Phil
__________________
Phil Waterman `41 C60L Pattern 12 `42 C60S Radio Pattern 13 `45 HUP http://canadianmilitarypattern.com/ New e-mail Philip@canadianmilitarypattern.com
|
|
#104
29-04-13, 00:46
|
|||
|
|||
|
What's the OD on the studs? I've restored many classic engines in my time. I use FOX wedges on heads, they are very thin steel wedges used in engineering for that very same job! Also to clean out the corrosion down the studs you can use COPPER TUBE.....! If you can get tube the same ID for the studs and OD for the hole. In one end of tube cut jagged "teeth" with a hacksaw. Nothing fancy as you will need to repeat a few times in the process. Either drill a hole in opposite end or attach some form of handle, I use small bar through the hole, an Allen (hex?) Key is fine. Then just slip bar over stud and rotate to cut down between the stud and hole! Works great on alloy housings with steel studs! Thermostat housings etc.

__________________
BETTER TO BURN OUT THAN FADE AWAY.
|
|
#105
21-05-13, 02:43
|
||||
|
||||
|
Thanks for the ideas guys, still in th process of removing them when I get time. In the meantime I removed a set of tool box/wheel carrier chassis mounts from a C60L wreck I have. I had planned on fixing them to my F60L but the bolt holes are not present on the Ford. What variant would not require a tool/wheel carrier?
__________________
Blitz books.
|
|
#107
28-09-13, 02:21
|
||||
|
||||
|
Also, just on the macs website.
I cannot see a listing for rear brake cylinder kits in the 1 1/2 inch size. Has anyone got a source for these? And are these: http://macsautoparts.com/early-v8-fo...0R3CHL1071994/ they are brake linings, ok for blitz brake shoes?
__________________
Blitz books.
|
|
#108
28-09-13, 02:32
|
||||
|
||||
|
ok, the 1 1/2 inch brake kit has the modern part number of f3634 according to the modern cmp number thread. Is this an online thing only or can they be had at say repco or the like?
__________________
Blitz books.
|
|
#109
28-09-13, 04:19
|
||||
|
||||
|
Quote:
Will check when I have them accessible.
__________________
Film maker 42 FGT No8 (Aust) remains 42 FGT No9 (Aust) 42 F15 Keith Webb Macleod, Victoria Australia Also Canadian Military Pattern Vehicles group on Facebook https://www.facebook.com/groups/canadianmilitarypattern
|
|
#110
30-09-13, 01:44
|
|||
|
|||
|
Quote:
I obtained my wheel cylinder cups at Bayside Brake and Clutch in Frankston. I had written to ABS a few years ago and they informed me those sizes as used on Ford Blitzes are still available off the shelf hence I just tried my local brake shop. Sure beats hardened years-old NOS rubber. Part Nos are Rear- A725 and front- A857. Cheers, Jacques
__________________
F15-A 1942 Battery Staff Jacques Reed
|
|
#111
30-09-13, 03:00
|
|||
|
|||
|
Jacques, you can probably buy them also in a 0.004" or 0.007" oversize as well.
As your cup says "use with expander" I hope you have them as well.
__________________
Bluebell Carrier Armoured O.P. No1 Mk3 W. T84991 Carrier Bren No2.Mk.I. NewZealand Railways. NZR.6. Dodge WC55. 37mm Gun Motor Carriage M6 Jeep Mb #135668 So many questions....
|
|
#112
30-09-13, 03:27
|
|||
|
|||
|
Quote:
Thanks for that info. Yes I assume the expanders are the thin steel backing plates. If so I have them, Front NOS, rear not perfect but usable I think. Have heard some say they are not needed but if the original ones had them its good enough for me to use them too. Anyone have 4 x NOS 1-1/2" Rear expander/backing plates? Never saw any in any catalog. Cheers, Jacques
__________________
F15-A 1942 Battery Staff Jacques Reed
|
|
#113
30-09-13, 04:14
|
||||
|
||||
|
Cheers Jacques for the heads up. I'm heading into town today so I will go visiting some brakes shops.
Thanks Keith, looking forward to seeing if my number is present in your lists.
__________________
Blitz books.
|
|
#114
01-10-13, 00:48
|
||||
|
||||
|
This was a "Truck, 3-ton Machinery" with engine number listed as 3G7700F which is one digit less than normal, perhaps a clerical error. Sold back to Ford.
__________________
Film maker 42 FGT No8 (Aust) remains 42 FGT No9 (Aust) 42 F15 Keith Webb Macleod, Victoria Australia Also Canadian Military Pattern Vehicles group on Facebook https://www.facebook.com/groups/canadianmilitarypattern
|
|
#116
01-10-13, 12:30
|
||||
|
||||
|
Quote:
__________________
Film maker 42 FGT No8 (Aust) remains 42 FGT No9 (Aust) 42 F15 Keith Webb Macleod, Victoria Australia Also Canadian Military Pattern Vehicles group on Facebook https://www.facebook.com/groups/canadianmilitarypattern
|
|
#117
02-10-13, 13:53
|
||||
|
||||
|
Quote:
__________________
Howard Holgate F15 #12 F15A #13 (stretched) F60S #13 C15A #13 Wireless (incomplete)
|
|
#118
31-12-13, 09:06
|
||||
|
||||
|
I'm dirty, my fingers are aching and I came close to cutting a vein when my drill got caught in my glove and quickly twisted up. Must have been a good day in the shed.
It's snail's pace but it is progressing.
__________________
Blitz books.
|
|
#120
02-01-14, 09:06
|
||||
|
||||
|
No pics of the near miss rob, just some bruising.
I was out in the shed again today, more work on the brakes. Using nos shoes to replace the buggered ones, one needed some slight mods for the handbrake holes. These were the ones I bought in nar nar goon some years ago. Going to replace the wheel bearings front drivers side. Anyone have the part numbers at hand? Timken parts. I'm just not totally happy with their free play so will put new ones in.
__________________
Blitz books. Last edited by Ryan; 02-01-14 at 10:08. Reason: spelling
|
 |
| Thread Tools | |
| Display Modes | |
|
|


 Linear Mode

