|
#1
 05-03-19, 20:17
|
||||
|
||||
|
Hello guys...let me introduce myself so you know I am on the level.
I design and build paper model kits. I'm currently working on a 1/18 scale Ford F-AT (Quad) and I am looking for reference photos (as well as a few answers from those in the know.) I like larger scale models of interesting vehicles...and I usually have little or no knowledge of these vehicles when I start. In fact, they are usually inspired by some sort of personal history. My big Centurion was first inspired the 1960s Dinky Toy which I owned. https://www.flickr.com/photos/659362...57648042862522 My Saladin kit was also inspired by a Dinky or Corgi Toy. https://www.flickr.com/photos/659362...57681055410226 My Autocar Armoured Car came about because I wanted something totally unique (as a model) and the Canadian connection intrigued me. https://www.flickr.com/photos/659362...57652148291031 Originally, I met a guy in Ireland who restored a Morris C8, and I remembered the old Airfix kit I had, and that inspired me to do my own model of it. He supplied me with a full set of restoration photos. But after some research I realized that the Ford and Chevy Gun Tractors were of more interest to me and that became the subject of my current project. Anyway... I am having difficulty finding a nice set of restoration photos. In fact, any photos that show me the frame and chassis and how it all goes together. The body... I have sorted already...and I'll worry about specific exterior details later. Right now, I am starting at the ground, and building the frame and drivetrain. I've noticed some possible differences between the Ford and Chevy chassis... -slight differences in frame cross members to accommodate different different transmission, etc -different engine and transmission (Ford flathead V8 vs Chevy inline 6) -different axles/diffs. (housings are definitely different!) Since I am focused on a Ford, I want to see more photos of these (Ford) things. ...can anyone help? Oh...and a question...can anyone help me understand how the beetleback body sits on the frame...or more accurately, above the frame. In some photos there appears to be solid mounting rails/blocks between the body floor and the frame rails. In other underside photos, i see nothing but some elevated brackets supporting the body (6-8") above the frame rails. I'd also like to nail down a specific and accurate Canadian Ford F-AT (paint colour, markings, etc) for my first kit. I'm hoping to also create a British version...maybe a Australian one too. Okay...I'm not always super accurate...and I take some artistic license when trying to design something in paper. But I like to reference the real and accurate thing in the beginning, and not just make stuff up. Any help you guys can give me is mucho appreciated!! If you have any interest in the paper model project, I'll gladly post its progress here for you to see. 
|
|
#2
05-03-19, 22:30
|
||||
|
||||
|
Hallo Dave,
Welcome here on MLU. I am truly amazed by your paper models and I hope to see a CMP "in the paper" sometime.  Hanno
__________________
Regards, Hanno --------------------------
|
|
#3
06-03-19, 08:22
|
|||
|
|||
|
Hi Dave, great work, I would love to see the progress photos of a build.
Rich.
__________________
C60S Austin Champ x 2 Humber 1 Ton & Trailer
|
|
#4
06-03-19, 15:37
|
||||
|
||||
|
http://www.mapleleafup.net/forums/se...earchid=761216 have a look at Sylvains post he has restored at FGT cab 12
__________________
1941 Chevrolet, Cab 12 CGT, 7A2 body 1944 Ariel W/NG 1944 Scammell Pioneer SV/2S x 2 1955 Austin Champ, 04BF45 1946 Chevrolet 5400 COE, Civilian
|
|
#5
06-03-19, 16:15
|
||||
|
||||
|
Quote:
And I tried searching the forum for "FGT cab 12" and got "nothing found".
|
|
#6
06-03-19, 16:53
|
||||
|
||||
|
I will gladly post some build reports.
I started to assemble the Frame last night. Basically the first draft ...this is how I work. I design (the parts and assemblies) in my head and on the computer. I will usually test build an uncoloured version to check fit, sizes, etc. And then make necessary adjustments. And then build it again, if needed. Paper does not allow for compound curves and certain complicated shapes. And unlike plastic model construction, you have to form and assemble the individual parts, before those can be fitted together to form larger assemblies and parts. And the smaller things get, the more difficult all that becomes. So, its all about stylizing objects and using artwork and surface details in place of molded features. I also have to think about how another builder will assemble my model, and I have to design with "kit" in mind. Frame and Drivetrain (in paper) of Little Willie WW1 Tank 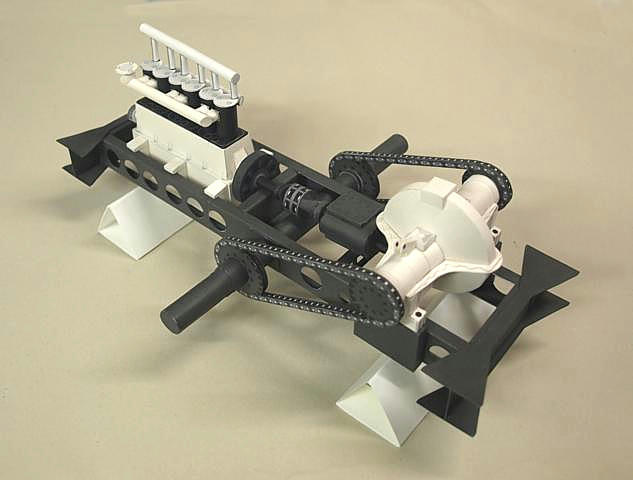 ... I generally research on the fly, thats why I get very demanding about finding the necessary research material as quickly as possible. I hate to stop my design work...and I don't always have the option of working on a different area. For example, right now, I want to complete the frame design and move on to the Axles, Diffs and Engine and Transmission. But the frame cross members are a big question mark. And I have been searching the web looking for photos of exposed chassis and frames. Its tough wading through photos of Chevys, Fords and Morris' and trying to determine which is which! lol Theres a definite difference between their components. Anyway, I'll keep working at it, and post some pics when I have something to show. Thanks for showing some interest.
|
|
#7
06-03-19, 16:54
|
||||
|
||||
|
http://www.mapleleafup.net/forums/sh...t=24736&page=2 this might work then, ans then look at his other threads
__________________
1941 Chevrolet, Cab 12 CGT, 7A2 body 1944 Ariel W/NG 1944 Scammell Pioneer SV/2S x 2 1955 Austin Champ, 04BF45 1946 Chevrolet 5400 COE, Civilian
|
|
#8
06-03-19, 17:06
|
||||
|
||||
|
Quote:
Great! A couple of things in there that might help me. No chassis views unfortunately.
|
|
#9
06-03-19, 17:33
|
||||
|
||||
|
http://www.mapleleafup.net/forums/sh...ad.php?t=27990 a bit of chassis here.
also here but a longer 60CWT,http://www.mapleleafup.net/forums/sh...highlight=ford the FAT chassis is essentially a 15CWT with winch and beef up springs and the 4wd from the larger (if I am wrong please anyone correct)
__________________
1941 Chevrolet, Cab 12 CGT, 7A2 body 1944 Ariel W/NG 1944 Scammell Pioneer SV/2S x 2 1955 Austin Champ, 04BF45 1946 Chevrolet 5400 COE, Civilian
|
|
#11
12-04-19, 18:05
|
||||
|
||||
|
Can anyone help me with some photos of the Drive Transfer Case on the Gun Tractor?
It would be nice if it was the Tractor version, with the take-off shaft for the winch. But even just the regular four-by-four transfer would help. I'd love to see one out of the chassis, from multiple angles. I am basically interested in the overall shape and design and how it's bracketed to the frame. ... Sorry, for the lack of updates... Work is continuing quite nicely on my 1/16 paper model. Yes, I am aware that at the start of this thread, I said I was working on a 1/18 model. I started out with the idea of doing a 1/24 scale kit, but found that some parts were too small. Even though I stylize and simplify a lot of things, this kit was to be on par with my previous large scale builds. And those are all 1/16 scale. So, I gave up on the idea and went back to 1/16 scale! The Gun Tractor isn't a large vehicle anyway, so the model will be under a foot long. shhhh...I know...once the Limber and Gun trailer are added, the model will be 3 feet long! shhh. Anyway...after a quick test of the basic body design, I switched over to the Frame and Chassis. Its best to get all that sorted first and then figure out how to fit the Body. Heres a few photos of construction so far. (Axles are not yet installed...just placed (upside down! lol) for the photos) Everything you see is 100% paper (cardstock) Some things are stylized to make them more easily buildable (in paper). Frame rails, for example, are straight in-line and boxed. Keep in mind, I am designing on the fly and sometimes things get thrown out as the design changes, but usually, I just keep modifying what I have already built. So what you see may not be the final design. At the same time, I am designing Parts for a retail kit, keeping track of the assembly, creating Instruction pages with assembly diagrams, and more! So, its a lot of slow work. It can take months...often well more than a year to finish everything (before a retail kit is available). Anyway, feel free to ask any questions.  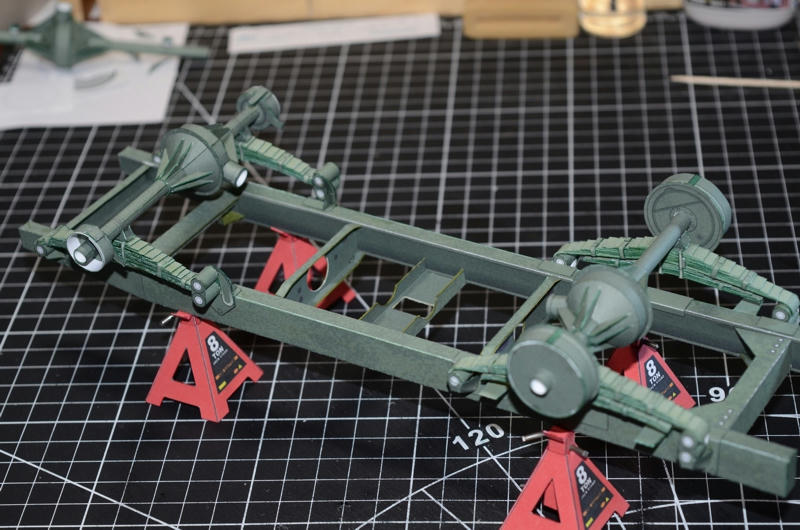 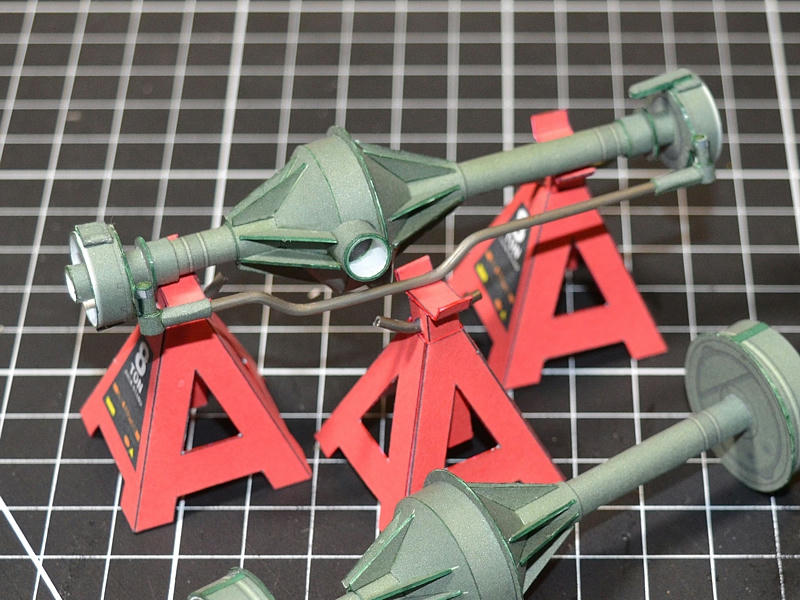 
|
|
#12
16-04-19, 22:08
|
||||
|
||||
|
Just for fun, another photo update...
I test fitted the Axles again, along with the newly added Power Take Off. In this case, its an adapted Axle/Differential used to drive the power winch/tow cable. I need only to complete the Drive Transfer unit and then I can sort out all the driveshafts. Engine and Transmission are still on hold until I decide what to do about Body, floor pan, and interior components. 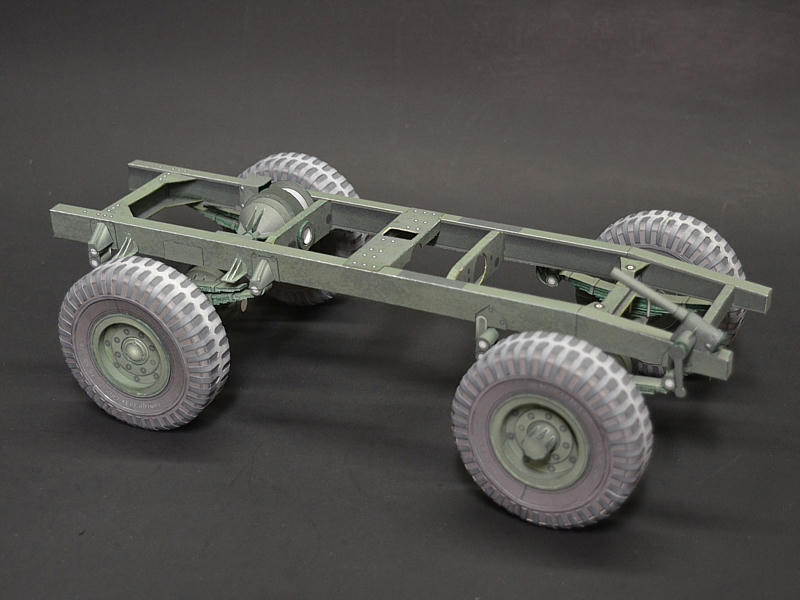 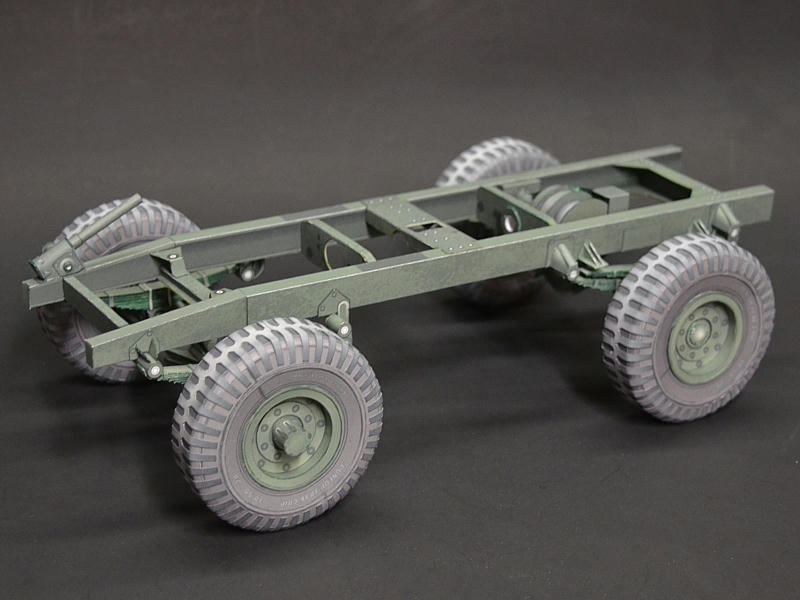 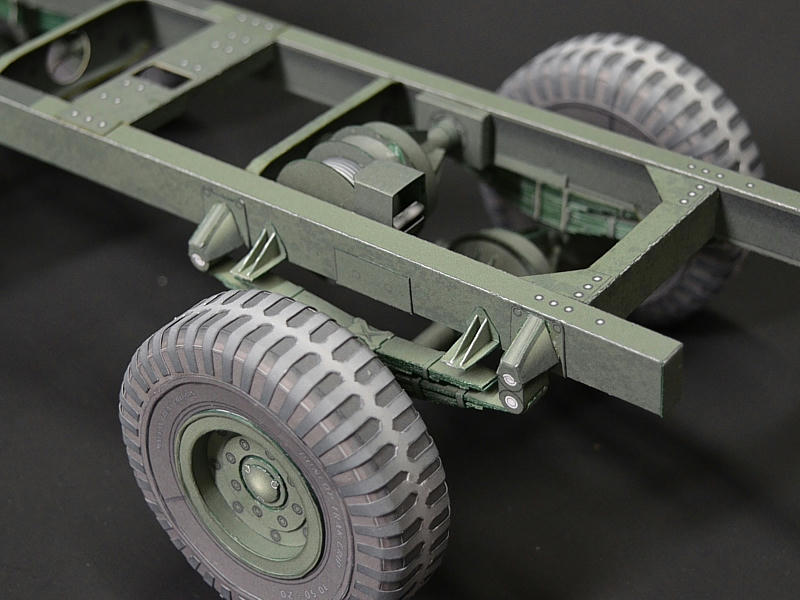 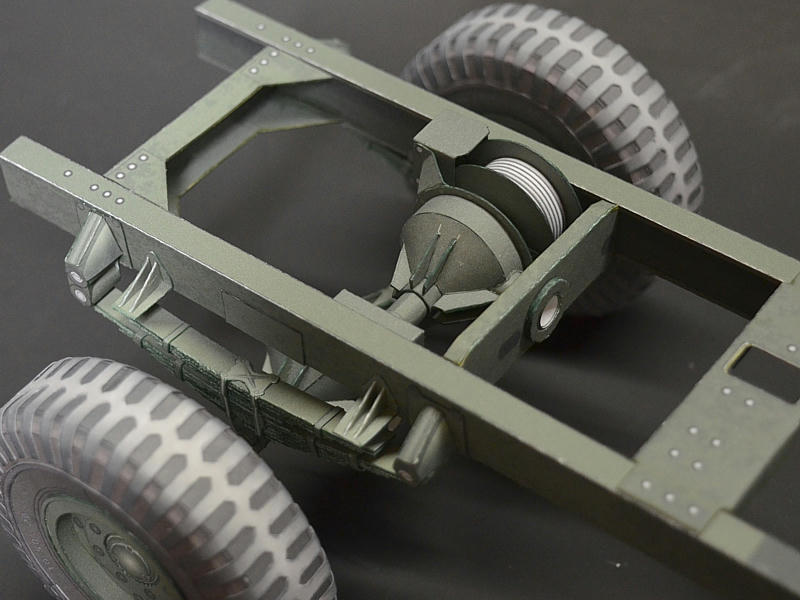 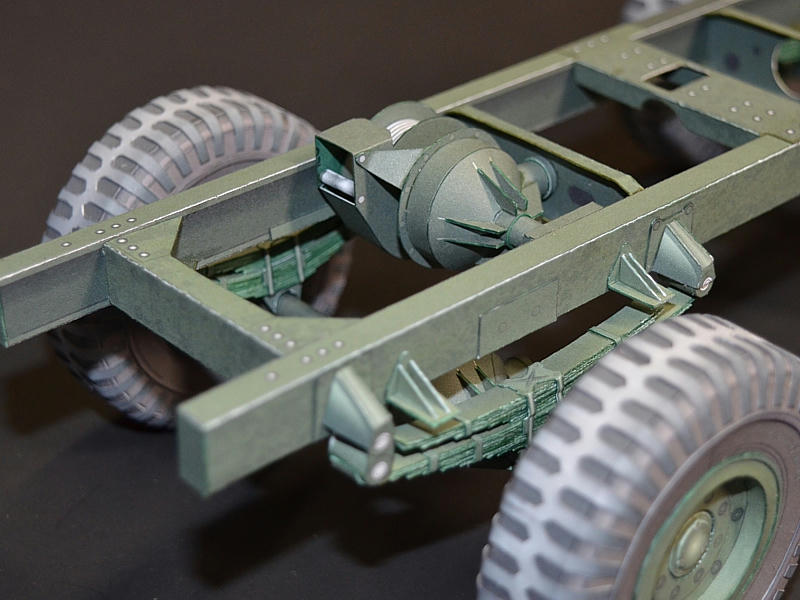
|
|
#13
18-04-19, 18:34
|
||||
|
||||
|
Can anyone explain some of this to me?
or give me more photos. There appears to be a flat plate between the frame rails at the very rear? Does it span rail to rail? is it mounted below the rails (to the bottom of the frame rails? Just how much area does it cover and what is it for? Also...there are two cable reels... what are these for? And are they mounted below that plate I mentioned above? is that the purpose of the flat plate? (a mounting surface?) I'm guessing the two reels, create a guide for the tow cable...but I am guessing. I assume these reels are not driven. But are they brakes of some sort? What about the diameter of these reels? These are the only photos I have, and things aren't clear to me. 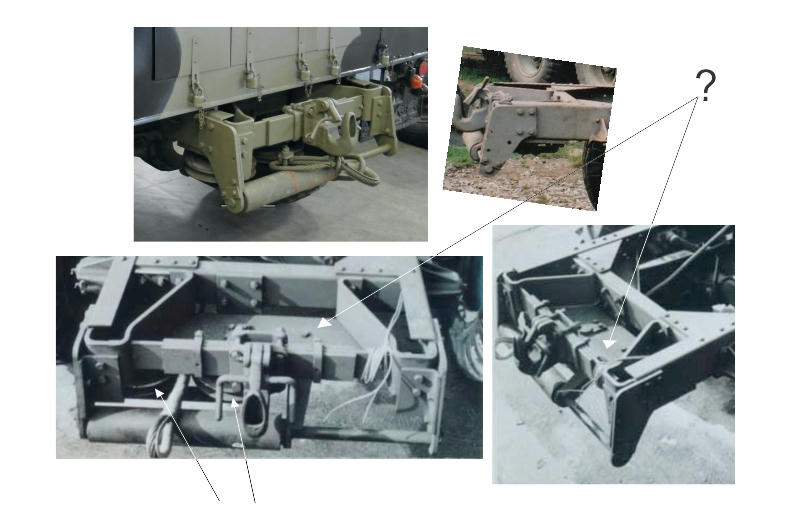
|
|
#14
19-04-19, 02:21
|
||||
|
||||
|
Bruce...you mean the Wheels?!
The center hubs of the wheels are wrong? You are telling me that the front is on the back, and the back is on the front!?! lol yes, the wheels are not attached. I just pushed them onto the axles so I could take a photo. I wasn't paying any attention to their position. Even the Axles/Diffs are not glued in place yet...the springs are just resting on them (again, for the purpose of a photo). Thanks...good eye...!
|
|
#15
28-04-19, 05:57
|
|||
|
|||
|
Dave, assuming that the winch fairleads are same across the range of CMP's:
The two wire rope sheaves or pulleys are un-braked and measure in at 8 3/4inch diameter, 1 1/2inch thick, mounted on a vertical pin that passes through a boss top and bottom of both sheaves. This gives an overall height of 3 3/4 inches between the two mounting plates. The top mounting plate is as you have marked, going full width under the chassis rail. There is a lower plate that retains the mounting pins, it is the width of the two sheaves combined, and is basically a wide "U" section welded to the underside of the top plate. The bottom roller I have goes full side to side, but guessing the diameter would be the same, 3 1/2 inch. You know there is a set of fairleads on the front bumper as well? Rich.
__________________
C60S Austin Champ x 2 Humber 1 Ton & Trailer
|
|
#16
28-04-19, 18:21
|
||||
|
||||
|
Quote:
My "pulleys" are 12" x 2" scale size...so not too far off. Not bad for a guess. Sometimes, a bit bigger is better for scale assembly. I am still unclear about the second mounting plate. The "wide U section" you refer to. I can see part of it in my reference photos, but its still not clear to me how it mounts, or its actual shape and size. Its not a big concern, since I am not including every accurate detail, but... 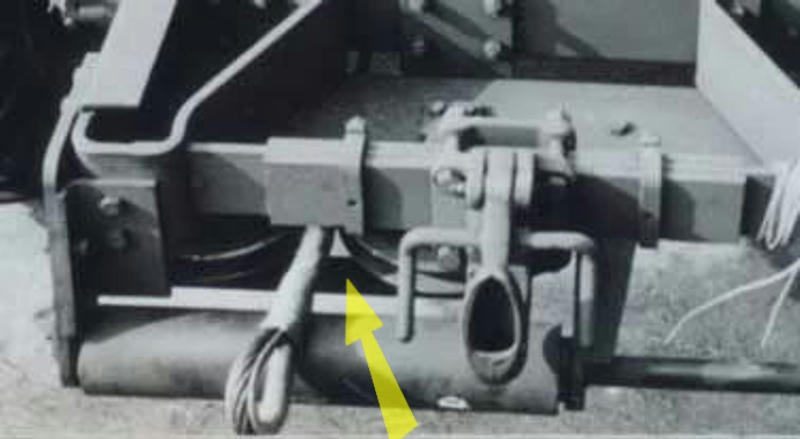 ... "fairleads"...whats that? You wouldn't be talking about that roller cable guide thingy? Is that what you refer to "up front"? 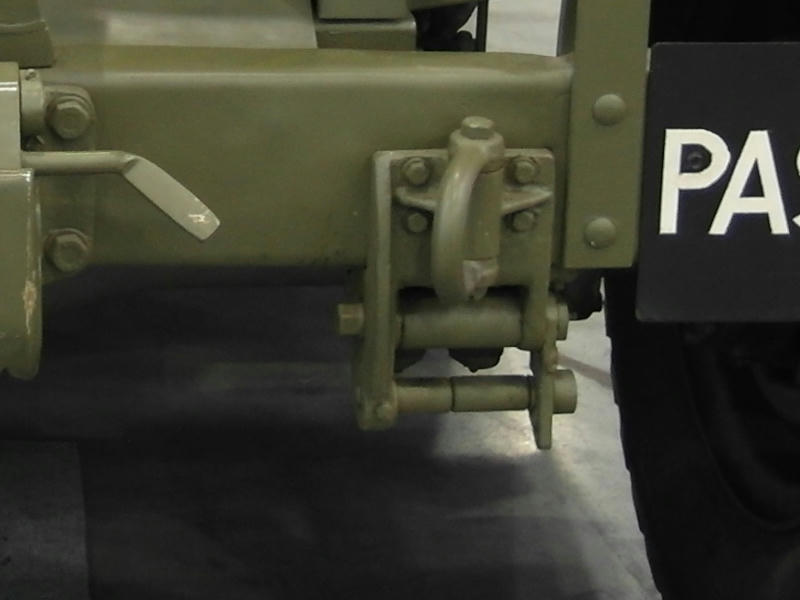 ... Where is the cable guide in the rear? Does it go here(photo)? Something is missing (on my model) to guide the tow cable under the frame. 
Last edited by DaveW; 28-04-19 at 18:29.
|
|
#17
29-04-19, 14:15
|
|||
|
|||
|
Better described as a Wide "L" shaped plate...this also holds the guide roller behind the sheaves.
Fairleads = Roller Cable Thingy, or any roller guiding the winch cable. The fairleads on the front, as shown in your pic, are nice and simple, they can be heavier and more complex than that: swing out rollers to pass the cable hook/eye through. Just in case.... the wire rope is fed around the outer sheave and forward to the fairlead on the front bumper for when winching is required at the front of the truck. Rich.
__________________
C60S Austin Champ x 2 Humber 1 Ton & Trailer
|
|
#18
29-04-19, 16:13
|
||||
|
||||
|
o-tay!
I have a much clearer understanding of this...thank you. I may have to reduce the diameter of my pulleys...I don't know. But I definitely have to add that lower plate. The fairlead is going to be a small problem, because even at 1/16 scale those rollers are less than 1 or 2mm diameter...and its hard to roll paper cylinders that small! I try to produce a "kit" that is self contained ...in other words, doesn't require you to introduce any other materials other than the printed paper parts I supply. Obviously some builders like to add other materials and alter parts using other materials to be more realistic or detailed. Its totally up to the builder...but I try not to expect that in my kits. My kits will produce a basic model, that is complete using only whats supplied. I may have to come up with a boxy stylized contraption instead. ... anyway, thanks again for your assistance. The help here has been great so far! Thanks again Ian!! ... I managed to finally sort out a basic design for the Drive Transfer Unit. Is that what we're calling it? lol The unit that connects directly behind the Transmission, and feeds the front and rear prop shafts/drive axles. And in this case, also supplies the Power takeoff for the Tow Winch. Being well hidden under the frame, I didn't want to get carried away with details or make the assembly too complicated, but I also had difficulty understanding its overall shape and how it sat within the frame. Now I understand. 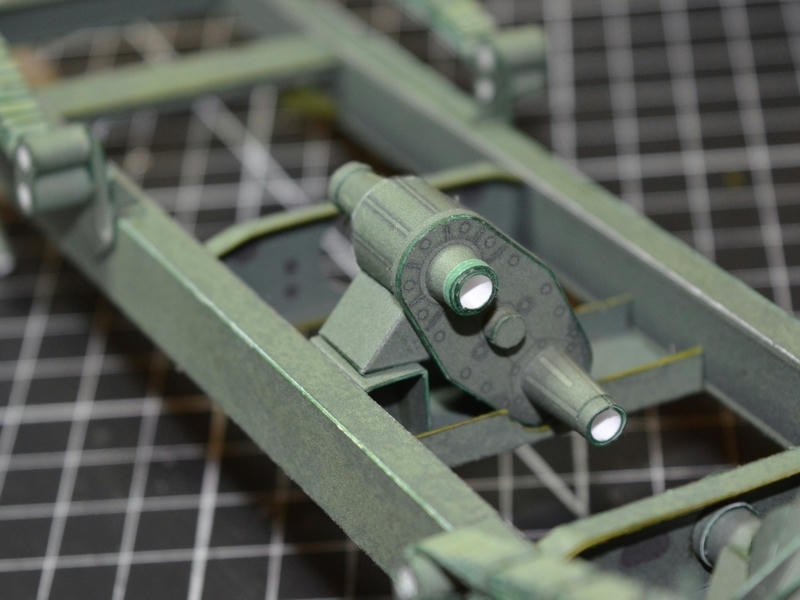 After that, I need to check the alignment of all the drive elements. No point in continuing if things didn't line up! I did build the basics of the power takeoff drive shaft, so I could test the closest component. And I wanted to get the Transfer Unit glued into place, so I needed that connection. But I also managed to confirm that the lower driveshafts(propshafts) and axles/diffs all line up. At least close enough to sort out the angles and the propshafts. 
|
|
#19
29-04-19, 18:20
|
|||
|
|||
|
Dave,
The thing right in the middle of the above picture is almost universally called a "transfer box" in all wheel drive vehicles except in modern articulated loading shovels (and possibly some marine installations) where it is called a "drop box" as it's primary function is to lower the drive-line. A transfer box can be bolted directly to the back of the gearbox / transmission as in jeeps etc, or be separate as in most trucks. Also, to be pedantic the pulleys or sheaves are PART OF the fairlead assembly. The front fairlead has a pair of vertical rollers just behind the two horizontal rollers so that sideways loads can be taken. These are just visible in your post #16 middle photo. The use of pulleys at the rear is simply to allow for greater angles without damaging the rope by bending it too sharply. Great work though, please keep posting. David Last edited by David Herbert; 29-04-19 at 18:28.
|
|
#20
29-04-19, 18:40
|
|||
|
|||
|
I assume that Richard's photos show a winch equipped C60 which seems to have a bigger gap between the rear chassis cross member and the fairlead than a FAT. The top photo in Dave's post #16 shows the vertical legs of the heavy piece of plate that goes under the pulleys, bolted to the face of the rear chassis cross member. On the C60 the vertical legs are welded to the horizontal plate directly above the pulleys but also to something higher up - maybe another horizontal plate above the chassis rails ? There is then a gap of about 5" to the front of the rear cross member, leaving room for the brackets for the rollers to be extended upwards at about 45 degrees to reinforce the vertical plate.
David Last edited by David Herbert; 29-04-19 at 18:46.
|
|
#21
29-04-19, 19:15
|
||||
|
||||
|
Thanks David for your input.
When I get to the front, I will look at the pulleys up there. I am a Class A Auto Mechanic as well, but what I know as a "Transfer Case" may be called something else (eg transfer box)in other countries, and on other types of vehicles, and from different eras. Thats why I sometimes stumble with the actual names of things. Here in North America, its generally referred to as a Transfer Case (on a 4x4 vehicle). Funny thing...in Canada, a prop shaft is on an aircraft. The tube connecting a transmission to an axle/diff is a driveshaft. but once, when I was in England, helping my Dad fix his car, we went to buy parts for his driveshaft and they tried to sell us parts for the rear axle/diff. We did not realize that terms were displaced, and we actually needed prop shaft parts! ... anyway... I have been referring to photos of three or four different types of frames/chassis to get various angles. And I am aware that cross members and other things are in different places along the frame. I have a plan of the 4x4 Quad frame, so I am doing my best to keep things proportioned to that.
|
|
#22
01-05-19, 23:36
|
||||
|
||||
|
a bit late reply but this might give you an ideal how the winch cable runs.
photo credit to Hermann Van Hove
__________________
1941 Chevrolet, Cab 12 CGT, 7A2 body 1944 Ariel W/NG 1944 Scammell Pioneer SV/2S x 2 1955 Austin Champ, 04BF45 1946 Chevrolet 5400 COE, Civilian
|
|
#25
26-05-19, 01:13
|
||||
|
||||
|
I need some more help!!
But first, the current state of affairs: 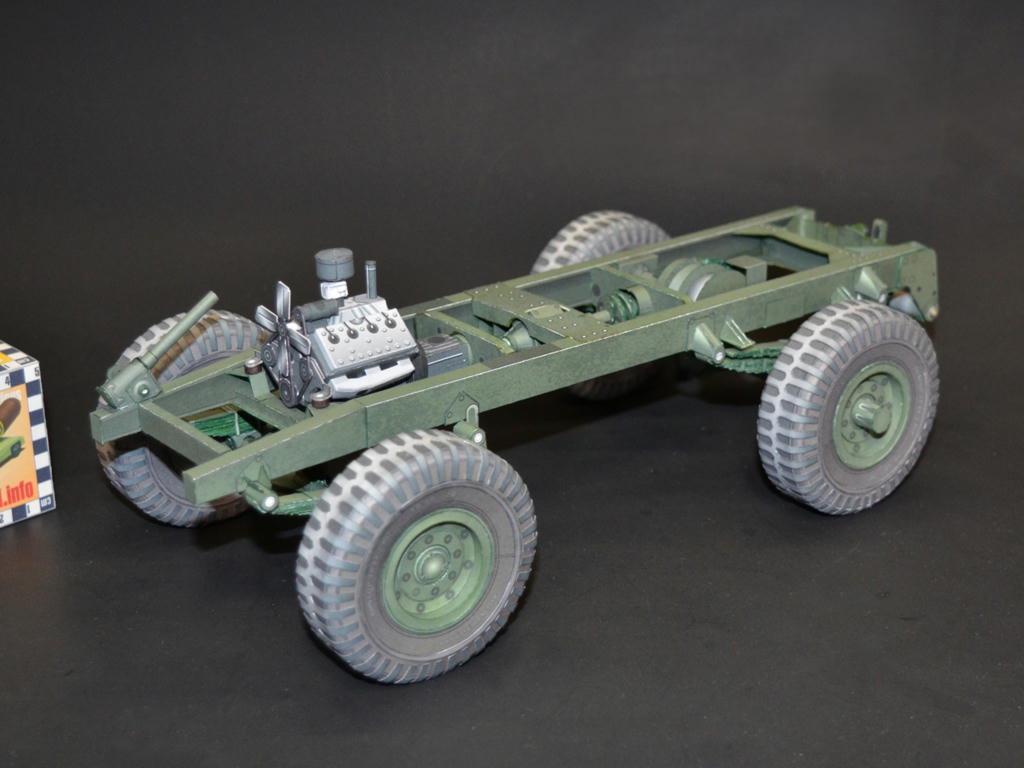 Okay... Fuel Tanks....I assume the Quad Gun Tractor has two tanks, both the same. Are they the same size as the larger, longer vehicles? What are the rough dimensions of the tanks? Mine are scale 10" x 10" by 31" long...which I think is too small. I'm also not sure if they are close to square, or are they rectangular? (wider than tall?) And, what is the position of the filler neck. I've got pics of Tanks with filler necks in different places...I don't know what tanks go with what vehicle. Exhaust system... my current plan is to create a y-pipe under the motor, connecting to the left side pipe. Then straight back to a straight inline Silencer, with a 90 degree outlet pipe after that. The Silencer appears to mount under the frame inside of the left fuel tank. But I am unsure of where the exhaust outlet sits. Can anyone answer any of this? I appreciate it if you can.
|
|
#26
27-05-19, 09:21
|
||||
|
||||
|
Hello
Good job! Yes they are two same size tank , 26x30x82 cm , they are each side along the frame, the filler neck is short and strait . Hope it helps
|
|
#27
27-05-19, 15:50
|
||||
|
||||
|
Quote:
|
|
#28
27-05-19, 16:43
|
||||
|
||||
|
excellent info...thank you both!!!!!!!!
and that photo helps too. So, the Quad tanks are close to the same dimensions, except longer. I may stick with my current design, until I have the body in place. If I can enlarge the tanks, I will, when I know exactly how well they fit. Last edited by DaveW; 27-05-19 at 16:49.
|
|
#29
27-05-19, 22:05
|
||||
|
||||
|
So, everything is on hold at the moment.
I just received information that the back end Towing hardware on my Chassis is NOT a Ford setup. Supposedly its a Chevy FGT setup. Which is funny because I just photographed a Chevy Gun Tractor with something entirely different. (see the attached photo) I'm not arguing...I'm no expert...thats why I ask for help. But I'm hoping I will receive some more information (photos) to help me decide what to do. Redesigning the kit (and model) is not a problem. Rebuilding this prototype is. I am able to cut off some parts...some times... but there might be too much to modify, and as a result, might require building a whole new Frame. Which, at this point, I really don't want to do. But, I never release a kit without at least one attempt to build what is in it. So if I change something like this, I'll have to test build it. Sometimes there are interchangeable parts...was this set-up ever used on a Ford? ...if so, I am good to leave it in place. But if its definitely a Chevy specific set-up, then it will have to be changed. The axles and engine in this FGT are definitely Ford type.
|
|
#30
01-06-19, 15:59
|
||||
|
||||
|
Thanks Bruce for your help in sorting this out.
So, the bottom line is, that I referred to a couple of photos of an FGT chassis for the setup at the rear (Hitch/Spring mount, Towing Cable Roller and Guides, Brackets and Plates, etc) and the reference was obviously a Chevrolet built FGT chassis...not a Ford. I have been doing a careful job of comparing Ford and Chev chassis, and trying to make sure I am following Ford designs. I am already aware of many of the differences. And yet, I did not check to see if the Ford setup was the same as the one I was designing. Which it wasn't. There appear to be many variants out there, but the original Ford and Chev chassis' appear to each have a "factory" setup of their own. Luckily, it was not a big fix... I was able to surgically remove the parts I had already designed and attached to my prototype build. The removal damage was easily covered with some new surface layers printed on lightweight paper. The new parts design is much simpler with less parts to build and install. And it went together quite easily. I'm glad I didn't have to start from scratch and build an entire new Frame! But I have cut apart this Frame one too many times making changes, and as a result my Frame Rails now have a bit of twist in them. It didn't seriously affect installing the new Towing parts, so I am good to go. Hopefully this is the last major adjustment. 
|
 |
| Thread Tools | |
| Display Modes | |
|
|
 Similar Threads
|
||||
| Thread | Thread Starter | Forum | Replies | Last Post |
| Guy Quad-Ant | Dave Page | The Softskin Forum | 1 | 08-02-10 01:02 |
| Polsten Quad sights and technical info required | Chappers | The Gun Park | 2 | 11-10-09 19:55 |
| Ford (FAT?) Quad Gun Tractor | threadbear | The Softskin Forum | 7 | 01-12-08 01:13 |
| CMP quad + limber + 25 pdr gun | Richard Farrant | The Softskin Forum | 18 | 30-05-06 13:04 |
| Quad model | Snowtractor | The Softskin Forum | 2 | 05-07-03 08:48 |


 Linear Mode

