|
#151
 15-06-12, 04:31
|
|||
|
|||
|
.... just want to take advantage of your experience.
Bob
__________________
Bob Carriere....B.T.B C15a Cab 11 Hammond, Ontario Canada 
|
|
#152
15-06-12, 10:53
|
||||
|
||||
|
Quote:
__________________
Ford CMP, 115" WB,1942 (Under Restoration...still) Medium sized, half fake, artillery piece project. (The 1/4 Pounder)
|
|
#153
15-06-12, 14:54
|
|||
|
|||
|
Hi Bob
Glad you asked the question when you did, because I had not removed any of the rigging yet, so it was easy to just take more pictures to show the detail. I'll get them organized and posted. Whats funny is that get the engine in is now the easier part of the job, what is still time consuming is getting everything hooked up that is taking time. Things like replacing the flex fuel line between the body and the engine fuel pump. Have to get a new one because the old one didn't like the ethanol. Cheers Phil
__________________
Phil Waterman `41 C60L Pattern 12 `42 C60S Radio Pattern 13 `45 HUP http://canadianmilitarypattern.com/ New e-mail Philip@canadianmilitarypattern.com
|
|
#154
19-06-12, 23:40
|
|||
|
|||
|
Hi All
Well after a speedy installation of the engine it took me 2 days to get it all connected up. Actually it took 4 hours to hook everything up and day and a half to find where I had put all the parts. When I turn on the ignition and hit the starter the engine fired right up. But there was a horrible grinding noise from the front of the engine and no oil pressure. Turn off the engine and went looking for source of the problems. Lack of oil pressure was easy to find, puddle of oil on floor right below the oil pressure line which wasn't connected. Fixed that and started searching for source of the noise, loosened the generator and spun fan to check the water pump and make sure fan was not hitting any thing, no problem. Spun the generator no noise. So I left the fan belt of and restarted the engine. Grinding sound still there but was easy to localize. Anyone else want to guess the source of the problem? Yes I installed the front engine mount the wrong way around. Stick that one in the back of your head when your installing a Chevy engine. It is a real pain to fix this little problem about 3 hours to disconnect the various parts to lift the engine up the couple of inches necessary to remove the mount and turn it around and then put all the parts back. I was able to replace the spring on the radiator drain cock. Once that was all done restarted the engine and let it run nice and quiet oil pressure OK and the temperature came up to 160 F which is the thermostat on installed. In re-plumbing to install the steam relief tube, valve and the temperature gauge I discovered something I had never noticed. The valve has a small hole drilled in it to allow a small amount always coolant to flow past the sensor. Cheers Phil
__________________
Phil Waterman `41 C60L Pattern 12 `42 C60S Radio Pattern 13 `45 HUP http://canadianmilitarypattern.com/ New e-mail Philip@canadianmilitarypattern.com
|
|
#155
20-06-12, 23:17
|
|||
|
|||
|
Hi All
Well the HUP will drive out of the shop tomorrow under its own power 1 year 6 months 16 days after it last drove into the shop under its own power. Which is about 1 year longer than I had planned. It will be driving out with the front wheels doing the power because, when I moved the chassis back into the shop earlier this spring I backed it in which put the passenger side nearest the wall and I can't quite get the shaft in and I don't want to cut a 8" hole in the wall to feed the shaft in. Today was the first day of summer and it hit 90 F (32C) by 11:00 AM with the humidity 65% in the shop. Spent the day tidying little details on the wiring harness, things like treeing the wires behind the dash so they don't hang down. With the engine running the lights are now quite bright which is an improvement over the other day. Topped up all the gear lube in the the trans, transfer, and axles. Greased all the fittings as well. Only thing I have to remember to do is put the lub in the steering gear box tomorrow, just put a reminder on my calendar. Cheers Phil
__________________
Phil Waterman `41 C60L Pattern 12 `42 C60S Radio Pattern 13 `45 HUP http://canadianmilitarypattern.com/ New e-mail Philip@canadianmilitarypattern.com
|
|
#156
21-06-12, 03:07
|
||||
|
||||
|
Good news
 The massive power from that 216 will have you fighting to control the vehicle  We all know your favourite book is 'HOPPING up your chevy 216' that 1940's classic publication . So what type of twin carby system did you opt for ?
__________________
1940 cab 11 C8 1940 Morris-Commercial PU 1941 Morris-Commercial CS8 1940 Chev. 15cwt GS Van ( Aust.) 1942-45 Jeep salad
|
|
#157
21-06-12, 23:08
|
|||
|
|||
|
Yes, today the HUP did move out of the shop under its own power.
 It was a short drive but a big step forward. Link to video http://canadianmilitarypattern.com/R...021%202012.wmv As to Mikes question about hopping up the 216, only with the other trucks. My HUP was very original and complete when I got it years ago and as much as possible I'm keeping it stock with as many of its original parts, nuts, bolts, as I can keep reusing. Cheers Phil
__________________
Phil Waterman `41 C60L Pattern 12 `42 C60S Radio Pattern 13 `45 HUP http://canadianmilitarypattern.com/ New e-mail Philip@canadianmilitarypattern.com
|
|
#158
22-06-12, 23:45
|
|||
|
|||
|
Hi
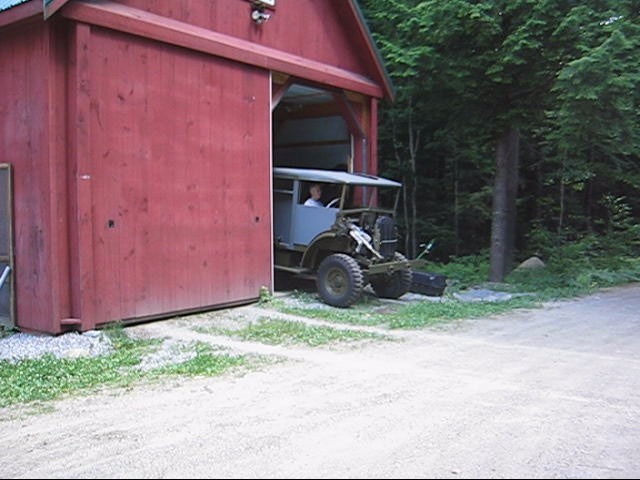
Working on an CMP is just so much more fun when you can actually see the progress. But the restoration lesson for the day is sort and label the parts and only have one storage area for the parts. Still wasting time looking for parts I know just seen. Same game as always putting the tools back in the tool box. Today's goal was to get the nose on and the rear axle shafts in place. As you can see from the photos hoisting the nose is a mater of couple of cargo straps two hooked in the vents and centered to the hoist and one to the front of the nose so that the nose hangs horizontal right to left and vertical along the back. (one caution loop one of the straps around the hoist hook so that the load of the nose can not slip to one side or the other.) One tip remove the brake peddle so that the curve of the wheel well can come straight down. Once the nose is bolted it you can slip the peddle back on easily. Cheers Phil
__________________
Phil Waterman `41 C60L Pattern 12 `42 C60S Radio Pattern 13 `45 HUP http://canadianmilitarypattern.com/ New e-mail Philip@canadianmilitarypattern.com
|
|
#159
26-06-12, 03:59
|
|||
|
|||
|
Phil it is really looking good. Cant wait to see it in person. Nice to see so much progress being made. On a side note my m38 has been dead for over a week now. Having coil issues. I hope I have it solved now just waiting on a new coil to arrive.
|
|
#160
06-07-12, 00:59
|
|||
|
|||
|
With virtually all the parts now bolted back in place the finial coat of paint starts to go on. Well almost.
Hi All With virtually all the parts now bolted back in place the final coat of paint starts to go on, well almost. In an homage to Gary Baths question about painting and the responses http://www.mapleleafup.net/forums/sh...light=painting what was to have been the top coat didn't go one as planned. So much for painting technique from memory as to and when all else fails go back and read the manual. Paint came out uneven with a lot of bits of paint drying before they hit the body. HUP looks a little like a zebra in with gloss and flat pattern. Got out the Dupont painting shop manual matched up the pictures of the paint flaws and looked at the possible causes. The list of problems: Paint to thick/runs- correct viscosity to proper 18-20 sec cup test Wrong air pressure/poor paint spray pattern - increase pressure to the suggested 50-65 psi (syphon type gun) Speckles and narrow gun patter - Dirty gun (yup this is the real killer) disassembled the gun soaked the whole thing in cleaner and clean each part of the paint path with soft brushes until all the old paint was gone. The gun worked fine for painting individual parts with just running some paint thinner through it after each use but for the overall painting it just didn't want to work right. Practiced with some old paint (not the Dupont Centari specially mixed to match original HUP color). Painted some practice panels and Jerry Cans and the paint went on like a charm. Tomorrow I'll lightly wet sand the HUP to clean up the imperfections and see if I can lay down a smooth flat top coat. July 2012 Dec 2010
__________________
Phil Waterman `41 C60L Pattern 12 `42 C60S Radio Pattern 13 `45 HUP http://canadianmilitarypattern.com/ New e-mail Philip@canadianmilitarypattern.com
|
|
#161
13-07-12, 00:58
|
|||
|
|||
|
Hi All
Well I guess the overhaul can be considered complete, the HUP is back on the road. Not fully happy with my paint work, but I ran out of time with our MV Clubs 25th Anniversary Rally coming up at the end of the month. Just got to the point that I had to start driving it around to get any little Gremlins out. Took it out for a drive to fill the gas tanks this morning and it runs good, couple of little problems, most notably a stick throttle linkage which kept returning to high idle instead of normal. This really made shifting a bit tough. Readjusted the throttle linkage and that seems to solve the problem. Ten miles on the clock now and hope to get 100+ before I head for the show. With temps hitting the high 80s everyday think I will take these drives in the morning. Point of interest for those of you working on Chevy CMPs - the later manual has some tips on adjusting the throttle linkages not found in the early manuals. Also several of these adjustments are best done before you put the nose on. Also though I'm sure nobody in the military ever bothered with the wear in the linkages. If I was doing the overhaul over again I'd rework all of the pivot shafts, pins, clevises and linkage arms to get rid of all the play. Rough shifting was compounded by the new gear lube though listed as being 80-140 is lighter than what was in it. Got some funny oil leaks on the transmission and transfer case, no leaks from the shaft seals instead it is leaking around the top of the transmission (no its not that full) and through the shim packs on the bearing caps of the transfer case. Will watch these for a while and probably tackle them after the show. The transmission and the transfer case might be slightly over filled will keep checking the level and amount leaking. Problem with the paint is that it didn't come out as flat as I wanted. But to put on another coat would take wet sanding the whole thing again. Little things still need to be done like new canvas around the window frames but those can wait. Cheers Phil
__________________
Phil Waterman `41 C60L Pattern 12 `42 C60S Radio Pattern 13 `45 HUP http://canadianmilitarypattern.com/ New e-mail Philip@canadianmilitarypattern.com
|
|
#162
13-07-12, 03:27
|
|||
|
|||
|
....self etching primer instead of wet sanding.....even body shops use it instead of hours of time consuming hand sanding in areas like rain trough for trunk cover.... and other compound curve areas.
Some Lucas tranny oil additives may ticken you existing oil.....works good on hydraulic system on farm tractors..... or even plain old STP in moderation can work wonders..... a little will do it..... too much and you will not be able to shift during cold weather.... in fact a M 37 overloaded with STP will not start unless the clutch is depressed..... and the engine will stall if the clutch released too fast in neutral......- 30 F and STP is like cement !!!!!! Bob
__________________
Bob Carriere....B.T.B C15a Cab 11 Hammond, Ontario Canada
|
|
#163
13-07-12, 03:30
|
|||
|
|||
|
Have you considered using regular gasoline as a thinner in your paint...... this was standard practice to reduce shine when painting M 37 back in the 70's..
Bob
__________________
Bob Carriere....B.T.B C15a Cab 11 Hammond, Ontario Canada
|
|
#164
13-07-12, 21:28
|
|||
|
|||
|
Hi Bob
Yes, you could do a lot of things with 1970 gas that I'm not sure would work now. As to the paint after going back to the Dupont manual think I know what the problem is, the hardener. It makes the paint set-up very fast and is hard wearing. It also makes for a very high gloss so it is fighting the flattening compound. I forgot for flattened application you use it in the 1st coat not top or last coat. Besides I've already put some marks in the paint putting on the last little parts. Are you guys still going to be able to come down to Weare? Cheers Phil
__________________
Phil Waterman `41 C60L Pattern 12 `42 C60S Radio Pattern 13 `45 HUP http://canadianmilitarypattern.com/ New e-mail Philip@canadianmilitarypattern.com
|
|
#165
13-07-12, 23:40
|
||||
|
||||
|
Always enjoy your progress shots and footage. Reassuring to see we dont always have smooth sailing as restorers as well.
Look forward to more pictures and film of the old girl thundering along...
__________________
Pax Vobiscum.......may you eat three meals a day & have regular bowel movements.
|
|
#166
16-07-12, 23:26
|
|||
|
|||
|
Hi All
No Jason may not be Karma see http://www.mapleleafup.net/forums/sh...ghlight=freeze Today I was out in the shop working on the Pattern 12 C60L getting it ready of our club rally starting next week. At the end of the day I looked under the HUP parked ahead of the C60L in the shop and dammed if there wasn't a puddle of antifreeze on the floor grabbed the creeper and rolled under the HUP to look for the source and it was dribbling out of the drain hole on cover pan under clutch (just as Jason had dis-cribbed), With visions of having to pull the engine this week to look at the freeze plug. As I had mentioned the service bulletins to Jason. Anyway I removed the pan and yes there was definitely coolant in the clutch pan. But a closer look showed that it had run into the pan from the outside because of the shape of the front shield. Looking up from under the HUP I could see that the side of the engine above the starter was wet. Visions leaking head gasket, then I opened the hood and darned if there wasn't coolant on top of the valve cover ridge on the lower lip on the the drivers side. Oh maybe a thermostat housing leak, looked closer and there was coolant above the thermostat housing dripping on to the steam re-leaf tube bracket. As I watched a nice big drop formed at the hose clamp on the steam re-leaf tube. In the morning I'll drain the coolant down below that level and replace the hose and clamps. That little bit of rubber hose is probably the only rubber hose that wasn't replaced. Hope that turns out to be the problem. Lesson learned look for the simple cause for problem and sometimes you get lucky. Cheers Phil
__________________
Phil Waterman `41 C60L Pattern 12 `42 C60S Radio Pattern 13 `45 HUP http://canadianmilitarypattern.com/ New e-mail Philip@canadianmilitarypattern.com
|
|
#167
08-10-12, 18:37
|
|||
|
|||
|
Hi All
Well the BEAST has been running good since it got back on the road in late July BUT it still has some very annoying teething problems. Some have been easy to find and fix BUT there is one very large annoying problem. The clutch intermittently sticks, the random nature of this problem is what is so frustrating. Ninety percent of the time it works fine then randomly it will decide to not disengage even with the peddle fully depressed. Sometimes this happens when I'm driving and some times it will happen when the truck is parked in gear or in neutral. I have pulled the clutch pan to see if I could see any thing obvious, No. Well Saturday was one of the clubs last Fall runs our foliage run it after adding another couple of hundred miles to the odometer and having it still stick hard every now and then, decided that it just had to come apart. So this morning I pulled the transmission and clutch assembly hoping that I would find something obviously wrong. No such luck. Looking for ideas on what to check. This clutch and pressure plate assembly was new before the recent overhaul (probably 5-7,000 miles) and it worked great before the overhaul. Anybody got any ides? Cheers Phil
__________________
Phil Waterman `41 C60L Pattern 12 `42 C60S Radio Pattern 13 `45 HUP http://canadianmilitarypattern.com/ New e-mail Philip@canadianmilitarypattern.com
|
|
#168
12-10-12, 02:50
|
|||
|
|||
|
HI Phil
Read through a few GM shop manuals.... so if I understand correctly..... with the clutch pedal fully depressed the clutch disc will not disengage...... If so... then none of the linkage adjustment or pedal bushings are to blame..... The only thing left is the mechanics of the clutch...... GM points out worn spline on tranny shaft and /or spline socket in center of clutch..... ....possibly a misalignment between the clutch housing and the pilot bushing in the end of the crank shaft.... Did you replace the bellhousing.....dowel alignment.... from BH to engine block? Something broken parts inside clutch pack...parts of which are moving and at times locking plate from movement.....but that usually applies to coil spring packs not the finger model... You are running a finger type clutch right...? weak or broken fingers..... Have you considered taking the clutch pack apart....making sure to punch locating marks before disassembly..... Almost has to be something mechanical that keeps the disc from moving even when you have full pressure on the fingers..... A lot has been written about clutch plates rusting on the flywheel after being parked for years..... and how to free them up.... not much found on a clutch that will rellease sometimes and sometimes not...... ....you would not have a HUP clutch in there by accident..... I hear they are fussy... Bob
__________________
Bob Carriere....B.T.B C15a Cab 11 Hammond, Ontario Canada
|
|
#169
06-11-12, 03:14
|
|||
|
|||
|
Hi Phil
Got my newsletter today..... So what was that gooey sticky stuff on the clutch plates??? and how did it get there....? how do you know it will not gather again...... ?? So could a full can of brake cleaner sprayed onto and into the clutch pack housing ... with the bottom cover removed..... be a roadside fix....? On another note..... how did you fare out with the latest bad weather..? Bob
__________________
Bob Carriere....B.T.B C15a Cab 11 Hammond, Ontario Canada
|
|
#170
06-11-12, 16:27
|
|||
|
|||
|
Hi Bob
Glad you got the Newsletter in readable condition. Let me explain Bob is speaking of Tech Tip section of our local MV newsletter were this month we were talking about Sticky Clutches. Now to Sticky Clutch as it appeared - with a few additional pictures " Tech Tips- Whats wrong with the picture at right, and can you guess the symptoms that resulted? This picture was sent in by Jim Miller and came out of Debs M151 and yes the spring was loose inside the clutch pressure plate assembly. The result was an intermittent problem with clutch disengagement. Yes, push in the clutch peddle and the clutch would not disengage which makes starting stopping and shifting gears a little difficult. Now in a couple of ways Jim was lucky in that when he took the clutch apart the problem was very obvious as was the solution replace the clutch disk. What was apparently happening was some times the spring would wedge and the clutch would stick sometimes it would slide and the clutch would work normally. Intermittent problems can be a real problem to diagnose and correct, particularly when the symptoms present erratically. It is down right reimbursing to be driving along going up and down through the gears and suddenly you start missing shifts. Bad enough when you hear the crunch yourself but worse when they can hear it in nearby vehicles as happened to your editor on the Fall Foliage Ride. After that trip I decided it was clear that something had to be done. By this time the clutch was sticking almost every time the truck was parked as well as randomly on the road. First step was remove the bellhousing bottom cover and have a look to see anything was obviously wrong. Only thing that I could see was that the clutch plate actually moved back with the pressure plate which seemed a little strange. Next step was go ahead and pull the transmission and clutch to see what was up. Once apart the first thing I check was that yes clutch disk was assembled the correct side to flywheel. (Yes some will go in wrong way around). I was hoping that I would find something obviously broken, bent , warped, or rusted no such luck everything looked like it was a relatively new clutch pack (only about 5000 miles) since it was replaced. Next step was to check each component. The pressure plate on Chevys have 3 little return springs if one is worn out or broken this can cause the pressure plate to pull back unevenly or crookedly but all three were perfect and new. The flywheel still had the resurfacing scratch marks from when the clutch had been replaced and was clean with no sign of anything.  The actual clutch disk was flat, no measurable wear, no loose rivets. The only thing that could be seen was some dark areas that felt sticky, yes sticky to the touch. When I ran my finger tip around on both the flywheel and pressure plate. The flywheel was clean but the pressure plate felt sticky as well. 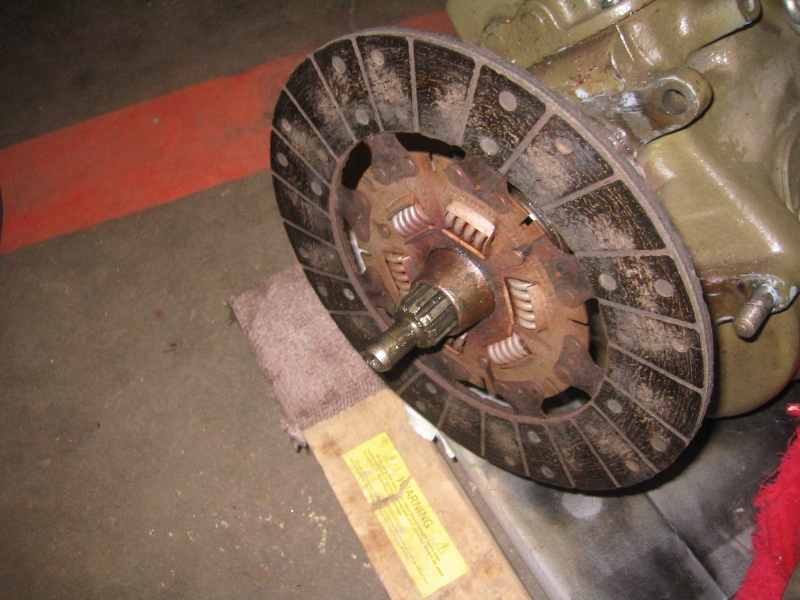 Cleaned all of the friction surfaces with brake cleaner until the rags came away clean. Flywheel and pressure plate came clean quite easily, taking only spraying and wiping twice. But the clutch disk took a more cleaning including using a soft bristle brush to scrub the recessed rivets clean. With everything really clean and the spines, through out bearing, and pilot bearing in the flywheel carefully regreased reinstalled the entire unit and hoped for the best. Luck was with me, now after another 200 miles of driving the clutch has not stuck. The only crunch noises from missed shift are my own missed double clutching." Now to Bobs questions: So what was that gooey sticky stuff on the clutch plates??? and how did it get there....? how do you know it will not gather again...... ?? I think that the sticky stuff was a combination of old engine oil and clutch dust. In thinking about it after pulling the clutch assembly out I remembered that because it was a relatively new clutch and pressure plate assembly I had not cleaned it. Remember one of the reasons for the overhaul was major rear main oil leak. This time I cleaned the entire pressure plate unit inside and out along with the clutch disk. So could a full can of brake cleaner sprayed onto and into the clutch pack housing ... with the bottom cover removed..... be a roadside fix....? Yes I think you are correct the brake cleaner treatment would probably work if as I observed the clutch was actually sticking to the pressure plate and moving back when the clutch was disengaged. so catching it when it was disengaged, or prying it forward, would let you stick the little degreaser nozzel in to spray. This does work with a clutch that is slipping because of oil leaks for a little while. On another note..... how did you fare out with the latest bad weather..? We fared OK power was out for three days because the wire was broken in two places in town. Because of the power companies triage system they send all the line crews to the most populated areas first. So people in rural communities are all buying generators. We have generators. Talking with the line crew that finally reconnected our area, they had just been told to pack-up and drive to Connecticut, New York City area. Its the people down there that I really feel sorry for. Cheers Phil
__________________
Phil Waterman `41 C60L Pattern 12 `42 C60S Radio Pattern 13 `45 HUP http://canadianmilitarypattern.com/ New e-mail Philip@canadianmilitarypattern.com
|
|
#171
07-11-12, 02:24
|
|||
|
|||
|
Sorry my pppuuuiii oooooooooooooooo key is sticking....
..... I was afraid you might be living out of the back of the Beast !!!! Bob
__________________
Bob Carriere....B.T.B C15a Cab 11 Hammond, Ontario Canada
|
|
#172
14-12-12, 23:17
|
|||
|
|||
|
CMPs Sharing Restoration Space with Lincoln
For the last 34 years my CMPs have shared garage space with some other antique vehicles. Well this fall with all three of my CMPs running and on the road I decided it was time for one of those other antiques to be moved from sleeping in the garage to restoration space in the shop. So earlier this month I started on what might be call Rip Van Winkle Lincoln which has been sleeping peacefully for 39 years. This last weeks project has been moving things like a spare 900+lbs. engine and transmission from garage to shop using the lift arm on the Pat 12 C60L. Then having the Lincoln on a rollback from garage to shop, much of the rest of the week was spent reorganizing the garage so that the C60L and HUP could move into the garage. The ’49 Lincoln Cosmopolitan Town Sedan was the first car I bought, and was the replacement for another ’49 Lincoln Cosmopolitan Six Passenger Coupe which had been in the family since new. The replacement was necessary as the Couple with well over 100K on the odometer and way to many on salty winter roads had developed terminal rust. I've the beginnings of a 49 Lincoln page on my web site http://canadianmilitarypattern.com/R...%20Lincoln.htm Don’t worry about my CMPs I still have a extra bay in the shop to work on them along side the Lincoln. Nor will my participation in MLU change, after much searching for a similar Lincoln forum I can conclusively report that MLU has all the car forums I have view beat hands down. MLU has got to be one of the best groups in terms of responsiveness to questions, thought and detail of response, and just general read ability. Here is the Lincoln before the Nap  Here is Rip Van Winkle Lincoln waking from its nap Here is Rip Van Winkle Lincoln waking from its nap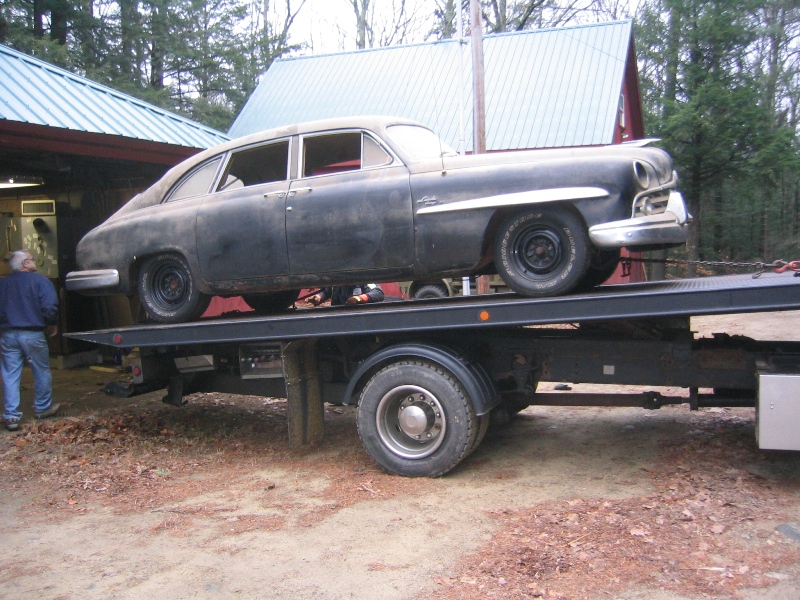 Pat 12 taking part in the move 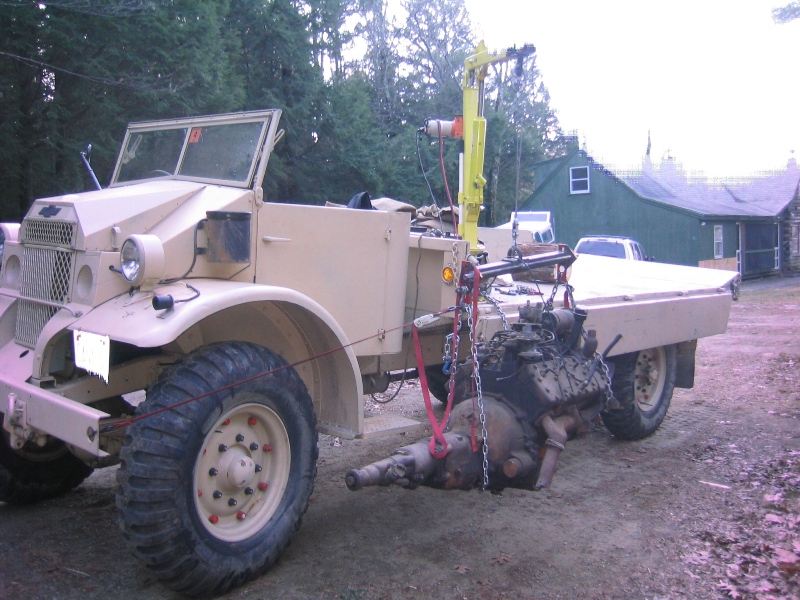 Cheers Phil
__________________
Phil Waterman `41 C60L Pattern 12 `42 C60S Radio Pattern 13 `45 HUP http://canadianmilitarypattern.com/ New e-mail Philip@canadianmilitarypattern.com Last edited by Phil Waterman; 14-12-12 at 23:55. Reason: Missing words
|
|
#173
15-12-12, 04:31
|
|||
|
|||
|
Not the car....... you !!!!!!
You never fail to surprise and amaze us. Will be monitoring you progress. Bob C.
__________________
Bob Carriere....B.T.B C15a Cab 11 Hammond, Ontario Canada
|
 |
|
|


 Linear Mode

