|
#31
 28-02-16, 17:57
|
|||
|
|||
|
That's a bummer, Wayne, it looks good! I bet that CS will be a pain to sandblast off. Wonder what other alternatives are out there if CS and POR15 have their own inherent issues? What type of grey paint did you use on the engine?
__________________
Peter Phillips 1952 M38Cdn 1953 M100Cdn 1951 PE-95K Gen Set MVPA Cdn Forces 1986-2006 
|
|
#32
28-02-16, 18:40
|
||||
|
||||
|
Hi Peter, Yes its definitely a little bit of a setback. My original intention was to use a good quality epoxy primer and paint. However, I was talked in to using the CS, as the guy told me I could paint over it (my fault for not doing my homework first). Anyway, Im back to my original plan. I don't need a "specialized" frame paint for this vehicle, as it is not a daily driver and will not be subject to winter road salt etc. Im thinking of redoing the "outside" portions of the frame only, and leaving the CS on the inner (hard to get at) sections that you cannot see.
My original engine paint was in very good shape, and looked quite good once I cleaned it up (several hours of cleaning). I am still looking for a high-temp paint in the right shade of grey. Everything I have found in "high-temp" is some type of aluminum or silver color. I sprayed a light coat of Krylon "light machinery grey" over the entire block, but Im sure it will not last too long in the hot areas. The Krylon is basically an exact match to the original color. I will keep looking for the same shade in a high-temp paint.
__________________
1953 M37 CDN 1953 M38A1 CDN 1967 M38A1 CDN2
|
|
#33
28-02-16, 19:27
|
|||
|
|||
|
Of course, the original colour was not grey. That was just the colour applied when the engines were rebuilt. Originally the engine would have been olive green with a black valve cover and the hurricane decal at the front of the valve cover.
The grey colour could vary depending on who did the rebuilds. The contract changed a couple of times, and as well 202 workshop was doing them for a spell, also in grey.
|
|
#34
28-02-16, 19:39
|
|||
|
|||
|
At different times both Ford and Chevrolet used grey paint on engine blocks although I'm not sure if the shade you need matches those colours. I'm not sure you need the "high temperature" paint often quoted as being for exhaust pipes and headers and ratedup to 1300 degrees. I would have thought something in the order of 300-500 degrees should be a high enough rating as I don't imagine the outside of the block should get any hotter than the oil and water inside the block. Several suppliers, Eastwood, Filling Station, Chevs of the 40s, Duplicolor, Hirsch, sell engine enamel in different versions of grey.
|
|
#35
02-03-16, 19:14
|
|||
|
|||
|
"Application Note: While Chassis Saver has incredible rust and corrosion resistance and can be used for all underbody applications without top coating, it is sensitive to UV light (sun) and its initial appearance will change over time. Its RUST STOPPING properties and corrosion resistance will never degrade but its color will shift from black to charcoal gray. Silver-aluminum remains very close to its original appearance. If aesthetics are important, Chassis Saver can and should be top coated with a quality industrial or automotive finish. Any opaque finish is effective. Clear coating is not recommended as protection. Suitable topcoats include any MAGNET Finishing System including 4800 Series Synthetic Urethane Enamels, MAGNACRYL 9000 Series Acrylic Enamels or MAGNATRON 5000 Series Acrylic Polyurethane Enamels. Call customer service or ask your local distributor for more information"
It looks like you can top coat this product as you would with POR 15. This was taken from the Magnet Paints website, perhaps the technical rep you spoke to was mistaken? http://www.magnetpaints.com/underbody.asp
|
|
#36
02-03-16, 20:55
|
||||
|
||||
|
Very interesting, thanks 45jim. I read that section in their technical bulletin a few weeks ago when I was seeking information about the procedure to apply finish top coats. I note that they indicate a list of siutable top coats: MAGNET 4800 Series Synthetic-Urethane Enamel, MAGNACRYL™ 9000 Series Acrylic Enamel or MAGNATRON™ 5000 Series Acrylic Polyurethane. I was unsuccessful in getting an actual procedure from CS, as their rep said top coating is not recommended. As you point out, it seems there is some misunderstanding or lack of product knowledge among their own product representatives.
I have been busy with work/travel, so I have not done anything further to my frame yet. I may reconsider my options, and/or do a small scale test to see how well coatings will adhere.
__________________
1953 M37 CDN 1953 M38A1 CDN 1967 M38A1 CDN2
|
|
#37
17-03-16, 05:27
|
||||
|
||||
|
Here is a followup to the last few posts regarding products that will stick to Chassis Saver. I tried two different tests on my frame as follows:
- POR Tie Coat Primer: Sprayed on. Still felt a bit soft 24hrs after. However, three days later it was hard as a rock, and I could not easily mark it with a scraper. I would say it bonds very well to Chassis Saver. - Red oxide primer: Red oxide dries quite fast, and it also passed my test with a metal scraper within a couple of hours of application. I am confident that both of these products bond well to CS, and I do not have any concerns. I guess I have a long term test underway, because I have moved on to applying my enamel paint. If anyone wants a "long term" update on this test... contact me in the future sometime... haha.
__________________
1953 M37 CDN 1953 M38A1 CDN 1967 M38A1 CDN2
|
|
#38
19-03-16, 00:50
|
||||
|
||||
|
Hi Stuart. There is not much science behind the temporary spray area I made. I simply hung some plastic tarps from the rails of one of my overhead doors. I left a bit of an air gap (~12") between the tarps and the floor to allow airflow, and a place for the fumes to drop and exit. I also put a plastic tarp on the floor to catch the overspray and any drips/mess. When Im spraying, I wear a 3M half-face respirator mask with two filters, and I leave a couple of doors open enough to create a crossflow of air. I don't have a lot of room around the edge of the scaffolding... probably only 2-3 feet around the edge (you dont really need much). For lighting, I just have a combination of the overhead fluorescent lights and a couple of halogen work-lights on floor stands (at about waist-chest height). You can see one of the work-lights in the photos above. Hope that helps.
__________________
1953 M37 CDN 1953 M38A1 CDN 1967 M38A1 CDN2
|
|
#39
30-03-16, 07:08
|
||||
|
||||
|
This body had several reinforcement plates added to it by the CF as shown in some of my earlier photos (refer to post #14). In the short term, I believe the intent of these plates was to make the jeep last a few more years in service (early 80's). However, they created a bunch of damage to certain parts of the body when they did these modifications (hidden under the reinforcement plates).
With the frame painting complete, I have turned over to fixing some of the damaged body sections. Im in the process of making up a few new body sections that I will butt-weld into place where the ugliest damage was (under the doors, and around the tail lights). The good part is the jeep is essentially rust-free, so once I cut out the bumpy/damaged parts, its all solid. By the way: I wish they still made vehicles with 14ga sheet metal on the sides!
__________________
1953 M37 CDN 1953 M38A1 CDN 1967 M38A1 CDN2
|
|
#40
21-07-16, 18:34
|
||||
|
||||
|
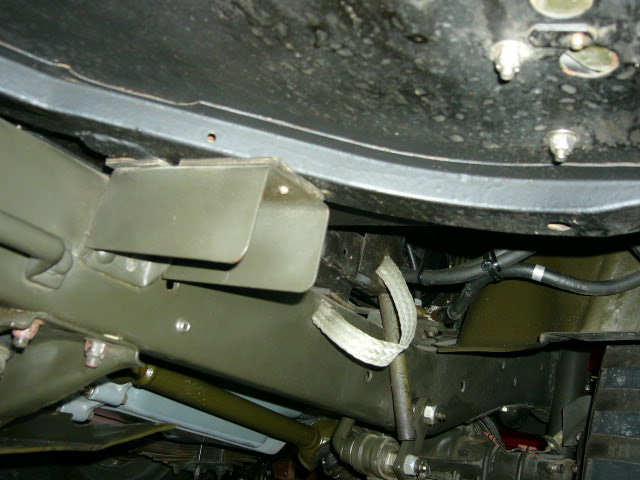
Progress has been a bit slow over the past several months, as other priorities have consumed my time.
I finally got around to cleaning and painting the differentials and mounting the frame back on. A few photos before installing the transmission (hopefully tonight), and engine (soon). I'm still not 100% decided on the final paint color (semi-gloss OD, or 3-color camo), but either way the frame has a glossy coat of OD that will make a good base of protection, no mater what comes later. This is similar to the way the jeep would have started out new.
__________________
1953 M37 CDN 1953 M38A1 CDN 1967 M38A1 CDN2
|
|
#41
21-07-16, 18:36
|
||||
|
||||
|
A few more...
__________________
1953 M37 CDN 1953 M38A1 CDN 1967 M38A1 CDN2
|
|
#42
25-07-16, 01:04
|
||||
|
||||
|
New clutch set and engine dropped into place.
__________________
1953 M37 CDN 1953 M38A1 CDN 1967 M38A1 CDN2
|
|
#43
25-07-16, 01:08
|
||||
|
||||
|
Most of the chassis parts and pieces back in place.
__________________
1953 M37 CDN 1953 M38A1 CDN 1967 M38A1 CDN2
|
|
#44
26-08-16, 11:08
|
|||
|
|||
|
Hello Wayne,
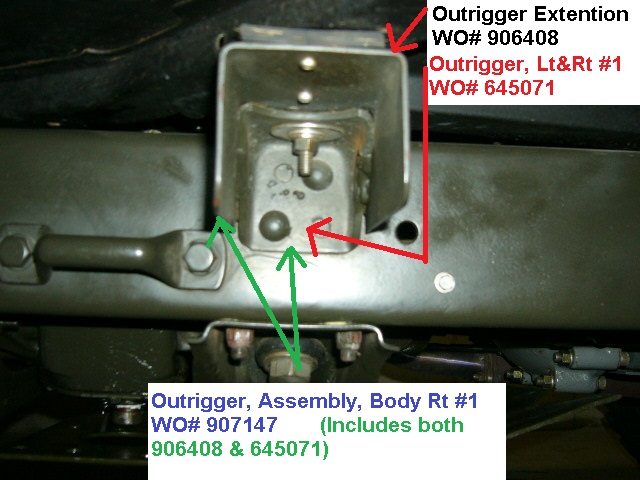
I notice in your very early photos of your frame the right front tub mount bracket is the extended type but in the remainder of your restored frame photos you have replaced it with the standard early chassis tub mount bracket (often called Outrigger). 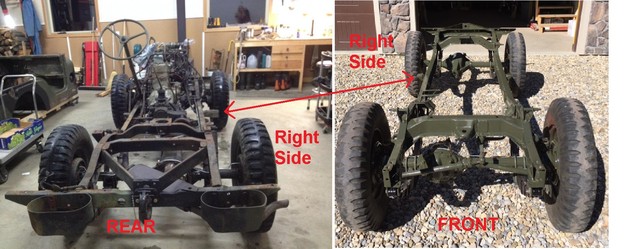 Are these the same frames?
__________________
Wes K 45 MB, 51 M38
|
|
#45
26-08-16, 15:29
|
||||
|
||||
|
Good eye Wes. Yes it's the same frame. I cut the mount back to original configuration.
__________________
1953 M37 CDN 1953 M38A1 CDN 1967 M38A1 CDN2
|
|
#46
26-08-16, 17:22
|
|||
|
|||
|
What information were you able to find that led you to remove the outrigger extension? Was it ever standard on the M38A1 CDN series 1, 2 or 3? I have seen it often on CJ5's but not military.
__________________
Wes K 45 MB, 51 M38
|
|
#47
26-08-16, 17:52
|
||||
|
||||
|
I believe the body mount extension was added to this vehicle as part of the "life extension program" in the early 1980's (Im sure someone like Rob L. can confirm that the body mount extension was part of the upgrade modifications when necessary). The CF had the body off this jeep and performed a number of modifications and repairs to the entire vehicle. That particular body mount extension is located under the passenger floor area, and was most likely added to make things more rigid as there are sometimes stress cracks that develop in the body metal around some of the body mounts (due to rough service and/or heavy loading in that area).
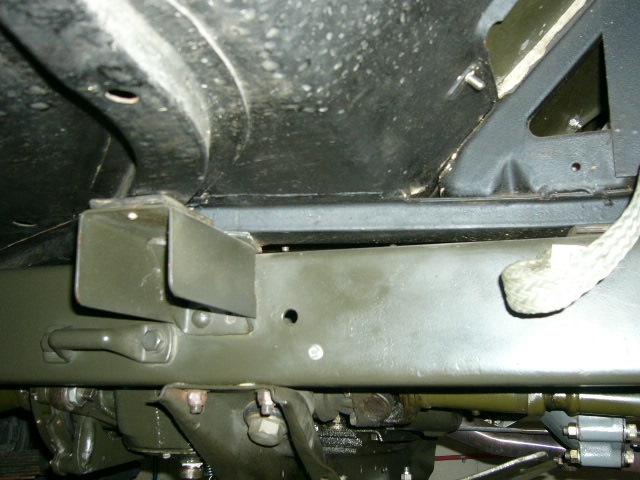
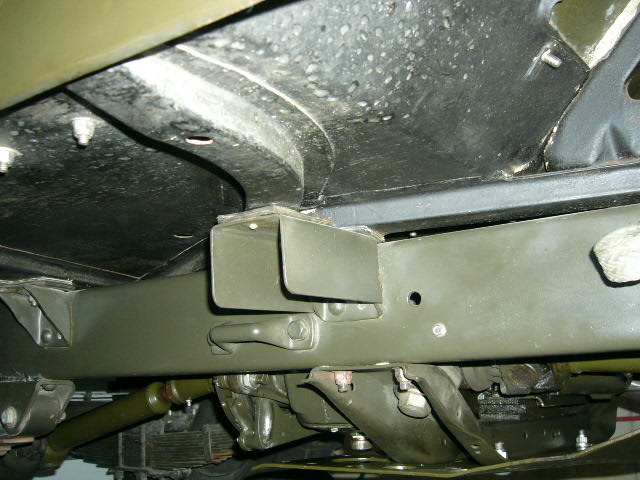
The body mount extension on this jeep was somewhat poorly welded in place and had been bent from an under-body impact of some type. I decided to remove it rather than repair it. This modification was not standard on the M38A1 CDN model, but I am guessing that it was a common addition (where necessary) on the CDN 2 & 3 models that survived into the 80's.
__________________
1953 M37 CDN 1953 M38A1 CDN 1967 M38A1 CDN2
|
|
#48
26-08-16, 18:30
|
|||
|
|||
|
Wayne,
Thank you for the explanation. This extension has caused some confusion even on our www.willysmjeeps.com discussion boards. The outrigger extension is listed in the US M38A1 ORD 9 parts manual as WO# 906408 but is presumably for the M170 frame but can be used on the M38A1 frame and probably was a desired upgrade when the M38A1 was used as a recoiless rifle or machine gun platform. Unfortunately neither the MWO for the M38A1C conversion nor Change 1 to the TM 9-8015-2 show this extended outrigger being used on either jeep.
__________________
Wes K 45 MB, 51 M38
|
|
#50
11-05-17, 05:47
|
||||
|
||||
|
After completing all of the body welding last December, I have been waiting since January to get a weather window with clear skies and dry roads so I could get the body in for sandblasting. Unfortunately between traveling about 80% of the time for work, and consistent winter weather when home, I didn't get the sandblasting done until today. What a relief to finally get that stage completed, and move on to the final body work and painting.
__________________
1953 M37 CDN 1953 M38A1 CDN 1967 M38A1 CDN2
|
|
#51
11-05-17, 05:55
|
||||
|
||||
|
A few photos:
__________________
1953 M37 CDN 1953 M38A1 CDN 1967 M38A1 CDN2
|
|
#52
11-05-17, 14:19
|
||||
|
||||
|
Hi Wayne
I was quickly reading over your last few comments on your post regarding the frame. From my understanding, M38A1 frames were black right from the manufacturer at the time... Not sure if this applies to the later built CDN2 or CDN3 models but US built Jeeps had black frames.
__________________
3RD Echelon Wksp 1968 M274A5 Mule Baifield USMC 1966 M274A2 Mule BMY USMC 1958 M274 Mule Willys US Army 1970 M38A1 CDN3 70-08715 1 CSR 1981 MANAC 3/4T CDN trailer 1943 Converto Airborne Trailer 1983 M1009 CUCV RT-524, PRC-77s, and trucks and stuff and more stuff and and....... OMVA, MVPA, G503, Steel Soldiers
|
|
#54
12-05-17, 00:22
|
||||
|
||||
|
I was looking at the patch kit photos, your lucky that they followed the instructions, the one I'm working on now were all welded and the rear corner panel was replaced for WHAT reason? lots of fab work but it's coming along , great work on yours , should be on the road soon,
|
|
#55
12-05-17, 06:14
|
||||
|
||||
|
I hadn't really thought of it that way Frank. Originally I thought it would have been better if they had welded the patches on, but now that you mention it, the rivets made it much easier to get them off. I just had to drill out about 500 rivets and then fill the holes with weld. I still can not understand why 90% of the patches were even on this jeep... there was no need in my opinion.
Good luck with your project. It would be good to see some photos of what you are dealing with.
__________________
1953 M37 CDN 1953 M38A1 CDN 1967 M38A1 CDN2 Last edited by Wayne Hingley; 24-05-17 at 04:01. Reason: sp
|
|
#57
13-05-17, 01:16
|
||||
|
||||
|
That fender is actually off this CDN2, but due to patch damage I removed the original reinforcement plate. I have a new reinforcement plate that I will install.
__________________
1953 M37 CDN 1953 M38A1 CDN 1967 M38A1 CDN2
|
|
#58
16-05-17, 06:00
|
||||
|
||||
|
What is the black coating inside the battery box? Is the product (or something similar) available on the market? The only product I have found on line so far is for aircraft http://www.aircraftspruce.com/catalo...lkfloatbtm.php
I don't really need to re-do the coating in my battery box, but it would be nice to apply a fresh coat of sealant while it is apart.
__________________
1953 M37 CDN 1953 M38A1 CDN 1967 M38A1 CDN2
|
|
#60
16-05-17, 06:33
|
||||
|
||||
|
Thanks Rob. It is good to know what product was used. It looks like coal tar epoxy is available from a few different manufacturers including Rustoleum http://www.rustoleum.com/product-cat...coal-tar-epoxy
However, it is only available in 1 gallon cans and larger. The coating in my battery box is still quite good, so I will not redo it at this time. I was kind of hoping to find something in a spray can that I could do a minor touch-up with. Ill save the complete recoating job for a future time.
__________________
1953 M37 CDN 1953 M38A1 CDN 1967 M38A1 CDN2
|
 |
| Thread Tools | |
| Display Modes | |
|
|
 Similar Threads
|
||||
| Thread | Thread Starter | Forum | Replies | Last Post |
| Dual RT-524's in M38A1 CDN2 | rick25 | Post-war Military Vehicles | 4 | 06-09-14 08:14 |
| Jeep M38A1 / cdn2 | CWO (ret) Gilles Aubé | Post-war Military Vehicles | 20 | 09-06-14 04:08 |
| New winter project: Borgward | malcolm erik bogaert | Post-war Military Vehicles | 13 | 22-11-12 12:34 |
| New M38A1 CDN2 | rick25 | Post-war Military Vehicles | 27 | 11-05-12 00:24 |
| MG mount for a M38A1 CDN2 | BOBM35A2 | Post-war Military Vehicles | 31 | 19-06-10 01:44 |


 Linear Mode

