MLU FORUM  

Go Back   MLU FORUM > MILITARY VEHICLES > The Softskin Forum

Notices

Reply
 
Thread Tools Display Modes
  #1  
Old 07-02-12, 07:41
CWO (ret) Gilles Aubé's Avatar
CWO (ret) Gilles Aubé CWO (ret) Gilles Aubé is offline
Registered User
 
Join Date: Mar 2008
Location: Laval, Québec, Canada
Posts: 217
Default CHEV 216 VS Chev 235

Is there an easy way to difference a Chev 216 VS a Chev 235?
Reply With Quote
  #2  
Old 07-02-12, 11:55
Grant Bowker Grant Bowker is offline
Registered User
 
Join Date: Jul 2006
Location: Ottawa, Canada
Posts: 2,287
Default

www.stovebolt.com is a good resource for Chevrolet cars and trucks of the same age as CMPs.
One page on engine identification is:
http://www.stovebolt.com/techtips/en...tification.htm

The following gives some guidance for identifying engines (with photos)
http://www.victorylibrary.com/graphi...2520photos.pdf
Reply With Quote
  #3  
Old 07-02-12, 20:39
cletrac (RIP)'s Avatar
cletrac (RIP) cletrac (RIP) is offline
David Pope
 
Join Date: Jul 2003
Location: Eston, Sask, Canada
Posts: 2,251
Default

On a 216 the pushrod and lifter cover tin goes up to the tappet cover and on the 235 it ends at the top of the block.
__________________
1940 Cab 11 C8 Wireless with 1A2 box & 11 set
1940 Cab 11 C8 cab and chassis
1940 Cab 11 C15 with 2A1 & Motley mount & Lewis gun
1940 Cab 11 F15A w/ Chev rear ends
1941 Cab 12 F15A
1942-44 Cab 13 F15A x 5
1942 cab 13 F15A with 2B1 box
1943 cab 13 F15A with 2H1 box
1943 Cab 13 C8A HUP
1944 Cab 13 C15A with 2C1 box
1943 Cletrac M2 High Speed Tractor
MkII Bren gun carrier chassis x 2
Reply With Quote
  #4  
Old 07-02-12, 20:48
CWO (ret) Gilles Aubé's Avatar
CWO (ret) Gilles Aubé CWO (ret) Gilles Aubé is offline
Registered User
 
Join Date: Mar 2008
Location: Laval, Québec, Canada
Posts: 217
Default 216 vs 235

Thank you Grant for the info.
Gilles
Reply With Quote
  #5  
Old 07-02-12, 22:22
Grant Bowker Grant Bowker is offline
Registered User
 
Join Date: Jul 2006
Location: Ottawa, Canada
Posts: 2,287
Default

Quote:
Originally Posted by cletrac View Post
On a 216 the pushrod and lifter cover tin goes up to the tappet cover and on the 235 it ends at the top of the block.
Is that true for all 235 including the 1942ish splash lubricated ones used in US Army Chev 4x4 1-1/2 ton ? I thought those looked like 216, but could easily be wrong.
Reply With Quote
  #6  
Old 08-02-12, 00:02
Phil Waterman Phil Waterman is offline
Moderator
 
Join Date: Feb 2003
Location: Temple, New Hampshire, USA
Posts: 3,927
Default Early 216 and 235 share many parts

Hi All

Just went into the Master Parts Book Chevrolet, Maple Leaf and GMC Truck Parts Catalogue 1938-1951.

Grant you are correct the early 216 and 235 share the same valve side cover along with many other parts. From the parts book it looks like the change in side cover came some time in 1950. Dave I also remember one site which had the statement about the side cover, but I think the differentiation they meant to make was between the early splash lubricated 235 and the the later pressure lube crank.

So the full valve side cover vs the short cover is not a definitive identifier.

As to the military 235 engine I just installed a NOS 235 head 1942 date on 216 engine http://canadianmilitarypattern.com/H...May%20Work.htm

The casting numbers seem to be the best way of telling which is which.

Here are a couple of good websites:
http://chevy.oldcarmanualproject.com/models/engine.htm
http://clubs.hemmings.com/clubsites/...tory/cast.html
http://aera.org/techtools.aspx

I'm working on an update to my web page with a list of current good Stovebolt Six web information site


Cheers Phil
__________________
Phil Waterman
`41 C60L Pattern 12
`42 C60S Radio Pattern 13
`45 HUP
http://canadianmilitarypattern.com/
New e-mail Philip@canadianmilitarypattern.com

Last edited by Phil Waterman; 08-02-12 at 00:12. Reason: add information
Reply With Quote
  #7  
Old 08-02-12, 09:46
Hanno Spoelstra's Avatar
Hanno Spoelstra Hanno Spoelstra is offline
MLU Administrator
 
Join Date: Feb 2003
Location: The Netherlands
Posts: 14,426
Default

Here's a nice one to test your Chevy engine ID skills: seller claims it is a 216. Engine sits in what remains of a 1949 Chevrolet truck, which is in the process of being dismantled.

PS: here's the link to the advert for the Dutchmen who are looking for a Chevrolet engine - http://link.marktplaats.nl/525635919

Someone please go save this and drop it in a CMP!

H.
Attached Thumbnails
5RYtLl6mbQjPzRU8FLXHAw==.jpg   MsAgKWj7Efd4YHaozn0V9Q==.jpg  
Reply With Quote
  #8  
Old 08-02-12, 12:50
motto motto is offline
Registered User
 
Join Date: Apr 2010
Location: Woodend,Victoria,Australia
Posts: 1,068
Default

Definitely appears to be a low pressure engine so most likely is a 216.

David
__________________
Hell no! I'm not that old!
Reply With Quote
  #9  
Old 08-02-12, 17:01
Phil Waterman Phil Waterman is offline
Moderator
 
Join Date: Feb 2003
Location: Temple, New Hampshire, USA
Posts: 3,927
Default Like the carb in those pictures

Hi Hanno

Found the two pictures interesting note the size of the carburetor looks like it is a little smaller than the original.

Cheers Phil
__________________
Phil Waterman
`41 C60L Pattern 12
`42 C60S Radio Pattern 13
`45 HUP
http://canadianmilitarypattern.com/
New e-mail Philip@canadianmilitarypattern.com
Reply With Quote
  #10  
Old 08-02-12, 21:23
Alex Blair (RIP) Alex Blair (RIP) is offline
"Mr. Manual", sadly no longer with us
 
Join Date: Feb 2003
Location: Ottawa ,Canada
Posts: 2,916
Default Left hand drive..

Bell housing and linkage would have to go...won't work in a right hand drive CMP..
Like the way the lad undid the steering column.???
Gas axe....
Sad...
__________________
Alex Blair
:remember :support :drunk:
Reply With Quote
  #11  
Old 09-02-12, 00:02
CWO (ret) Gilles Aubé's Avatar
CWO (ret) Gilles Aubé CWO (ret) Gilles Aubé is offline
Registered User
 
Join Date: Mar 2008
Location: Laval, Québec, Canada
Posts: 217
Default 216 vs 235

It has a valve cover with two top acorn nuts, also the right side cover is very big and the casting number GM 839253 so what it is????
Gilles
Reply With Quote
  #12  
Old 09-02-12, 00:50
Phil Waterman Phil Waterman is offline
Moderator
 
Join Date: Feb 2003
Location: Temple, New Hampshire, USA
Posts: 3,927
Default Bell Housing Conversion

Quote:
Originally Posted by Alex Blair View Post
Bell housing and linkage would have to go...won't work in a right hand drive CMP..
Like the way the lad undid the steering column.???
Gas axe....
Sad...
Hi Alex

Not really a problem, I've done two Bell Housing Conversions and they are not difficult to do. I'll dig out the photos and get them posted.

Old discussion http://www.mapleleafup.net/forums/showthread.php?t=4722 needs better photos particularly on the how.

Cheers Phil
__________________
Phil Waterman
`41 C60L Pattern 12
`42 C60S Radio Pattern 13
`45 HUP
http://canadianmilitarypattern.com/
New e-mail Philip@canadianmilitarypattern.com
Reply With Quote
  #13  
Old 09-02-12, 02:22
Alex Blair (RIP) Alex Blair (RIP) is offline
"Mr. Manual", sadly no longer with us
 
Join Date: Feb 2003
Location: Ottawa ,Canada
Posts: 2,916
Default SWitch..

Quote:
Originally Posted by Phil Waterman View Post
Hi Alex

Not really a problem, I've done two Bell Housing Conversions and they are not difficult to do. I'll dig out the photos and get them posted.

Old discussion http://www.mapleleafup.net/forums/showthread.php?t=4722 needs better photos particularly on the how.

Cheers Phil
Phil

Here is a set up that would make the old 216 snort..(Scroll down in the photo gallery to the 3rd pix.)

http://www.patricksantiquecars.com/gallery.html
I had a look at a Chev bell housing and thought it was possible to switch sides..The castings were there but not drilled..
I ran across some good Chev info that you may want to copy and keep for reference...
Alex

Quote:
http://www.patricksantiquecars.com/articles.html

Articles

Swap your '216 Chevy "6" for a '235

If you own a '37-'53 early Chevy car or truck with a "splash oiling" '216 or '235 engine, and want a smooth, powerful daily "driver", installing the later full-pressure '235 is the answer.

This new design was first installed in '53 passenger cars with PowerGlide, thereafter in all models and sizes
(passengers and commercial)

Not only does the swap happen easily, without butchering or modification, it brings improved performance and reliability from full-pressure oiling, insert rod bearing, and lighter-weight aluminum pistons not to mention improved breathing, thanks to larger intake valves and ports.

Read on for the simple installation tips and identification clues to help you score the right engine: This is one swap "made in heaven"

The rear of every Chevy '6' block ('216, '235, or '261) is the same from 1937 through 1962! And, the flywheel/crank-flange pattern is the same from '40-'62! We obviously have wonderful interchangeability. Therefore, using pure Chevy parts, any engine from '37-'62 can be installed into any chassis (car, truck, etc.) from '37262!
You will however, need to pick the right parts: here's how....

Whenever you're putting the donor engine into ('41-'53), re-use your original bell-housing, flywheel, and starter. This means your rear motor-mounts remain unchanged. '37-'40 installations will need to get a '41-'54 wide-tooth (#139) 6-bolt flywheel off any '216, '235 or '261; then, use their original bell- housing starter. The 6-volt starter is just fine, even if you're converting to 12-volts; it'll love it!
(Final Note of Caution: The fine-tooth (#162) '55 and later flywheel will not mesh with your original starter! Do not use it.)

*'37 chassis (Pass or comm.) are all alone in (3) additional requirements:

must obtain a '41-'54 throwout arm (and pivot ball).
replace throwout thrust washer with a '41-'62 throwout bearing, and
obtain and install a transmission throwout bearing retainer from '38 or '39 Chevy transmission.

Pre-'49 cars and trucks will have to slightly alter the exhaust pipe to fit the '235 manifold. (Nice time to install "duals", isn't it? Hint. Hint.) By the way, '216/'235 exhaust/intakes won't mix and match. And, although the entire '216 manifold set can be bolted to the 235 involved, it's a bit Mickey Mouse since the port rings will have to be eliminated due to the '216s smaller port size.

If your "new" '235 has the big water-temp. hole, ask NAPA for Balkamp part #701-1798 (Weatherhead calls it part # 202x5x4). Now, your original temp. sender fits.

Let's solve the "hydraulic or solid lifter question" now... "Solids' were the rule on every Chevy '6' through 1949 (either '216 or '235 "Loadmaster"). Between 1950 and 57. solids came with every commercial or "stick" (passenger) transmission, whether '216 or 235 or 261 engine. Hydraulics went only with PowerGlide equipped cars. From '58 to '62, every block was drilled for hydraulic lifters, though some had solids installed. (Hydraulic lifters will only function in a block that has the oiling passage drilled through the lifter bores) this hole will be plugged and visible on the rear of the block, just above the cam plug.

(**special note: there are, currently, no satisfactory aftermarket hydraulic lifters available. So, we suggest you install a solid-lifter cam/lifter combo,)

'58-'62 engines must use a lifter with chamfered sides to prevent shutting off rocker arm oil! No oil line from rear cam bearing to block-center will be found in the pushrod chamber of these engines; and, in addition to the I.D. criteria (above), will have a triangular side-mount pattern.

Mention MUST be made of the Federal reduction of gasoline lead-content to .1gm/gal. begining January 1, 1985. This amount of lead additive is 1/10 of the amount your engine was designed for and, continued operation will effect exhaust valve seat life. Take the time, while you're building your engine, to have the no-lead exhaust valves and seats installed in the cylinder hear! (You'll do it sooner or later.) Call Patrick's for the parts.


ADDENDUM

SPECIAL NOTE for all 1952 and '53 passenger. Your cars have a side-mount arrangement which will require locating a full-pressure block from either a '53 PowerGlide or (any '54) car or truck. (See add'l pics and details in eng. I.D. section).

With a bit of perserverance, a 58-62 block can be installed, by modifying the 53-54 mount brackets. Using a 55-57 block will require reverting to '49-'51 mounting: front mounts and side mounts and brackets (the bolt on's at the bell-housing and axle brackets extending off the frame rails)

Identifying the full-pressure you want to install: (Remember, you're looking for a '53 PowerGlide, or anything later.)

Simply checking the style of the water pump will take care of about 90% of the prospects. If it has a pump whose entire body is below the head gasket surface, rather than half on the block and the upper half in front of the head, it's gotta he '55 (2nd) through '62. You've found it. The search is over. Disregard any of the next criteria.
Check the rocker cover ("valve cover"). If it's held on with four (4) screws (2 on each side), it's a '54-'62 and the right one. Look no further- you just scored.
Walk on by any engine with the tall pushrod cover that surrounds the spark plugs. It is a "babbit pounder".
Also eliminate any engine with the little, tell-tale triangular plate and curved oil line in the middle of the driver's side. This tells you it has the dreaded dipper rods and splash oiling. The driver's side of the engine you want is ''clean" (no plate or line).
Disregard any engine with the studs through the rocker cover, except one: the '53 P.G. (first year); but, it will be without the above plate and line, too.
Want to pinpoint engine I.D.? On the block above the end of the starter will be an initial (A-L), followed by either (2) or (3) numbers. The initial represents the month: the numbers are the day and year the block was cast. Now, then, no more guessing!

A note on front mount plates.. They will interchange on every Chevy '6' ('216, '235, or '261) built from 1937 thru '62! This matches the bellhousing story. It's another story, but the fronts and rears of every Chevy '6' are also the same as every GMC "small" '6' ('228, '236, '248, '256, '270, and '302)! Obvious why these were popular swaps!

Throttle linkage may need modifying if your block's bellcrank mount hole is further back (toward firewall). Easy ... some of the curve will need to be taken out of the accelerator rod. Squeeze it in a vise 'till it makes it's travel without rubbing the floor pan (as installed in the bellcrank, without return spring). When that's done, measure how much it needs shortening by bringing the whole linkage assemble to "full throttle". Simply cut that amount out of the slender part of the rod and re-weld. Done!

Front engine mount pad(s) should be installed on the engine before putting it between the fenders, since the pass. side bolt may only go into the mount with the timing cover and "harmonic balancer" removed. (See front mount hole in addendum, item #3)

Water pump / generator alignments depend on each other. Install the water pump first. If your '235 wore the long water pump pulley, DO NOT BEGIN HACKING ON THE RADIATOR CORE SUPPORT and/or LATCH PANEL! Patrick's has the short pump and special pulley for only $139.95 This allows for the use of the larger, late-model fan, which provides better cooling.
(Note: it is not correct to press the early '216 pulley onto the late water pump, since this spins the impeller approximately 190% of design speed. and may even cavitate the water, causing overheating. In addition, the old, back-woods method can literally be dangerous, since it requires using the '216 "low speed" fan which is turned far beyond its design safety.)

Now, align the generator with the water pump pulley. If you wish to switch to an alternator at this point, Patrick's has the bracket set for only $59.95. (specify year.)

Radiator Hoses and sizes. Upper hose may require re-use of your '216 thermostat housing. No sweat, bolt it onto the '235 cylinder head. Lower hose may need to be dual-size. Your neighborhood parts house has them available.

Crankshaft Pilot Bushing. Check for the presence of this vital item if you're putting a "stick" trannie behind the later '235!
(if the engine came with automatic, it may not have one). Chevy part #3752487. Install with chamfered hole toward you. Drive bushing flush.

ENJOY!...

CONVERT YOUR 6-VOLT VEHICLE TO 12-VOLTS
This is one of the most rewarding gestures you can do for your favorite old car/truck and yourself, comparing time and money spent to amount of benefit gained.

No more hard starting, hot or cold; no more dim, yellow (dangerous) headlights: no more accessories that aren't compatible.

Instead. you have a new degree of serviceability, safety, and ease of operation. And, it can all be done in a couple of hours, inexpensively, and without any serious modifications to originality' Read on...

First, let's establish that, provided it's in good shape, your original wiring harness is more than up to the task. 6-volt systems carry twice the Amps of 12-volt systems, which means their wiring is considerably heavier than required.

This is the perfect time, too, to convert vehicles with Positive ground (Ford Products, GMCs, MoPars and others) to NEGATIVE ground. Three little moves get that done:

Simply reverse the wires on the Ammeter. (The previous "in" will now be "out" and vice-versa).

Also reverse the wires on the coil. Ignition will be on (+) and (-) will go to coil.

Finish by reversing the battery cables. POS will now go to the starter, and NEG will go to the ground. Much benefit can be gained by moving "ground" from frame to a starter attachment bolt. Do This! (These three operations are done with the battery disconnected!)

Now, to the conversion itself and the (2) basic approaches:
(1) with a 12V generator, or
(2) with a 12V alternator, with internal regulator.
We'll begin with the 12V generator approach.


Conversion with 12V generator
This is an easy way that retains the originality you may be concerned with. Simply obtain a corresponding 12V generator (making minor bracket or mount change), or have the existing 6V generator converted by installing 12V field coils into the existing generator case.
How could it be easier?

(Along with original appearance, there is another distinct benefit to this approach, and that is, that a generator will charge a dead battery; an alternator will not! In fact, operating an alternator in a completely discharged system can damage the alternator, since it requires an electrical source to energize. It is true, of course, that any generator system will show "discharge" at idle, while an alternator does not. With the quick recovery of the generator system at "r's", however, only the most severe loads would overtax it. But, it's your decision!)

Conversion with an alternator
This is probably the more widely used approach but some originality in appearance must be sacrificed.
The minimal wiring changes are no big deal.

Use a DA plug which allows discarding the old voltage regulator. Here, the "Batt" wire that went to the regulator is extended to the post of the alternator where it meets the red wire of the DA plug. Then, "heat" is picked up at some convenient "ignit" spot (the switch or the coil wire) and a wire run to the white DA wire. Presto! The old regulator and the "field" and "arm" wire of the harness are also eliminated.
Very tidy.

Here are the items and changes that will he needed, according to which procedure is adopted:

A 12-Volt battery. (Pick a size that fits the carrier.)

A 12-Volt regulator. (if using a generator)

A 12-Volt Coil.

A fistful of corresponding 12V bulbs (dash, stop/tail, etc.), including headlights.

An ignition ballast resistor which will he installed in the wire from the ignition switch to the coil (You've seen 'em on the firewall. like a'55 Chevy.) Ballast resistor not needed with a built-in resistor coil. A reducer for each accessory, such as your heater.

Use Runtz guage resistor for gas guage and heater resistor ... any fuel, temperature and oil pressure other than mechanical.

Note: Certain components will need to he converted to 12 volts.
Among them: convertible top motors, overdrive solenoids, and radios.
A simple resistor will not work on these.

If your vehicle is equipped with an ammeter,
it will function properly on either 6 or 12 volts,
so it will not need any modification or resistor.
__________________
Alex Blair
:remember :support :drunk:

Last edited by Hanno Spoelstra; 09-02-12 at 21:40. Reason: Formatting
Reply With Quote
  #14  
Old 09-02-12, 15:48
Phil Waterman Phil Waterman is offline
Moderator
 
Join Date: Feb 2003
Location: Temple, New Hampshire, USA
Posts: 3,927
Default Bell Housing Conversion left hand to right hand drive

Hi Alex

Your post is a very good one with lots of very useful information. I should have been more precise in my wording. What I meant was converting a standard left hand drive bell housing as commonly found in North America to one with the clutch fork connection on the right side (as looking forward) as used on Chevy CMPs is no big deal.

I have converted two standard housing over see the photos below. My reason for doing this in one case was that the existing CMP housing was badly cracked and in the other case was that when I re-engined from the 216 to 261 I wanted to keep the 216 engine unit complete.

The Patricks article indirectly points out another reason for keeping the bell housing and engine pair's together in that they are actually matched and pinned for alignment. It actually takes as long to re-align an engine bell housing pair as it does to add the clutch fork pivot and hole on the other side. (I'd lost my link to the Patrick's site so thanks for finding it for me, I've book marked it again.)

That nice clean orange bell housing was a NOS one that I picked up at a Flea Market, a real lucky find.

Cheers Phil
Attached Thumbnails
Web S 261 engine 3-6-08 015.jpg   Web S 261 engine 3-6-08 012.jpg  
__________________
Phil Waterman
`41 C60L Pattern 12
`42 C60S Radio Pattern 13
`45 HUP
http://canadianmilitarypattern.com/
New e-mail Philip@canadianmilitarypattern.com
Reply With Quote
  #15  
Old 10-02-12, 03:27
Alex Blair (RIP) Alex Blair (RIP) is offline
"Mr. Manual", sadly no longer with us
 
Join Date: Feb 2003
Location: Ottawa ,Canada
Posts: 2,916
Default Bell housing alignment

Phil
That bell housing alignment is very critical and no job for someone with out the right skills and tools for the job..How many back yard mechanics have tapered reemers or taper pins...
Having your bellhousing misaligned is bad..They dedicate a few paragraphs on Bellhousing alignment in the MB-C2..cCan't remember in the MB.F1 but same -same for critical on the old flathead,.
__________________
Alex Blair
:remember :support :drunk:

Last edited by Hanno Spoelstra; 10-02-12 at 07:13. Reason: Please do not quote entire postings!
Reply With Quote
  #16  
Old 10-02-12, 06:05
Gunner Gunner is offline
T' Guns thank God t' guns
 
Join Date: Sep 2004
Location: Near Ottawa, Canada
Posts: 776
Default On topic

Hi Guys... aren't we wandering a bit off Gilles question?

"It has a valve cover with two top acorn nuts, also the right side cover is very big and the casting number GM 839253 so what it is????"

Cheers! Mike
__________________
Mike Calnan
Ubique!
("Everywhere", the sole Battle Honour of the Royal Regiment of Canadian Artillery)
www.calnan.com/swords
Reply With Quote
  #17  
Old 10-02-12, 15:11
Stew Robertson Stew Robertson is offline
Staghound
 
Join Date: Feb 2010
Location: Rockwood, ON, Canada
Posts: 268
Default

Put a Ford in it!
Reply With Quote
  #18  
Old 10-02-12, 19:53
David_Hayward (RIP)'s Avatar
David_Hayward (RIP) David_Hayward (RIP) is offline
former Resident Historian
 
Join Date: Feb 2003
Location: The New Forest, England
Posts: 3,841
Default 261

Nice to see my webpages being referred-to and being used!

The 261 cu in is taller than the 235 and has 'Captain's Bars' on the block. The head has extra steam holes cf. the 235 although the 235 head will fiot on a 261 and can be modified I gather to match up holes on thne block. The CR will be higher than the 261.
Reply With Quote
  #19  
Old 11-02-12, 00:05
Phil Waterman Phil Waterman is offline
Moderator
 
Join Date: Feb 2003
Location: Temple, New Hampshire, USA
Posts: 3,927
Default Have we found the easy way to tell 216 from 235

Back to Gilles original question

Quote:
Originally Posted by CWO (ret) Gilles Aubé View Post
Is there an easy way to difference a Chev 216 VS a Chev 235?
I think the answer is no there is no easy way to differentiate 216 from 235. The only way I have ever found is by casting numbers on the block. Part of the problem is that the Stovebolt Six Engine was such an evolutionary engine being built over so many years in how many different countries?

It is not even easy to tell early (military ) 216 from 235 once the heads are off

216 Bore 3 1/2 Stroke 3 3/4
235 Bore 3 9/16 Stroke 3 15/16

So if you are going engine hunting print out one of the casting number tables and take it along. I have printed out two list that I have in my search notebook http://www.inliners.org/becks/BCN2.html and http://clubs.hemmings.com/clubsites/...tory/cast.html. One warning though I have seen engines that had casting numbers which are not listed.

Cheers Phil

PS I had not noticed but several of the Chevy web sites I have used for years have David Hayward as an acknowledge source. Good Work.
__________________
Phil Waterman
`41 C60L Pattern 12
`42 C60S Radio Pattern 13
`45 HUP
http://canadianmilitarypattern.com/
New e-mail Philip@canadianmilitarypattern.com

Last edited by Phil Waterman; 11-02-12 at 00:20. Reason: Additional Comment
Reply With Quote
  #20  
Old 11-02-12, 10:04
David_Hayward (RIP)'s Avatar
David_Hayward (RIP) David_Hayward (RIP) is offline
former Resident Historian
 
Join Date: Feb 2003
Location: The New Forest, England
Posts: 3,841
Default Casting numbers

Thanks for the plaudits.

I have Canadian-specific Chevrolet casting numbers on my database up to around 1959.

The other way to tell is by the serial number and any prefixes. C = light commercial 216, T = heavier commercial 216, K= light commercial 224 GMC and G = heavier 224 as used in Maple Leafs. I have not yet found a Canadian wartime 235 but it could have had a TT prefix. The letter R indicated rhd of course.

Post-war:
ENGINE PREFIXES to 1953:
216 CAR: NO PREFIX
216 LIGHT COMMERCIAL: “C”
216 TRUCK: “X”
235 TRUCK: “T”
239 GMC/PONTIAC: “W” for “Walkerville”?
PLUS ALL R.H.D. ENGINES HAD “R” AS A PREFIX
Reply With Quote
  #21  
Old 13-02-12, 14:05
young man emu young man emu is offline
Registered User
 
Join Date: Mar 2009
Location: Albany
Posts: 3
Default 216 to 235

I had a problem with the white metal lifting on the big end so i put a 1948 235 in to my C15 .
It fitted well into the engine bay but the fan is to high.
So i had problem with over heating so i have got a electric fan now.
I have been told there is a fix but have not found it yet.
Reply With Quote
  #22  
Old 13-02-12, 17:09
Phil Waterman Phil Waterman is offline
Moderator
 
Join Date: Feb 2003
Location: Temple, New Hampshire, USA
Posts: 3,927
Default Solution is adapter plate 235 or 261

Hi

The solution for difference in location of water pump on later 235 and 261s is an adapter plate.


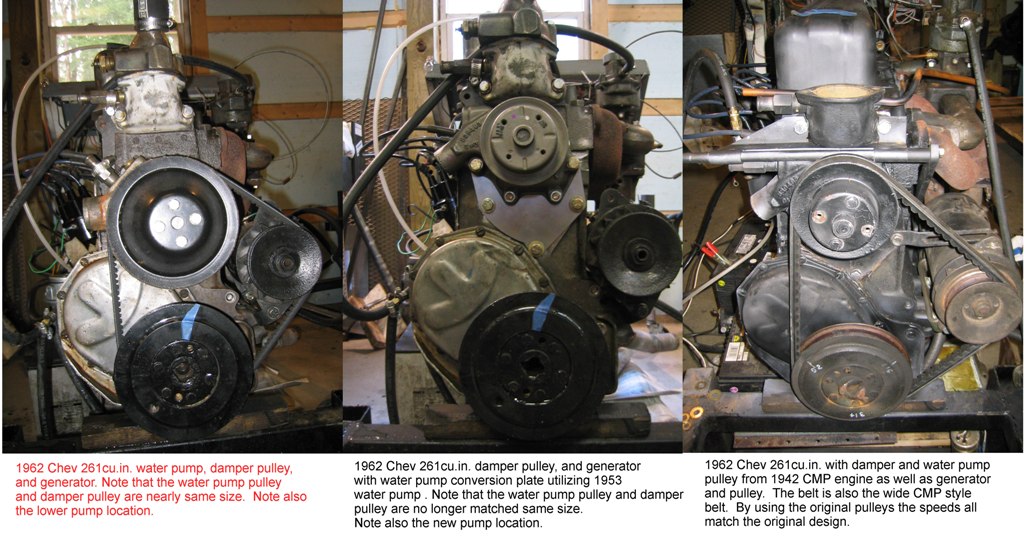
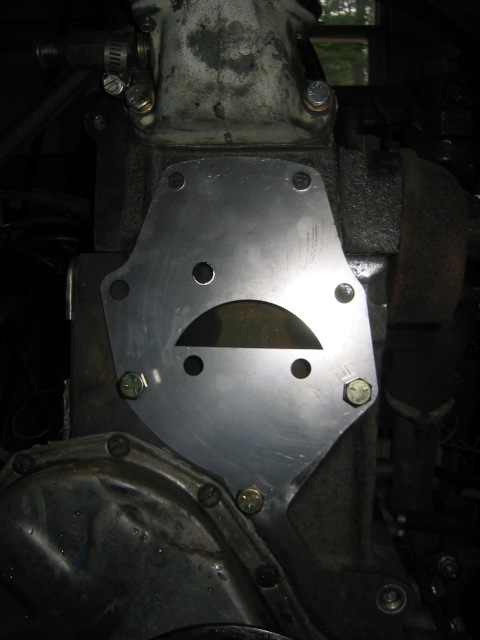
more on the adapter plate see http://canadianmilitarypattern.com/2...ifications.htm cost of the plate is small compared to the time to make one. Here is the guy I purchased my two plates from pre68bowtie@hotmail.com .

The time consuming part is finding the correct water pump with the short shaft and the correct size pulley. Short shaft is necessary for clearance to the radiator and the correct pulley size is to keep the fan speeds reasonable, should be the same as the engine RPM.

Hope this helps.

Cheers Phil
__________________
Phil Waterman
`41 C60L Pattern 12
`42 C60S Radio Pattern 13
`45 HUP
http://canadianmilitarypattern.com/
New e-mail Philip@canadianmilitarypattern.com
Reply With Quote
  #23  
Old 13-02-12, 17:40
Grant Bowker Grant Bowker is offline
Registered User
 
Join Date: Jul 2006
Location: Ottawa, Canada
Posts: 2,287
Default

The adptor plate shown above works with the 1942 or later water pump which can best be identified by the angled outlet and the two holes in the original backing plate. If you want to use a similar plate with the earlier pump used on CMP 216s (identified by an outlet parallel to the ground and a single hole in the backing plate) you will need to make it yourself. If you choose to make such a plate, pay attention to the clearance for the bolt head that is more or less hidden behind the outlet.
Reply With Quote
  #24  
Old 14-02-12, 11:38
young man emu young man emu is offline
Registered User
 
Join Date: Mar 2009
Location: Albany
Posts: 3
Default adapter plate 235 or 261

Thanks for that.
I been trying to find out for years and all i had to do was ask .
Cheers
Reply With Quote
  #25  
Old 08-01-18, 20:48
Jordan Baker's Avatar
Jordan Baker Jordan Baker is offline
Moderator
 
Join Date: Feb 2003
Location: Hamilton, Ontario, Canada
Posts: 4,004
Default

I've been reading a bunch of these older threads to figure out my engines. I'm going to be using the orange one since it's a very good runner. However I see I have the "1942" two hole water pump. My older cmp truck has the original one hole style. I understand that I should use the pulley off of the one holer? Do I also press off the flang with the 4 mounting bolts and put that on the two hole pump shaft?
Attached Thumbnails
IMG_7090.jpg   IMG_7089.jpg   IMG_7091.jpg  
__________________
Jordan Baker
RHLI Museum,
Otter LRC
C15A-Wire3, 1944
Willys MB, 1942
10cwt Canadian trailer
Reply With Quote
  #26  
Old 09-01-18, 20:43
Jordan Baker's Avatar
Jordan Baker Jordan Baker is offline
Moderator
 
Join Date: Feb 2003
Location: Hamilton, Ontario, Canada
Posts: 4,004
Default

I tried mounting the early pump and it does fit with the two upper bolts. Can I drill out a new hole into the block to allow for water passage and also drill and tap two new mounting holes. I did a quick spray paint over the rear plate to show the difference between the two.
Attached Thumbnails
IMG_7101.jpg   IMG_7102.jpg  
__________________
Jordan Baker
RHLI Museum,
Otter LRC
C15A-Wire3, 1944
Willys MB, 1942
10cwt Canadian trailer
Reply With Quote
  #27  
Old 10-01-18, 03:53
Bob Carriere Bob Carriere is offline
Moderator
 
Join Date: Mar 2003
Location: Hammond, Ontario
Posts: 5,201
Default Suggestion......

Talk with Phil W.

Seems we are up to our necks in water pumps these days.

I believe that Phil did a test to see if there was any flow/volume difference between the two vs one hole and found none.....

gone to see what pictures of my engine I can find.

Bob
__________________
Bob Carriere....B.T.B
C15a Cab 11
Hammond, Ontario
Canada
Reply With Quote
  #28  
Old 10-01-18, 04:29
Grant Bowker Grant Bowker is offline
Registered User
 
Join Date: Jul 2006
Location: Ottawa, Canada
Posts: 2,287
Default

Without anything solid to back my instinct, the spray paint does seem to show a lot of holes in close proximity. Swiss cheese isn't a great structural material....
My next instinct is that if the "correct" size pulley can be fitted to the 2 hole pump and everything else fits I would prefer to accept the slight inaccuracy of the 2 hole pump rather than that much adaptation of the cylinder block.
The commercial adapter plates are intended to fit the 2 hole 216/early 235 water pump to the late 235/261 block (pump impeller within the block, not mounted in front of block and head. Do you have a set of the instructions for the 235/261 commercial adapter plate? They inlcude a table of recommended balancer and pulley sizes. A copy of the instructions can be seen on Phils site at http://www.canadianmilitarypattern.c...ifications.htm
Reply With Quote
  #29  
Old 10-01-18, 05:48
Bob Carriere Bob Carriere is offline
Moderator
 
Join Date: Mar 2003
Location: Hammond, Ontario
Posts: 5,201
Default 3 pictures

Taken of the back of one hole pump and two hole pumps.......

I don't think they can be interchanged you will need a pump that matches the engine you prefer.

Grant comments???
Attached Thumbnails
11-07-07_1450.jpg   11-07-07_1451.jpg   11-07-07_1452.jpg  
__________________
Bob Carriere....B.T.B
C15a Cab 11
Hammond, Ontario
Canada
Reply With Quote
  #30  
Old 10-01-18, 17:03
Phil Waterman Phil Waterman is offline
Moderator
 
Join Date: Feb 2003
Location: Temple, New Hampshire, USA
Posts: 3,927
Default Will have to dig out some information

Hi Guys

Will have to sort through my shop notes and photos of water pumps couple of points to keep in mind as you play mix and match.

1. Keep the relative size of the pulley in mind between the crank pulley and the water pump pulley. The really small pulley on some of the 2 hole later pumps will dramatically over speed the fan when used with stock large crank pulley. I would be concerned about fan failure. Testing the 235/261 engines on the stand it was obvious that the fan was turning way to fast. The air stream over the engine was actually pulling oil out of the oil breather. So use the crank and water pump pulleys in sets.

2. If you decide to change the pulley some are bolted on and some are swedged directly to the water pump shaft. Those are very hard to remove without breaking or bending something.

3. The water flow tests I did was to confirm that the 235/261 stock water pumps and the modified 2 hole with adapter plate had the same or similar GPW flow rates through the normal operational RPM range, they do.

Will look to see if I've got good photos of which water pumps I used on which engines and what are the differences.

Cheers Phil
__________________
Phil Waterman
`41 C60L Pattern 12
`42 C60S Radio Pattern 13
`45 HUP
http://canadianmilitarypattern.com/
New e-mail Philip@canadianmilitarypattern.com
Reply With Quote
Reply


Posting Rules
You may not post new threads
You may not post replies
You may not post attachments
You may not edit your posts

BB code is On
Smilies are On
[IMG] code is On
HTML code is Off

Forum Jump


All times are GMT +2. The time now is 10:27.


Powered by vBulletin® Version 3.8.4
Copyright ©2000 - 2024, Jelsoft Enterprises Ltd.
Copyright © Maple Leaf Up, 2003-2016