|
#121
 31-05-12, 17:08
|
|||
|
|||
|
...... you should save that brass marker light a wall mounted plaque/trophy....
Reminds me of the lower rear axle shock absorber bracket, the one that bolts on the diff. cover....... Rob found one made of cast brass....even had proper GM part numbers on it....... go figure !!! Curious to hear what you find about the oil flow when a restriction is applied to the oil flow of the rockers. Bob
__________________
Bob Carriere....B.T.B C15a Cab 11 Hammond, Ontario Canada 
|
|
#122
01-06-12, 01:39
|
|||
|
|||
|
Hi Bob
Well it's not the rocker arm assembly spent an hour this morning testing the theory that it was excessive flow from the individual rocker arms that was causing the low oil flow from the rocker arm bypass or over flow. After bring the engine up to temperature and basically stabilize at 1500 RPM here are the results the end result was with the oil line to the rocker assembly disconnected and blocked there was no difference in oil pressure. Also posted a really dull video http://canadianmilitarypattern.com/R...%20Flow%20.wmv So spent the rest of the day working on reassembly of the HUP pretty much decided that I'm going to concentrate on getting the HUP completely reassembled. Tomorrow I plan to bring the other 216 engine down from the loft and set it up to run. That way I'll should be able to get the HUP on the road for the 25 Anniversary Weare Rally end of July. Should take me about 3 hours to set the other engine up and test it. I'll come back to this engine once everything else is done. Cheers Phil 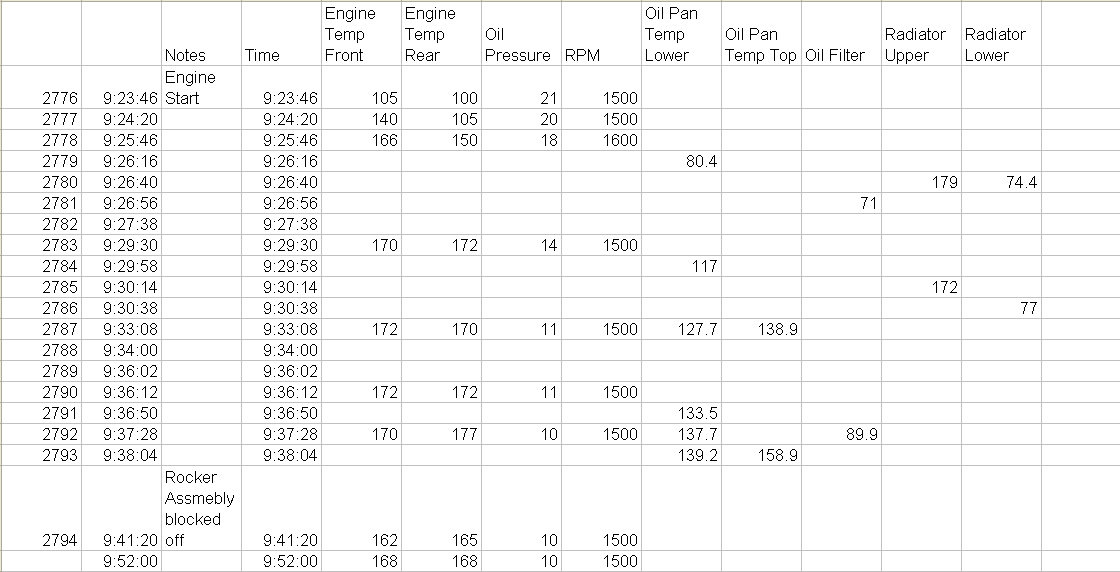
__________________
Phil Waterman `41 C60L Pattern 12 `42 C60S Radio Pattern 13 `45 HUP http://canadianmilitarypattern.com/ New e-mail Philip@canadianmilitarypattern.com
|
|
#123
01-06-12, 03:41
|
|||
|
|||
|
Hi Phil
How frustrating...... How did you block the oil flow to the rockers...? ... thinking out loud..... the oil comes out of the block underneath the carb inside that little cover ( the oil distributor valve assembly ) on the side of the block..... Could a blown gasket on that small cover cause it.... could the line running inside the block be opened.... From the previous video it seems you have a high volume flowing but no pressure..... so the pump flows good quantity... in fact large quantity..... but there is nothing ( as in tight cleanrances ) in the oiling system to hold it back and build pressure... So once out of the pump the oil goes into the main gallery some of which is directed to the rockers the rest goes to the crank and cam shaft...... something as to be opened either in a bearing clearance or a leak as occurred from the oil gallery...... has to be inside the block as nothing is leaking out or oil level going down...... can't be leaking at the pump or you would not have the high volume...... Intriging to say the least.... Being desperate I am now looking at the MB C2..... What about the Timing gear oil nozzle.... inside the timing cover...? Hummm have you read page K 28 ....which describes the oil flow in the block.... under Connecting Rod Bearing Lubrication... ...what if the "oil distributor valve" .... was stuck open ..instead of opening up when pressure builds up..... maybe toooo much oil is going to the six oil nozzle pipes....??? ....on page K 30 ... some caution about the sequence of the 2 dist. valve body gaskets....!!!!! and the pipe nipple is "calibrated" to deliver the proper amount of oil to rockers..... ...top of K 31....." Substituting a standard nipple will permit too heavy an oil flow and will interfere with the oil pressure in the entire oiling system"...... is that it ???? Bob C
__________________
Bob Carriere....B.T.B C15a Cab 11 Hammond, Ontario Canada Last edited by Bob Carriere; 01-06-12 at 03:54.
|
|
#124
01-06-12, 14:57
|
|||
|
|||
|
Hi Bob
Blocking of the oil feed to the rock assembly was easy just unscrewed the line from the fitting in the middle of the assembly and replace it with a union fitting that had the end soldered up. 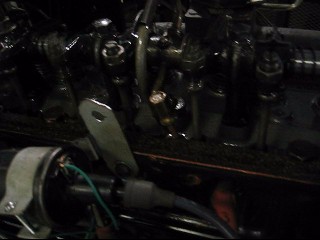 You can just see it sticking up between the push rods in the center of the picture. Yes I had taken note of the instructions about the gaskets on the oil pressure relief on the side of the engine. Took it apart and checked that I had assembled it correctly. As to the restrictive orifices yes I've learned to look at the fittings on the Chevy both in the oil system and vacuum system. When I find them I tag them, made a number of replacements over the years by soldering the replacement closed and then drilling it with a matching size drill. Your suggestions and comment have been very helpful as the process of communicating back and forth helps the diagnostic process. As does making incredibly dull videos because that way I can refer back to the video. I'm pretty sure that I have exhausted the easy things to check and that what ever it is going to take some real time to find. Cheers Phil
__________________
Phil Waterman `41 C60L Pattern 12 `42 C60S Radio Pattern 13 `45 HUP http://canadianmilitarypattern.com/ New e-mail Philip@canadianmilitarypattern.com
|
|
#125
02-06-12, 01:55
|
|||
|
|||
|
Hi All
Well after yesterdays discovery that there was no easy fix moved on to Plan B, bring out a another engine. 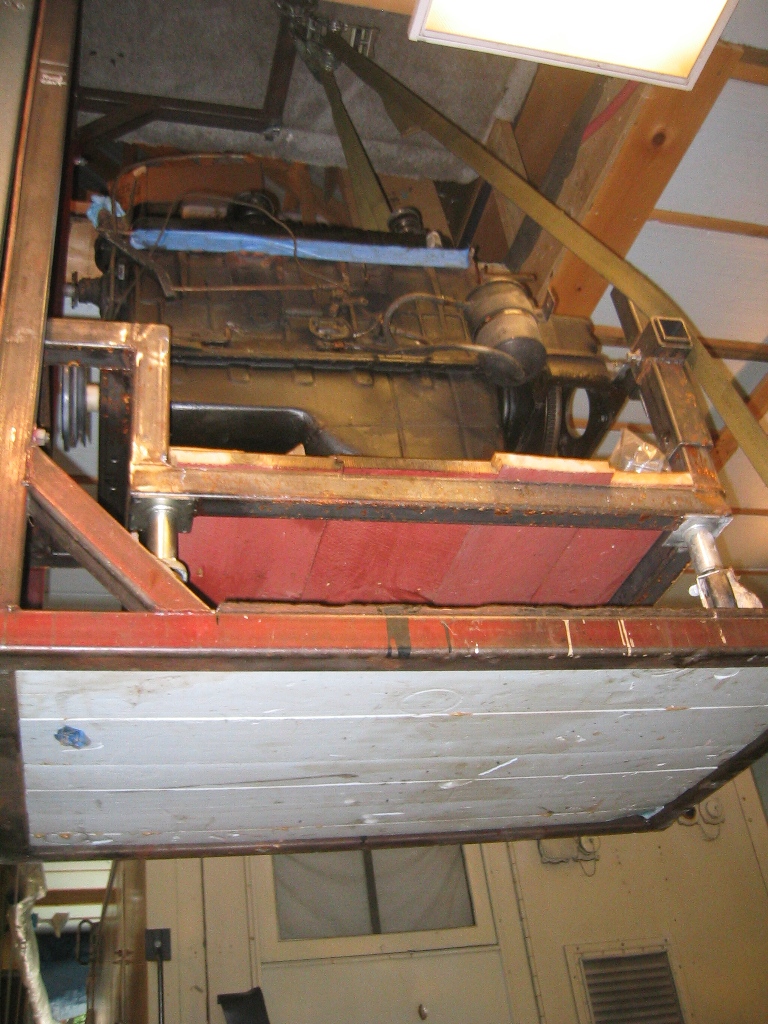 This is an engine that was running fine when it came out of my C60S in the back ground of the photo. Engine was put away on test stand nearly complete I'd dumped oil in the cylinders. Cleaned the outside today so that it can be painted.  Cheers Phil
__________________
Phil Waterman `41 C60L Pattern 12 `42 C60S Radio Pattern 13 `45 HUP http://canadianmilitarypattern.com/ New e-mail Philip@canadianmilitarypattern.com
|
|
#126
02-06-12, 04:28
|
|||
|
|||
|
... I now understand the rear engine mount arrangement and removeable instrument panel...... very clever.
Also love your elevator arrangement for storage to the second floor. Bob
__________________
Bob Carriere....B.T.B C15a Cab 11 Hammond, Ontario Canada
|
|
#127
06-06-12, 17:47
|
|||
|
|||
|
Hi Phil: I was looking for something on the CBC site today and found this photo of Mathew Halton and his HUP. I suspect yoiu've seen it before but just in case...
Photo credit: National Archives of Canada / PA-204812 Website: http://www.cbc.ca/news/background/dday1944/halton.html Looks like a cam pattern painted above the visible wheel.  Mike Mike  
__________________
Mike Calnan Ubique! ("Everywhere", the sole Battle Honour of the Royal Regiment of Canadian Artillery) www.calnan.com/swords
|
|
#128
07-06-12, 15:11
|
|||
|
|||
|
Hi Mike
First thanks much for posting the picture and link. I had seen the photo before but you spotted something I had never noticed, the camouflage, this style I think was called Micky Mouse Ears. Here is a slightly better source picture. 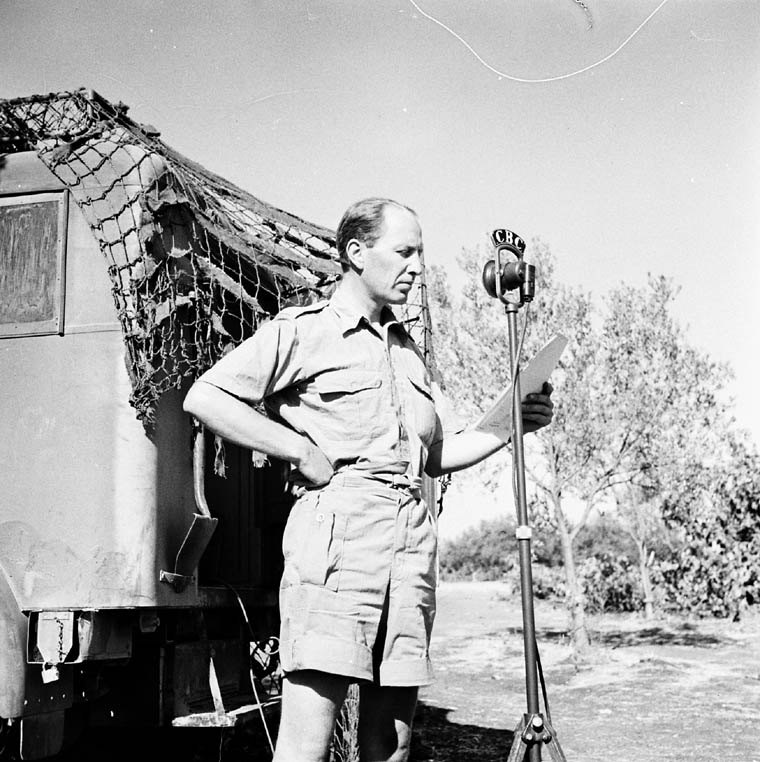 What you spotted brings out a very interesting point though not all the units had camouflage paint. Recording Unit 4 which seems to have been the most photographed doesn't. 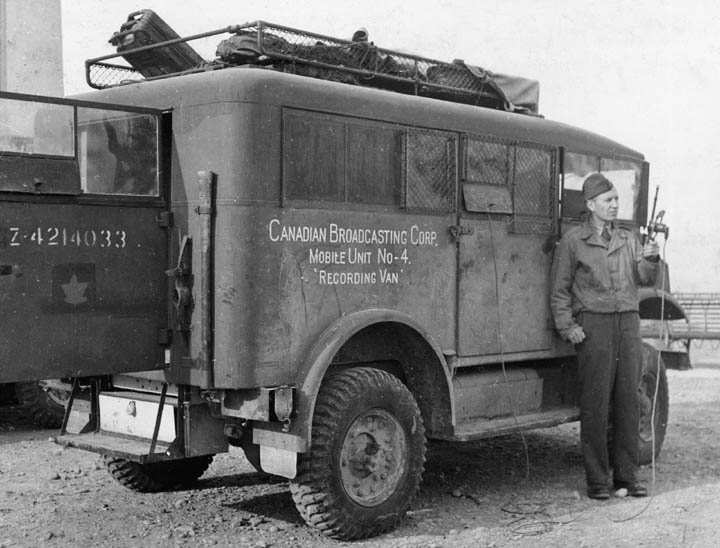  The second photo of Recording Unit 4 shows it before the signage had been paint on the rear. As a result of your spotting this though I started looking through sources here is a picture of the side of one of the Recording Units number unknown, that has camouflage maybe the same Unit as in the photo you spotted. 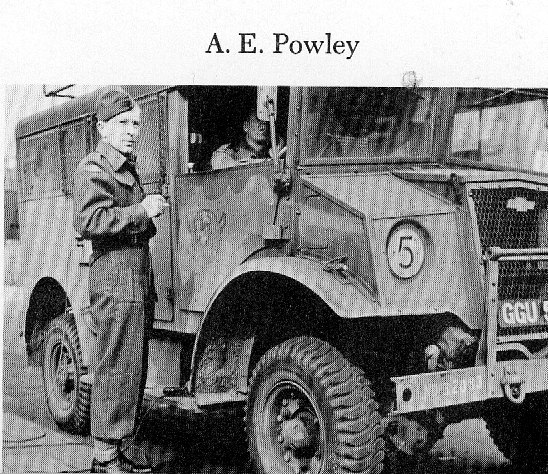 Again thanks for posting the picture and link to the CBC page I'll have to update my web page to include the new information you found. Cheers Phil
__________________
Phil Waterman `41 C60L Pattern 12 `42 C60S Radio Pattern 13 `45 HUP http://canadianmilitarypattern.com/ New e-mail Philip@canadianmilitarypattern.com
|
|
#129
07-06-12, 21:20
|
|||
|
|||
|
Hi Phil:
Looking at the two middle photos, as you say, they are of the same vehicle- Z4214033 and it is definitely camouflaged... in photo 2 look at the seam between the roof and the rear body panel. you can see a definite colour change a few inches below it. I would suggest that Unit 4's recording van definitely had a cam pattern. As you can see in photo 3 there is a broad band of colour running almost vertically through and below the middle window to the wheel well. Looking back at photo 2 you can see the same band once you know where to look! That would be consistent with the directives for painting the invasion 'fleet' of vehicles. There were many patterns authorised and Mike Starmer has done a better job of recording them than I can do here. Its interesting that the green with black bands became the standard British cam for years afterwards (notwithstanding the shiny bronze green years!). You may be onto something with photo 4: it looks like DND32033 on the bumper by the way, as it is definitely the mickey mouse ears cam pattern. It also has a civi licence plate- GGU 5??. British plate experts should be able to ID it for you as they have detailed records of all plates back to the start of plates... you know what I mean!  Mike Mike
__________________
Mike Calnan Ubique! ("Everywhere", the sole Battle Honour of the Royal Regiment of Canadian Artillery) www.calnan.com/swords
|
|
#130
08-06-12, 00:42
|
|||
|
|||
|
Hi Mike
Good eyes, I had never noticed the camo on Unit 4, now I'll have to go through all the pictures again to look at the points you spotted. If anybody comes across any photos of CBC or BBC recording equipment, people, or vehicles from this period please send them along as I am constantly being amazed at what is turning up on the web. Every now and then somebody at the CBC archives puts up an new bit or reorganizes and shows a better photo, or digs up another audio track. Sort of the holy grail for me would be to find the actual audio recordings that were made by the BBC crew of the Eisenhower Parade in New York in my HUP as shown in the film of them driving the HUP along side Eisenhower's parade car. http://canadianmilitarypattern.com/R...%20V1_0002.wmv. Thanks again Mike Cheers Phil
__________________
Phil Waterman `41 C60L Pattern 12 `42 C60S Radio Pattern 13 `45 HUP http://canadianmilitarypattern.com/ New e-mail Philip@canadianmilitarypattern.com
|
|
#131
08-06-12, 00:50
|
|||
|
|||
|
Well after spending 2 days cleaning up and setting up the other engine, I started it this afternoon. After the smoke cleared from all the oil put in the cylinders when I put the engine away it settled right down and ran just as smooth as it did before it came out of the C60S Beauty.
But to the big question oil flow and pressure. Looks to be exactly the same as the rebuilt engine. So maybe what I was worrying about is actually their normal state of operation. Got to fix a couple of minor coolant leaks and then I really give it a long run to double check everything. The work to get the engine completely setup just as it came out Beauty is not wasted. Now I have the original engine from Beauty all set up. Cheers Phil
__________________
Phil Waterman `41 C60L Pattern 12 `42 C60S Radio Pattern 13 `45 HUP http://canadianmilitarypattern.com/ New e-mail Philip@canadianmilitarypattern.com
|
|
#132
10-06-12, 01:23
|
|||
|
|||
|
Hi All
I had put the wiring harness in several weeks ago, but this week I started actually connecting everything up and powering up the lights. Wiring harness is a duplicate of the original harness that I made up about 20 years ago. So things went pretty smoothly other than dirt or fading made reading some of the color traces hard. Took two days to get the dash and rear lights all connected up and working. Only problem that I have not figured out is that the when the brake lights come on they are not brighter than the tail lights. Bit of a problem only way you can tell that the brake lights come on is that two more of the little tail lights come on. While in the big modern tail light assemblies that have two element bulbs 1154s. When the only the brake is on that element is noticeably brighter than the tail only but when both are on together there is no difference. So I suspect a cross connection or poor ground in one (both) of the tail light assemblies. When I made the new harness I used all the correct color codes and sizes (modern wire but with cloth covering) it is copper wire instead of the original steel strand wire. I have the original harness all pinned out on a 3x8 piece of plywood with all the wires labeled. Is what I have used to make wiring harnesses and as a large reference. Cheers Phil
__________________
Phil Waterman `41 C60L Pattern 12 `42 C60S Radio Pattern 13 `45 HUP http://canadianmilitarypattern.com/ New e-mail Philip@canadianmilitarypattern.com
|
|
#133
10-06-12, 05:33
|
|||
|
|||
|
If your taillights are the bigger rubber ones you can get 6 volt LED bulbs to fit in them
i used LED on my brake lights on my CMP when it was 6 volt the work on a 2 bulb circuit but not a 4 bulb circuit. It did make them much brighter than the running light. Now though I switched the battery and the voltage regulator to 12 volt and put LED bulbs in all the lights including the dash lights. I put a pencil light as the running lights on the back and the larger early rubber lights for the break lights, cause I had a pair available at the time. I was out working on my 20 CWT trailer, all set up and making progress when my wife dropped by and whispered in my ear, "there's water under the hot water tank"..... 
|
|
#134
11-06-12, 00:07
|
|||
|
|||
|
Spent another day working on the lights, connecting the wiring harness. Got all the original CMP lights working fairly easy. Just the normal stuff of poor grounds on freshly painted parts, easy to fix just remove a little paint.
Also did a little voltage testing to find the fixtures that didn't look as bright as they should. Used the volt meter to read voltage of the ground in the light fixture to true ground. If the voltage across the ground was significant went looking for cause. Also did resistance testing but that did not seem as reliable as looking for stray voltage. The only real problem was with the modern tail lights, just could not get a noticeable difference when the tail lights are on and stepped on the brakes. Did a little measuring to confirm what my eyes were telling me. At one foot got the following readings: Tail lights only - 22 Foot Candles Brake lights only - 60-70 Foot Candles Both tail and brake lights-30 Foot Candles This really didn't make sense so checked for voltage drop and it looks like is the problem just the number of bulbs or filaments being lit is sucking the voltage down by 2-2.5 volts. Once I mount the battery I'll check to see if the problem goes away, for testing the battery was connected to the HUP with 14 gauge wire coming from the battery on the engine test stand. But I really like Harry's suggestion of the LED replacements, more light less current being drawn. Just have to find the correct bulb replacements for 6 volt type 63 horizontal mount then vertical mount 1154 and 1129. I really would like to know how they wired the dash. Just can not figure out an easy way to do it. The problem is the support for the steering wheel which blocks every thing. If you take the support out and wire everything then it is hard to get the bolts of the support in. Best way I found for doing it is with nose off, take the dash and put it up side down on the window ledge. Then wire everything up and test it then remove the lower part of the steering support and swing the dash down some of the wires have to go be hid the support as does the speedometer cable and oil line. Cheers Phil
__________________
Phil Waterman `41 C60L Pattern 12 `42 C60S Radio Pattern 13 `45 HUP http://canadianmilitarypattern.com/ New e-mail Philip@canadianmilitarypattern.com
|
|
#135
11-06-12, 04:22
|
|||
|
|||
|
https://www.superbrightleds.com/
You can find any bulbs you need here.
|
|
#136
11-06-12, 16:55
|
|||
|
|||
|
Hi Harry
Thanks for the source I'll have to spend some time looking through the site. I'll post what I find. Cheers Phil
__________________
Phil Waterman `41 C60L Pattern 12 `42 C60S Radio Pattern 13 `45 HUP http://canadianmilitarypattern.com/ New e-mail Philip@canadianmilitarypattern.com
|
|
#137
12-06-12, 01:25
|
|||
|
|||
|
Hi All
Need to move stuff around in the shop so I could install the engine, but decided instead of moving the doors again I would reinstall them on the truck. So that was the project for the day, rear and side went right into position no problems. Though Tony will appreciate this as I tighten the bolts on the rear door a previously invisible fatigue crack appeared. So that will need to be fixed but decided to leave the door mounted to keep it out of the way for now. Front doors have always been more a fitting problem as anybody who has ever worked on Pattern 13s knows. Cheers Phil
__________________
Phil Waterman `41 C60L Pattern 12 `42 C60S Radio Pattern 13 `45 HUP http://canadianmilitarypattern.com/ New e-mail Philip@canadianmilitarypattern.com
|
|
#138
12-06-12, 03:31
|
||||
|
||||
|
Quote:
__________________
RHC Why is it that when you have the $$, you don't have the time, and when you have the time you don't have the $$?
|
|
#139
12-06-12, 03:45
|
|||
|
|||
|
....it's a female HUP !!!!!!
Hay KnoKneeMuss
__________________
Bob Carriere....B.T.B C15a Cab 11 Hammond, Ontario Canada
|
|
#141
12-06-12, 04:29
|
|||
|
|||
|
..... it's tooooo late now !!!!
__________________
Bob Carriere....B.T.B C15a Cab 11 Hammond, Ontario Canada
|
|
#142
12-06-12, 14:39
|
|||
|
|||
|
Hi Rob
Crack is in the rear door top hinge between the two bolts closest edge. Only showed up when the bolts were tightened. I'll post a picture this evening. Now back out to the shop to finish the front door fitting and get ready to install the engine. Cheers Phil
__________________
Phil Waterman `41 C60L Pattern 12 `42 C60S Radio Pattern 13 `45 HUP http://canadianmilitarypattern.com/ New e-mail Philip@canadianmilitarypattern.com
|
|
#143
13-06-12, 01:29
|
|||
|
|||
|
Hi All
First here is the picture of the fatigue crack found yesterday, upper hinge rear door. Finished installing the front doors and shimming the hinges. After lunch started on installing the engine 3:20 PM 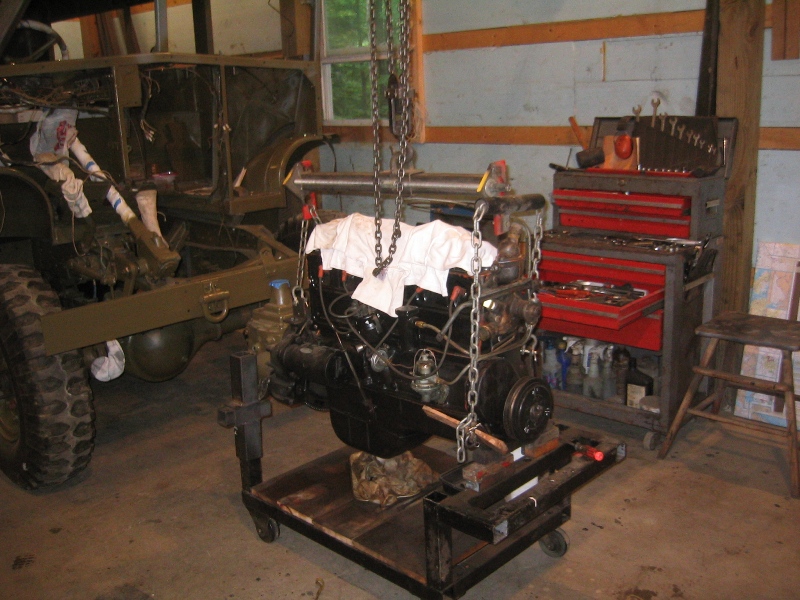 Engine in sitting on the engine mounts 4:49 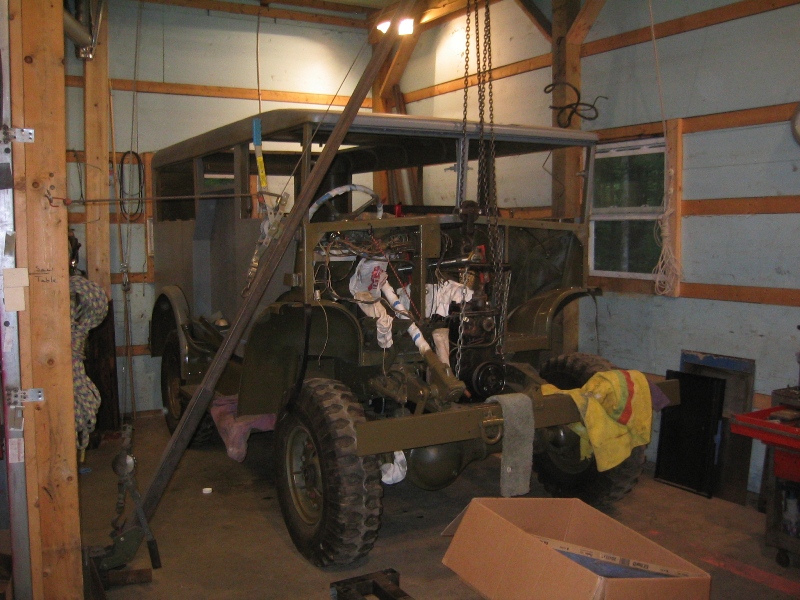 See what repetition gets you first time I did this it took me most of 2 days to do what it took an 1 hour and 29 minutes do. Of course this time I had advantage of knowing how to rig the engine, what parts had to be removed for it to slide in and how to get around the center of gravity issue. Tomorrow, goal is to get it all hooked up and running. Cheers Phi
__________________
Phil Waterman `41 C60L Pattern 12 `42 C60S Radio Pattern 13 `45 HUP http://canadianmilitarypattern.com/ New e-mail Philip@canadianmilitarypattern.com
|
|
#144
13-06-12, 02:36
|
|||
|
|||
|
While I was swapping the radiator over on to the other test stand to check an engine discovered the cause of a minor coolant leak from the radiator drain cock. Take a look at the spring that holds the tapered part of the valve tight to the body.
Cheers Phil
__________________
Phil Waterman `41 C60L Pattern 12 `42 C60S Radio Pattern 13 `45 HUP http://canadianmilitarypattern.com/ New e-mail Philip@canadianmilitarypattern.com
|
|
#145
13-06-12, 02:45
|
|||
|
|||
|
So far I have failed to find a really good spring for one of my drain cocks (I often work on more than one of a part at a time if I think I might need it later, it saves re-learning how to do the job next time) although one seemed to be good enough to re-use. When you find a good match, can you give us the source?
Grant
|
|
#146
13-06-12, 03:11
|
|||
|
|||
|
Hi Grant
Yes, I plan to try and fix the one I have, but may have found 5 of them NOS in a parts warehouse. Have not order them yet because they want to sell the master pack (all 5) at once. Now that I have discovered that I need two I'll probably just order the bunch. Let you know how I make out. Cheers Phil
__________________
Phil Waterman `41 C60L Pattern 12 `42 C60S Radio Pattern 13 `45 HUP http://canadianmilitarypattern.com/ New e-mail Philip@canadianmilitarypattern.com
|
|
#147
13-06-12, 04:06
|
|||
|
|||
|
When I was looking at options I started with replace the spring (in theory replacing one small part should be less wasteful than replacing the whole assembly, what can I say - I have a cheap streak in me). I also looked at complete new drain cocks.
They seem to be given part number DC601-8 by Parker Hannefin. Fastenal lists something similar as their part # 699963 and a functionally similar part can be found as 42-104 at apollovalves.com If you end up with more drain cocks than you really want, I could be interested.
|
|
#148
13-06-12, 04:33
|
|||
|
|||
|
Hi Phil
Never ceases to amaze me how much you do flying solo... Where did you tie you lifting chains to....... rear...? front something bolted to the side engine mount bolt holes..? How about close up pictures of your own design built engine load equalizer.... most of what I have seen are too short and intended for V 8 short blocks. Bob
__________________
Bob Carriere....B.T.B C15a Cab 11 Hammond, Ontario Canada
|
|
#149
13-06-12, 18:33
|
|||
|
|||
|
I have a pesky little leak on the same valve, I'll take a closer look.
|
|
#150
14-06-12, 05:25
|
|||
|
|||
|
Hi Bob
Thought you might ask about how I do it well the trick is repetition and rigging. After reading your post I took a bunch more photos of the rigging and the tricks. Where to attach how to attach etc. just need to organize my process and the photos to tell the story. Try and get them posted soon. Cheers Phil
__________________
Phil Waterman `41 C60L Pattern 12 `42 C60S Radio Pattern 13 `45 HUP http://canadianmilitarypattern.com/ New e-mail Philip@canadianmilitarypattern.com
|
 |
|
|


 Linear Mode

