|
#331
 12-03-12, 04:09
|
|||
|
|||
|
Had some time this weekend to make the spare tire carrier. Only tack welded the threaded rod for the wing nut as I am sure the tire dimensions will change once it is inflated, and some adjustments will be needed....
Next project is making the spare wheel. That's the last thing big I will have to fabricate, then I can finally return to repairing/restoring only original parts! Thanks, David 
|
|
#332
13-03-12, 03:57
|
|||
|
|||
|
....going to make a spare rim for the spare tire.....????
You continue to amaze me..... !!!! doesn't anybody have a spare rim....? anywhere...? Bob
__________________
Bob Carriere....B.T.B C15a Cab 11 Hammond, Ontario Canada
|
|
#333
13-03-12, 05:36
|
|||
|
|||
|
Hi Bob,
Unfortunately these 13" wheels are very hard to come by, no matter where you are located on the globe. Of course, I am screwed down here in Texas.  If anyone has an affordable extra 13" wheel, please let me know. edit: Bob, the plan is to use the center out of one of my 15" aftermarket wheels I bought a while ago,(post #65). The center will be cut out, turned down to correct size on my friend's lathe and welded into one of the wide late '60's Chevrolet Corvair 13'' outer rims. Thanks, David Last edited by David DeWeese; 14-03-12 at 02:30. Reason: added b.s.
|
|
#334
17-03-12, 04:27
|
|||
|
|||
|
Hi,
Had one open day this week to make that spare wheel. Cut out the centers of both wheels and headed over to a friend's house to use his lathe. Things got slow when I found out the edge of the center rim piece I was working with was now hardened from cutting it out with a torch. Add to that the saw-tooth profile of the piece from the torch work, and it made for agonizingly slow progress to keep from breaking tips off the cutting tools.. Things got even slower when the automatic feed on the lathe broke, so the rest of the machining was fed by hand for two hours. Anyway, made it home in time to dress the outer rim, true everything, weld it, prime it and put on a coat of paint before the sun went down. Thanks, David Last edited by David DeWeese; 19-03-12 at 07:04. Reason: changed photo
|
|
#335
09-04-12, 04:13
|
|||
|
|||
|
Hi,
Disassembled my reproduction storage lockers to prime and paint them this weekend. Decided to keep the "X" stamped locker doors because I liked the look of them too much to just throw them in the scrap bin. Tack-welded a dummy fuel filler neck on the end of the left tank to match the right one, now both being fairly close to the style of tanks used on the Duple body C8. The plan was to add fuel to this left tank from it's original cap now located inside the lower locker, as I did not want to cut a hole in a nice original tank. Well, I noticed this tank is vented through a hole that is located next to the filler cap. I was worried that fuel vapor would now be building up inside the lower locker. This seemed like an accident waiting to happen, so.... Found an old military generator shroud with the right size louvers and made a removable end panel for the lower locker. That end panel had to be removable anyway to access the center bolts that hold the lockers to the lower framework. I have no idea how the original lockers were made, so this is the best I could come up with to make everything work out. Anyway, the reproduction lockers and fuel tank mods are finally done, so no more painful fabrication is ahead for me or anyone else to suffer through.....hopefully! Thanks, David
|
|
#336
09-04-12, 05:58
|
||||
|
||||
|
Looking great, David!

__________________
Film maker 42 FGT No8 (Aust) remains 42 FGT No9 (Aust) 42 F15 Keith Webb Macleod, Victoria Australia Also Canadian Military Pattern Vehicles group on Facebook https://www.facebook.com/groups/canadianmilitarypattern
|
|
#337
15-04-12, 19:48
|
|||
|
|||
|
Thanks Keith!
This weekend I had time to refinish and install the cab rear panel. The original rear panel was beat up to the point of needing a new skin and a lot of structural work. Luckily I had a nice 12 cab rear panel here that only needed a few dents taken out. It also had an advantage over the 11 cab panel as it has the two seat recesses in the upper angle iron. That will give me another inch of leg room! A fire extinguisher bracket also needed to be installed on the panel first as the tight space between the rear panel and lockers makes it so you can't get to the bolts to install it later. I found one on a 1/2 ton Dodge ambulance body here that was still in good shape. It lined up with the 6 bolt holes on the rear panel, but is it the correct style? Anyway, it was nice to do some restoration, instead of fabrication, on the C8 for a change.  Thanks, David
|
|
#338
17-04-12, 05:32
|
|||
|
|||
|
Hi,
Pulled out my doors today to look at them and had a few nagging questions: What do the snaps for the canvas windows look like? I have only bare holes in the upper door skins, and the holes are all different sizes. Did a search on the forum, but detailed photos of cab 11/12 doors are hard to come by. Are these inner door handles original, or....? I have to order outer door handles also. From what I can gather, these are 1939-40 Ford? Please forgive my newbie questions, and as always thanks for all your help! Thanks, David Last edited by David DeWeese; 17-04-12 at 05:42. Reason: spelling
|
|
#339
17-04-12, 08:47
|
||||
|
||||
|
Quote:
Door handles look original On my doors all snaps appear to be the same size except there are only 3 across the top that I can see
__________________
Have a good one Andrew Custodian of the "Rare and Rusty" 
Last edited by aj.lec; 17-04-12 at 08:57.
|
|
#340
17-04-12, 17:46
|
|||
|
|||
|
Hi David
I have some of the snaps (sorry just enough for my truck) but will take pictures of them so you know what to look for. I have seen them on one of the old car sites so they are being reproduced. As to the door handles, as you can see in the picture my Pat 12 C60L has the same type of handles with the short lobe pointing forward waiting to get caught on brush. 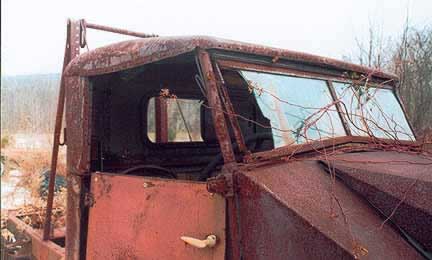 I replaced them with a very similar design that are 40s Dodge which are the curved design which are less likely to get caught on stuff. The correct ones are available as bright chrome I'll try and find the source. I'll take some photos. Oh yes the picture is of my truck as found not as it is today. Cheers Phil
__________________
Phil Waterman `41 C60L Pattern 12 `42 C60S Radio Pattern 13 `45 HUP http://canadianmilitarypattern.com/ New e-mail Philip@canadianmilitarypattern.com
|
|
#341
17-04-12, 22:35
|
|||
|
|||
|
Hi David
Here are some photo of the little snaps first ones are the snaps before installation, the next are what they look like as installed. As you will see they are designed to go into the hole then are expanded to hold. I'll look and see if I can find the source that got them from.
__________________
Phil Waterman `41 C60L Pattern 12 `42 C60S Radio Pattern 13 `45 HUP http://canadianmilitarypattern.com/ New e-mail Philip@canadianmilitarypattern.com
|
|
#342
17-04-12, 22:40
|
|||
|
|||
|
Hi David
Here are some photos of the door handles on my Pat 12 C60l. The square shaft and the bezel seem to be fairly common what seems to be the issue is the length of the shaft, the Dodge ones I used as an expedient were about an inch to long, cut off and drilled and tapped for the inside handle. Cheers Phil
__________________
Phil Waterman `41 C60L Pattern 12 `42 C60S Radio Pattern 13 `45 HUP http://canadianmilitarypattern.com/ New e-mail Philip@canadianmilitarypattern.com
|
|
#343
18-04-12, 01:29
|
|||
|
|||
|
Quote:
See: http://macsautoparts.com/ford-side-c...R3CHL1075951E/ and http://macsautoparts.com/side-curtai...R3CHL1075952E/
|
|
#344
18-04-12, 01:57
|
|||
|
|||
|
Thanks Andrew and Phil for all the photos and great information!
Phil, are your old outer handles available? If so, please let me know. I did find some outer door handles at Mac's antique auto parts, but they don't look quite the same as the ones posted. Found inner handles also, but were also chromed, and not brass over steel. Is this bare brass over steel thing just for military vehicles of the time? I've never seen it on anything else. Ordered some of the canvas snaps from Ron Fitzpatrick Jeep Parts. My brother, the jeep enthusiast, said to order a few more than I need as they can get distorted when you try and install them. Decided to re-use my original inner door handles. One was broken and missing part of it's outer brass sheeting. Found a brass key tag, then formed and brazed it around the missing part. With a little effort it turned out OK. Thanks again! David
|
|
#345
18-04-12, 01:59
|
|||
|
|||
|
Thanks, Grant for the information!
Was apparently typing a reply while you were posting your's..... Thanks again, David
|
|
#346
23-04-12, 00:53
|
|||
|
|||
|
Hi,
Got both my doors all welded up and fairly straight this weekend. There were lots of stress cracks, structural damage and some very deep dents to manage. The deep dents in both doors were apparently caused by the lack of door check straps fitted, which caused these suicide doors to slam into the rear body.....and must have happened a lot on this truck! If you saw the condition of the door latches, you would know why. Received my door snaps for the canvas window openings on Saturday. They installed OK using light pressure with a large "C" clamp. I used brass tarp eylettes in the two upper holes in the doors. Didn't know what exactly went in these holes, but one of Andrew's photos show a brass fitting in one of them. The tarp eyelettes were an exact pressed fit, and I had them already, so I went with them for the time being. The 1934 Ford door handles will go away once I order a correct reproduction pair, but they do look kind of stylish, don't they? Also sorted out my windshield wiper hardware and installed the grab handle on the passenger side floor. Thanks, David
|
|
#347
23-04-12, 01:14
|
|||
|
|||
|
Hi David
The vertical or top surface holes hold a tapered molded units to hold the door window frames. This also is a standard old Ford part used for the same purpose holding door side curtains in open cars that didn't have roll up windows. Think I have seen it in Macs. I'll take a couple of pictures of the ones on my truck. Wonder work you are doing, the truck is going to be a true prize when it is done, heck its a prize now. Cheers Phil
__________________
Phil Waterman `41 C60L Pattern 12 `42 C60S Radio Pattern 13 `45 HUP http://canadianmilitarypattern.com/ New e-mail Philip@canadianmilitarypattern.com
|
|
#348
23-04-12, 02:53
|
|||
|
|||
|
HI David
The door holes... the ones on top, are as Phil describes, meant to hold the round rod steel support for the canvas side covers. They are available from Mac Auto...... who also has the proper door handles. The early cab 11 doors did not have door straps to keep them from hitting the cargo box. In fact in some early WW 2 Canadian manoeuver pictures all the trucks seem to have the doors open all the way back..... as if they hade been tied in the extreme back position to make getting in and out easier. Some cab 11 were retro fitted with the strap.... which in turn created additional strees points in the sheet metal.....most cab 12 had the straps built in at the factory. Did you have trouble installing the 3 "hat" shaped fittings in the door..... did you have the proper tool that Mac sells.......???? Here is the big question for me...... I have original side curtains that I procured from Dirk. BUT I have never seen what the steel rods, that are inserted in the canvas, looks like. Anyone out there that has pictures and measurements.... should not be too hard to repro.[COLOR="Green"][/COLOR] Sure enjoy reading about your progress ...... Bob C
__________________
Bob Carriere....B.T.B C15a Cab 11 Hammond, Ontario Canada
|
|
#349
23-04-12, 12:39
|
||||
|
||||
|
Ohhh goody. My favourite thread is back..
Again, very resourceful choices when there is nothing else available. Well done Phil and Bob - have you got the part numbers for the door handles and those rods for the door canvas? I am itching to get both these items. By the way I didnt realise you Chev blokes spoke Ford???
__________________
Pax Vobiscum.......may you eat three meals a day & have regular bowel movements.
|
|
#350
23-04-12, 17:22
|
|||
|
|||
|
Hi
Yes most Chevy speakers can speak Ford, but need to use many hand gestures and speak loudly and slowly to be understood by those who speak Ford. I'll take some photos of the window post units from the doors this afternoon, I got a list of photos I need to take to answer various CMP questions for people. The use of Ford parts on Chevy CMPs and visa verse all seems to stem back to the thinking that was described by Sid Swallow about the birth of the CMP concept at Ford and GM. They needed parts fast and they engineers grab parts that they had that worked which would not require time to develop new tooling. It would be fun to have a time machine and go back and watch this relatively small group of people develop the first CMPs get them into production and then evolve them based on the feedback they got. Cheers Phil
__________________
Phil Waterman `41 C60L Pattern 12 `42 C60S Radio Pattern 13 `45 HUP http://canadianmilitarypattern.com/ New e-mail Philip@canadianmilitarypattern.com
|
|
#351
23-04-12, 17:33
|
|||
|
|||
|
from Mac's web site
http://macsautoparts.com/ford-side-c...0R3CHL1075964/ I'll let someone who's actually used the handles (or at least has the originals) comment on that part.
|
|
#352
23-04-12, 23:20
|
||||
|
||||
|
Quote:
I suppose... applying logic....those curtain rods would have come off something from the 20's or 30's..
__________________
Pax Vobiscum.......may you eat three meals a day & have regular bowel movements.
|
|
#353
24-04-12, 02:42
|
|||
|
|||
|
Thanks everyone for the replies and the helpful information!
I guess that explains the unknown holes on the ends of each door a few inches below where those rod fitting would be. It also appears that the previous owner had the side curtains installed while all that damage was occuring to the doors. All the door skins around the holes where those missing fitting would be installed were badly mangled. The photo from Mac's, (thanks Grant), look like those fitttings have a square socket on the inside. Did the side curtain rods have a square shank with round rod or...? Thanks again, David
|
|
#354
24-04-12, 03:02
|
||||
|
||||
|
Something I've noticed
The Chevy cab 11/12 doors have a inner panel , but the fraud version didn't , the outer panel is exposed . Mike
__________________
1940 cab 11 C8 1940 Morris-Commercial PU 1941 Morris-Commercial CS8 1940 Chev. 15cwt GS Van ( Aust.) 1942-45 Jeep salad
|
|
#355
24-04-12, 03:51
|
|||
|
|||
|
HI Mike
I don't remember ever seeing a Ford cab 11 but the Ford cab twelve did not have a inner panel and the bottom inner section became a very convenient shelf for gloves, maps. etc. Tony The MAc door handles are listed as .... item Standard, straight handle chrome 68-702350-A at $23.00 USA $ but that was 5 years ago. One would be wise to get the screws and the rubber that fits under the handle mounting base. The "Side curtain rod socket item A180620 is sligthly different and chromed... the originals were potmetal..... and are held in place by rounded head screw bolt as shown in David's picture..... can't remember if they have a square shape inside but will next time in the barn. From Mac's photos one could conclude that the window steel rods had a round end where they fitted the door socket but became a flat bar where they entered the canvas. AS I have a set of original side curtains, from Dirk, it may be possible to figure out where the metal rods should fit...... the sleeves/channels where the rod can be inserted must be fairly obvious..... I will check next weekend when in the barn. I also got a set of handles from Dirk NOS and hit pay dirt on Ebay where I got 3 NOS in box for considerably less. Both Ebay and Dirk had the original OD green paint and are otherwise identical. Strangely the Mac version in Chrome seem to have a better smoother finish. The chrome would need some light sand blasitng for the paint to adhere. Now for the steel rods ........ MAc sell them for a specific application. As the CMP side windows were unique I am not aware of anything even vaguely similar available on the market. I am sure they would be relatively easy to bend for repro but I have never seen an original set.... not even in picture form..... I will take and post some pictures of the original door socket and the repro from Mac as well as the various handles I have. Also.... on the cab 11 there was a small inner handle that fits over the square rod of the external handle ....... we found some.... will need to consult Rob Clarke...... I think they came from the bolt distributor in Toronto again slightly different in size but very similar..... FOUND THEM....at Mac's Roadster & Phaeton, chrome item A702400C at $8.20 (2 needed) As anyone ever seen an original set of those steel rods for the side curtains...??????? Bob PS..... found a series of pictures of the doors and various handles, etc.....from a few Winters ago....will sort them out and repost with captions.
__________________
Bob Carriere....B.T.B C15a Cab 11 Hammond, Ontario Canada Last edited by Bob Carriere; 01-05-12 at 03:31.
|
|
#356
25-04-12, 02:50
|
|||
|
|||
|
The first one focuses on that funny thimble taht fit in the top side pf the doors and designed to hold some curtain support rod....
The first two photos shows the original slightly longer and squared in design. Next photo shows comparaison between original and repro. .... and finakky YES they are square on the inside. More to follow
__________________
Bob Carriere....B.T.B C15a Cab 11 Hammond, Ontario Canada
|
|
#357
25-04-12, 02:59
|
|||
|
|||
|
here is a side view comparaison..... the repro is sligthly shorter but will still instal even if the screw is slightly offside.
The next series are the door handle ..external and the small internal handle. You will noticed small diofference on the inside door handle but close enough The last picture is of the latching mechanism.... it is spot welded inside the door....usually totaly worn out....available from Mac........ Bob
__________________
Bob Carriere....B.T.B C15a Cab 11 Hammond, Ontario Canada
|
|
#358
25-04-12, 03:11
|
|||
|
|||
|
When repairing the cab 11/12 doors I found some chronic weak areas.... one is near the latch ..... where the wedge on the frame of the cab inserts to line up the door when closed.... the cutout for the wedge has seriously weakened the door frame and it is normal to find that part of the frame cracked with the resulting strcutural load palced on the door skin.
I solved that issue by installing a large reinforcement plate to the frame..... not interferring with the function and totally covered by the inner skin anyways. See the photos for details......adds little weight but realy stiffens the door I will have more information after the weekend. If you have any questions fire away and will take additional photos to help you out. That's what the forum is all about. Bob
__________________
Bob Carriere....B.T.B C15a Cab 11 Hammond, Ontario Canada
|
|
#359
25-04-12, 04:55
|
|||
|
|||
|
I have one of the original side curtains with rods on my Cab 12 F8. Next time at the cottage I will photo them. They are square section except at the tips where they are rounded. Quite easy to reproduce from square section bar. One of my "receivers" is missing - Bob, where did you get the repro?
|
|
#360
26-04-12, 02:45
|
|||
|
|||
|
Wow, you sure know your way around a cab 11/12 door!
 I guess it is about time to blow the dust off my credit card, and start ordering stuff! Thanks again Bob for taking the time to post all of this up. This information will probably help a lot of folks out. Thanks, David
|
 |
|
|


 Linear Mode

