|
#1
 25-04-11, 19:55
|
|||
|
|||
|
Hello everyone
I'd like to start by thanking you for letting me join and to tell you about the restoration that I am part of. I recently joined a living history group called the Canadian Military Heritage Society (www.cmhslivinghistory.com). The group has a CMP that needs to be restored. I am high school teacher at a school with a huge Auto shop program, so I suggested the two work together. Here is the result http://cmhsmobilemuseum.wordpress.com/ The high school is now restoring the CMP and we will need all the knowledge that this site has. Any help will be greatly appreciated and I will be asking alot of questions as the weeks go by. If you know or see anything that will help please let us know. Thanks Joel 
|
|
#2
25-04-11, 20:53
|
|||
|
|||
|
Joel ..
What you have is a C-15A..with GM Diffs.. You are in the right place... Get your kids on the forum and ask away..this is the best and biggest in the world when it comes to CMP Knowlege. Alex Blair Ottawa There are reproduction manuals for the parts and maintenance of the C15-A C-15..Two Wheel drive.. C-15A 4 wheel drive. Here are the manuals you need.. Quote:
Grant 613-749-2551 Bowker <g.bowker@cyberus.ca>; Grant Bowker <canadianmanuals@yahoo.ca>; If the manuals collections was still mine I would donate the manuals to the school for the kids ..as I did a few years ago when another school was doing a restoration project on a Canadian CMP truck..but I'm sure Grant will work something out with you.. Love to see kids interested in CMP restoration.   
__________________
Alex Blair :remember :support :drunk: Last edited by Hanno Spoelstra; 28-04-11 at 12:05. Reason: formatting
|
|
#3
27-04-11, 00:13
|
|||
|
|||
|
Well this may seem silly but do we have the right order of spark plugs, there seems to be some disagreement on how they should go.
  Any help would be greatly appreciated Joel
|
|
#5
27-04-11, 11:20
|
||||
|
||||
|
Hello Joel and crew (or G'day perhaps),
You have chosen wisely with these vehicles. Apart from the skills gained and experience of bringing a vintage vehicle 'back from the brink', you will no doubt find much information on 'how to' as manuals readily available online and parts sourced fairly easily. Personally, I have found the guys & girls on Maple Leaf Up have a collective knowledge second to none! All the best with the restoration. Seems to be off to a great start so far. Don't forget to post lots of photos as you progress!!!!!!! Tony B P.S: Pity it wasn't a Ford, but no-one's perfect :-)
__________________
Ford CMP, 115" WB,1942 (Under Restoration...still) Medium sized, half fake, artillery piece project. (The 1/4 Pounder) Last edited by Private_collector; 27-04-11 at 11:23. Reason: I stuffed up
|
|
#6
28-04-11, 04:11
|
|||
|
|||
|
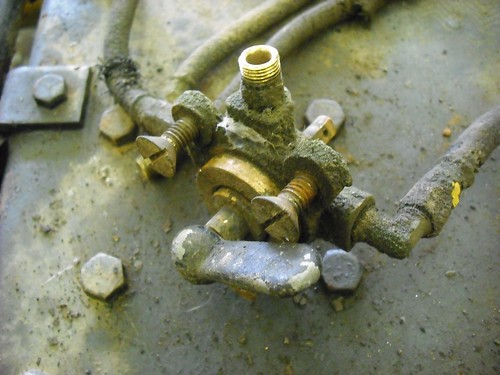
Here are a couple of questions, what colour should the chassis be painted...black, green or the colour of the body (ie brown)?? and where to find a t-valve like this
  Joel
|
|
#7
28-04-11, 08:09
|
||||
|
||||
|
Joel
I had a look at your web page. That is a very nice unmolested truck to begin with. What is wrong with the fuel tank selector ? If you give it a good clean it will probably work fine . If it leaks try lapping in the barrel with some fine valve grinding paste . The chassis would normally be the same colour as the rest of the truck. Mike
__________________
1940 cab 11 C8 1940 Morris-Commercial PU 1941 Morris-Commercial CS8 1940 Chev. 15cwt GS Van ( Aust.) 1942-45 Jeep salad
|
|
#8
28-04-11, 23:04
|
|||
|
|||
|
Hi Joel
I love the suggestion from Alex.... have the kids write in their questions... You will get a whole bunch of responses for all of us..... Most parts can still be found but not at your Canadian tire. There are some specialized OMVA flea markets events that will cater to our CMP needs..... otherwise some members may have spare parts to share or sell. I have a familiar saying that you cannot restore a CMP without have at least another one for parts.... you are fortunate that yours is in very good condition. Your fuel valve seems to be missing the bottom washer/spring/nut assembly... that assembly tends to be hard to replace or find parts for...... memebrs at large may have spare parts available. On your rims..... most of us old guys have given up trying to remove old tires that have been rust welded to the rim for 60 years and refer to rural tractor/truck tire shops who usually will do the job....safely.... for $15 to $20 each....... I have stood the front end of a farm 4 ton tractor on the edge of old CMP tires without breaking the bead. with due consideration for safety $100 for the 5 wheels is cheap. On the rims..... hang them from a rope and wack with a hammer.... make sure they rign like a bell..... if dull sound is heard it is cracked. After sandlasting make sure that teh rust pitting is not too deep as to render the whel unsafe..... at the very least half of the steel should be left in deep piths...... some time i the rust is all in the same bottom section.... better replace than risk injury... that would really kill your project. At 50n pounds of pressure these tires can kill you if the separate..... make sure the studs and nuts are in good shape or ask for replacements.... and you will only find them on MLU not at a tire store..... thread are British Wentworth odd arrangement. So fire away with the questions and include photos as some of us can't read !!!!! Bob C.
__________________
Bob Carriere....B.T.B C15a Cab 11 Hammond, Ontario Canada
|
|
#9
28-04-11, 23:26
|
|||
|
|||
|
Brakes....... master cylinder is almost impossible to find......
John Stuart in Stoney Creek rebuilds them with a SS sleeve good for life.... has him to give you a deal for the school... Each wheel cylinder should be checked and rechecked.... possibly rebuilt again Stuart can be a source of parts and rubber boots...... Check the oil seals on the axles ... if they are leaking modern replacements are available.... the best brake job is useless if the lining get oiled up. Brake lining can be salvaged by soaking them in naphta gas.... but a fire hazzard.... linings buried in cheap cat litter and heated with a heat lamp is a good alternative..... the dusty cat litter and heat will migrate oil out of the lining and your cat will not rust. The above are critical safety components....... Nice to see the old girl still has an original 216 engine.... do you have the right spark plugs for it.... AC 43 or 44 or 45 or an acceptable equivalent..... The new gas filter pictured is intended for installation on a farm tractor gas tank.... your inline plastic filter is a better bet...... Make sure your radiator is in good shape..... they normally do not run underpressure but wasting expensive antifreeze and risking overheating the engine is not worth being cheap. I assume you will be draining all axles and tranny and T case and refilling with fresh oil..... monitor the levels regularly... they are known to leak but we affectionetely refer to that as "marking there territory". If the engine has not started for along while you may want to consider removing the plugs and squirting light engine oil in each cylinder... a table spoon.... and spin the engine with the starter while the plugs are still out. If the valve cover is removed during that initial spin you may be able to check if oil is actually being pushed to the rocker arm/valve train. Enjoy. Bob C.
__________________
Bob Carriere....B.T.B C15a Cab 11 Hammond, Ontario Canada
|
|
#10
05-05-11, 01:21
|
|||
|
|||
|
Well it was decided to remove the tires so the rims can be sand blasted and three days later only 2 tires are off....determined little tires
One of our soon to be challanges is what to do about the roof hatch. There was a square one but the hatch was removed and a metal plate (bigger then the original hole was welded over top. We need to figure out how to reomve the plate and replace the hatch. Oh and the welding continues, fillin' in all the extra holes. On a completely side note, our welding teacher is now taking one of his students to Skills Nationals for welding. 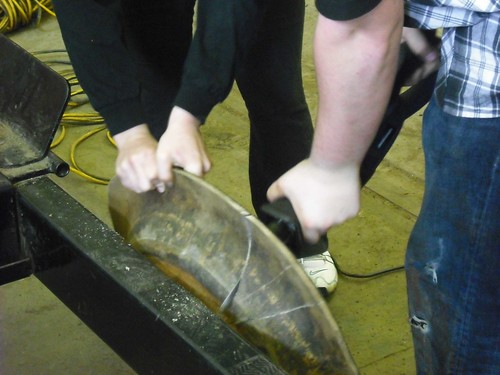 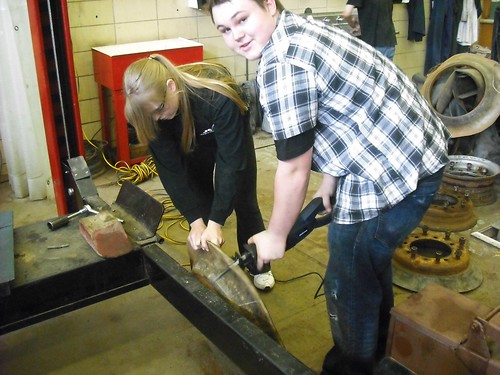 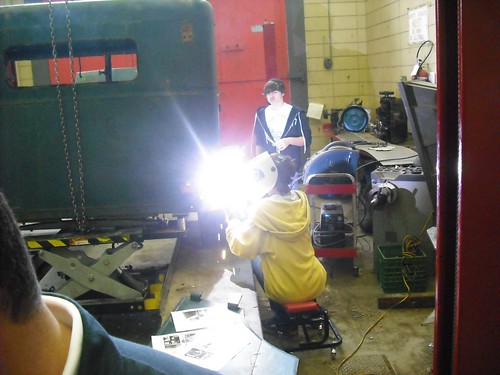
|
|
#11
05-05-11, 02:32
|
|||
|
|||
|
Hi Joel
Removing old tires can be a headache....... be thankful you were not removing original 1940 tires that had become rsut welded to the rims..... so of mine had to be cleaned with a "needle gun" to remove the stuck bead casings off the rims before we could do sandblasting. The celaner the inside portion of th erim is and the smoother the glossy paint job.... the easier it willbe to instal the new tires...... make sure you borrow a couple of cups of tire lubricant.... the snooty stuff from a truck tire shop.... it really facilitates the job greatly. If the kids get really good at this maybe you can take in contracts for CMP restorations. On the hatch..... they are hard to find..... and when you do they are expensive...... if you are not a purist and not looking for absolute accuracy you may be able to reproduce one in your school metal shop ... you just will need access to a real one to measure, photo and fabricate a copy. Good luck Bob C.
__________________
Bob Carriere....B.T.B C15a Cab 11 Hammond, Ontario Canada
|
|
#12
05-05-11, 02:44
|
|||
|
|||
|
That would be great I just don't know where I can access a hatch to get all that info so that the metal shop can do it
|
|
#13
05-05-11, 03:06
|
|||
|
|||
|
Did a quick search of the MLU forum for "hatch"..... found a number of postings that contain pictures...... it's a start.
Best bets would be Museum.... if they will let you climb on the truck to measure and photo the thing..... museum in Oshawa may be a good spot... There are a number of CMP collectors in the Toronto area that may be able to help.... Strangely I do nto remember anyone ever posting detailed information on size, construction layout, close up of restored hatches..... or anyone attempting to reproduce one..... Maybe you need to start a new posting/thread on the restoration section just for "Hatches"...... focusing on the earlier rectangular ones.... Bob C.
__________________
Bob Carriere....B.T.B C15a Cab 11 Hammond, Ontario Canada
|
|
#14
05-05-11, 15:36
|
|||
|
|||
|
Hi Joel
Which hatch design did your truck have Round or Rectangular? Round would have been something about 26 inches. If you can not tell from the patch which it was what year do you think your subject truck is? From the CMHS web site it appears you are working on a 1942 which as I understand it would be the rectangular metal hatch. I have some details of the round style 1945 vintage on my website http://www.canadianmilitarypattern.com/Posting.html I also have my hatch and all the hardware off my truck so I can provide any photos or dimensions you need if you are looking for the round style. Cheers Phil
__________________
Phil Waterman `41 C60L Pattern 12 `42 C60S Radio Pattern 13 `45 HUP http://canadianmilitarypattern.com/ New e-mail Philip@canadianmilitarypattern.com
|
|
#15
07-05-11, 05:04
|
|||
|
|||
|
I too should introduce myself. I represent the CMHS half of this partnership and have been working with Joel, the Shop teacher, and the students. Everyone would be truly impressed, as I have been, with the level of enthusiam and professional attitude from the students and faculty. The hard part has been trying to keep up with them. They are multitasking and getting a lot done very fast.
You will probably see me pipe in once and while, tag teaming Joel with many questions and updates. We certainly appreciate this forum, the experiences and advise that starts here. I have been a member for years, but now that our project in underway I can remain quiet not longer. I have many question to come. We have a 1942 C15A-GS made in Oshawa. It does have the clam shell tire holder and box and a square hatch above the cab. We plan to dress the vehicle for front line duty, representing the PPCLI (1st CDN Div) during the Italy Campaign. Adrian Rittner Last edited by Adrian Rittner; 07-05-11 at 05:13. Reason: additional info
|
|
#16
07-05-11, 12:47
|
||||
|
||||
|
Joel & Crew,
Couldn't help having a bit of a chuckle about your trouble removing the tyres from rims. It's not that I enjoy your kaos, just that you're by no means the first. Consider it a right of passage. I had exactly same trouble with two of mine......so far, the local truck tyre place saved the day for me. Must say...................It's Looking Good So Far!!!!!!!! 
__________________
Ford CMP, 115" WB,1942 (Under Restoration...still) Medium sized, half fake, artillery piece project. (The 1/4 Pounder)
|
|
#17
08-05-11, 19:57
|
|||
|
|||
|
Quote:
|
|
#18
08-05-11, 20:28
|
|||
|
|||
|
Well the tires are FINALLY done..one of the students decided it was his personel mission to get the tires off the rims.
The students cranked the engine over to find out that the fly wheel is loose, the now the whole transmission has to come off. The hatch for this CMP is the rectangle one, I've found some info but not alot. I believe I will start a thread to gather info on it. What I am trying to find is what modern paint colour is the same as British Standard Camouflage Color No. 2. We are hoping that if we can get a paint number that one of the local companies will donate it. Any help would be greatly appreciated
|
|
#19
09-05-11, 09:46
|
||||
|
||||
|
Quote:
Mine looked very similar to yours when I found it. All I did was pull it apart, clean the crap out & put it back together. To create new and clean fuel lines I used rubber fuel hose (good stuff that'll handle injection pressure levels) and used double flared brake line with threaded brake line nuts. Between the tap and the tank I chucked in some in line fuel filters. Not original, but very reliable and who's gonna know except yourselves?
__________________
Pax Vobiscum.......may you eat three meals a day & have regular bowel movements.
|
|
#20
10-05-11, 00:04
|
|||
|
|||
|
Joel
If you look at Tony's picture you will see that he used a specail brass fitting easy to find at CarQuest or CTC..... it has a male pipe thread at one end to fit into the valve body.... the other side of the fitting is designed to take a 1/4 inch doubled flared steel brake line. The original assembly had 3 rubber lines going into and out of the valve body. This was done to deal with vibrations and body twist in severe driving conditions. I have found that Jeep 9 or 12 inch fuel lines fit perfectly..... I don't thing you need to go that far for a dependable running vehicle. Can you post a picture of your valve body to show the back side where the nut and spring is located just want to make sure your assembly is complete. It should clean up real nice using acetone or paint remover..... you can even shine it up with a cloth wheel and buffing compound.....when you take it apart you will find an internal tapered shaft..... if scratched or scored..... you can smear some valve griding compound on the tapered shaft.... use the fine stuff..... and insert the tapered stem and rotate by hand.... no need to fully re-assemble. once properly polished....clean thoroughly in gasoline.... re-assemble with a few drops of motor oil on the tapered shaft .... you need enough pressure on the spring at the bottom to keep it tight but loose enough to allow easy turning ... Fuel Filters are an essential part of a dependable system.... Color wise the whole underneath should be the same color as the overall shade of the truck. There are early WW II flat Olive drab green paint that very closely match what was initially applied at the Oshawa factory made by Gillespie number 34087 which I found to be a perfect match to the shade of OD green found under protected areas of my truck. If you are thinking of camouflage colors with "Mickey Mouse ears" pattern seen in Britain or even Europe you are on your own..... not an expert in that area. Bob C.
__________________
Bob Carriere....B.T.B C15a Cab 11 Hammond, Ontario Canada
|
|
#21
10-05-11, 01:03
|
||||
|
||||
|
******Be careful about welding up holes in the cab *** some of them are supposed to be there !
you may find a couple holes in the roof over the passenger side... this is for the clip to hold the roof hatch when open There may also be holes in the rear cab wall, some had em, some not.. this was for a 1 quart brass fire extinguisher.. other holes may be for mounting of a shovel and/or pick axe and helve (depending on model) on the cab rear lots of holes on the doghouse too.. for fire extinguisher, and shifting plates etc.. OH and do try to remove nuts and bolts undamaged if you can, for re=use.. they are hard to match these days. A lot of items can be found, just not at Cdn Tire, nor cheaply when you do find them. and dont' forget left hand threads on left side lug nuts...but I guess you've discovered that..?
__________________
I see you stand like greyhounds in the slips, Straining upon the start. The game's afoot! Last edited by Marc Montgomery; 10-05-11 at 01:10.
|
|
#22
10-05-11, 01:22
|
||||
|
||||
|
you have an very good base vehicle to start from... the doghouse still has the round inspection covers (an item hard to find) and even the floor grab handle...some very nice details to have already and not have to look for!
BTW- the CMPs did not have rear "windows".. there was a frame with double channels and two sliding (thick) sheet metal plates. These frames however are almost always rotted at the bottom. What are the students cutting with the saw?
__________________
I see you stand like greyhounds in the slips, Straining upon the start. The game's afoot!
|
|
#23
10-05-11, 05:00
|
|||
|
|||
|
Thanks for the note on the back window. We were wondering about that. Yes the channel was a bit rotten. Anyone know the size and thinkness of the window plates?
The welding of the holes were obvious holes that shouldn`t be there. One was for an afterthought extention arm for the PTO. An operator probably stood outside the vehicle and controled the lever. They bored a hole in the body to reach the outside. We filled the hole and left the pto operator in the cab. Curious to see an original winch as there is not one on the truck, and being a GS body (not recovery) not other need for PTO really. The factory or drilled holes were left. But that raises any question. We looked in the orginal Chevy shop manual. It has great drawings of the front cab loking forward including the instrument cluster and features. But there is no diagram looking back in the cab. Meaning we have no idea where the tools, bags, rifle holder, fire extinguisher, etc, should go. Any one have a handy picture? the old rubber was really fused to the rims. Cutting them with a saws all was the only way, then literally chisel the band away from the lip of the split rim. Personally if I was doing that task myself, I would have given up and squeezed the old noggin for a better idea. But the one kid was so determined and surprisingly made a science out of it.
|
|
#24
10-05-11, 05:41
|
|||
|
|||
|
PAINTING - the ultimate question.
The more I read about paint and schemes, the more confused we get. I used to have website links that specified paint (even samples of colours Brit and US) and disruptive paint orders during the timeline of the war. Brit green to brown (dtb), verses US olive drab. Two things to consider. We plan to dress the CMP as a front GS lorry in the Italy campaign with 1st CND Division. Are we correct in assuming that the entire vehicle was painted "dog turd brown"? Does anyone know the modern paint numbers for this colour? Second question. I was suspect when someone mentioned that the chassis and body should be repainted in the same colour. I guess that would depend on the year manufactured and the time period portrayed...no? This CMP was built in Oshawa in 1942. It is the earlier cab13 with the square access hole, etc. I would think that the chassis specifically was painted one flat colour at the factory according to the contract or batch made at the time. Then delivered to DMD. Then history takes over. Depending on what level of service the vehicle ends up, different paint and camo orders come into play. Overtime a vehicle gets overhauled, repainted or even whitewashed in some accounts. So my thinking is that they would only re-paint the outer body, not bothering with the interior and underbelly. So would the chassis be one colour, the interior... whatever.. and the exterior the order of the day. Italy late 1943 to early 1945, I understand was the Brit earth brown affection know as DTB. No to little disruptive over painting. So to reiterate am I correct in this logic. Vehicles originally painted to contract spec at GM plant - solid flat olive drab finish. Vehicles deployed to north Africa - get overhauled and repainted sand, desert tan. Vehicles deployed to Sicily - overhauled and repainted brown with black scheme or I have also heard that trucks from redeployed from Africa to Operation Husky would be tan and black scheme. Vehicles deployed to Italy - overhauled and repainted earthen brown, I have not come across any disruptive paint being used in this period, but still used the roundel symbol on the cab for air recognition. Vehicles deployed to western Europe (d-day to NW) - overhauled, repainted bronze green, and adopt the allied star symbol on the roof and the "crooked" star on the doors. I bet there is an entire thread somewhere in this forum that explains all of this but I can`t find it. painful -help needed. Adrian
|
|
#25
10-05-11, 10:42
|
||||
|
||||
|
Quote:
__________________
Film maker 42 FGT No8 (Aust) remains 42 FGT No9 (Aust) 42 F15 Keith Webb Macleod, Victoria Australia Also Canadian Military Pattern Vehicles group on Facebook https://www.facebook.com/groups/canadianmilitarypattern
|
|
#26
11-05-11, 04:11
|
|||
|
|||
|
Well the students tried to crank the engine over and found out that the flywheel is cracked. Now they have removed the transmission and started working on the bell casing. Pain in the backside with some of the bolts in the actual casing itself. One looks like it might be stripped.
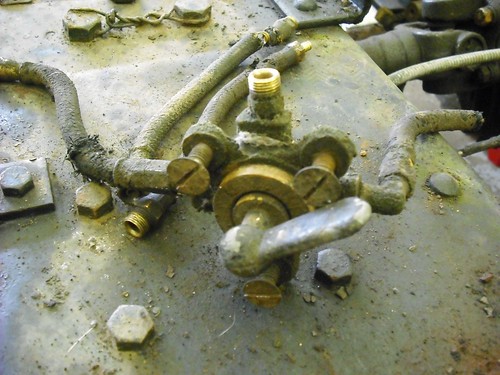
On a positive note the new master cylinder was reattached and the new lines were installed and now the brakes work. I've also attached two new pics of the fuel line switch 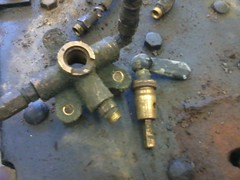 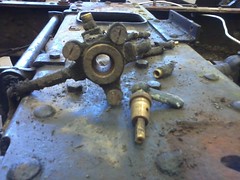 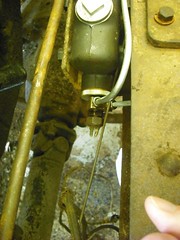 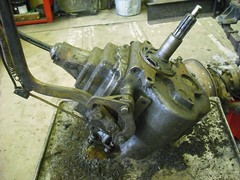
|
|
#27
11-05-11, 05:35
|
|||
|
|||
|
Hi Joel; Nice to see kids working at preserving history. If you can't get that fuel valve to work properly PM me and I'll see if I can't find you a NOS replacement from the collection here. Might even have a flywheel if yours is damaged....Bob
|
|
#28
14-05-11, 00:31
|
|||
|
|||
|
Well the students finall removed the flywheel...holy crap...what a pain to remove. First they students removed the transmission (one student thought he could lift the whole thing himself, he tried but quickly yelled for help). Then they had to remove the clutch plate and then the flywheel, all with the bell casing on because you can't remove the bell casing until everything is out of it first...ahhhhh
We are trying to see if the flywheel can be replaced but we don't know yet. The students finished off the major body work so that it can be sandblasted, then returned so we can get it painted. Two of the students can not wait for it to get back so that they can complete the body work. 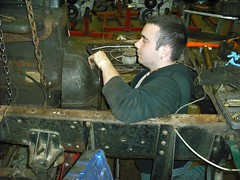 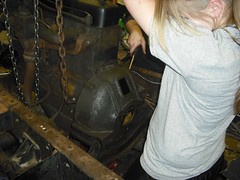 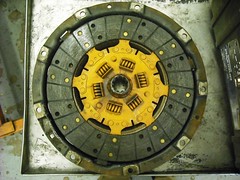   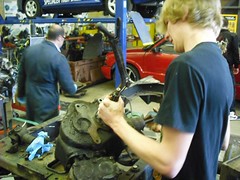
|
|
#29
14-05-11, 14:00
|
|||
|
|||
|
Hi Joel
Didn't really follow the problem with the flywheel, was it loose, flywheel cracked, or the ring gear damaged? Cheers Phil Great photos, hope all the students are enjoying the project, most of us reading about the process are wishing we could have a project like that in school.
__________________
Phil Waterman `41 C60L Pattern 12 `42 C60S Radio Pattern 13 `45 HUP http://canadianmilitarypattern.com/ New e-mail Philip@canadianmilitarypattern.com
|
|
#30
14-05-11, 19:05
|
|||
|
|||
|
Ring gear is cracked, We are hoping the 2nd CMP has one or that Youngs Automotive can find a replacement, so far they haven't let us down, they have been awesome.

|
 |
|
|


 153624


 Linear Mode

