|
#31
 12-01-16, 11:52
|
|||
|
|||
|
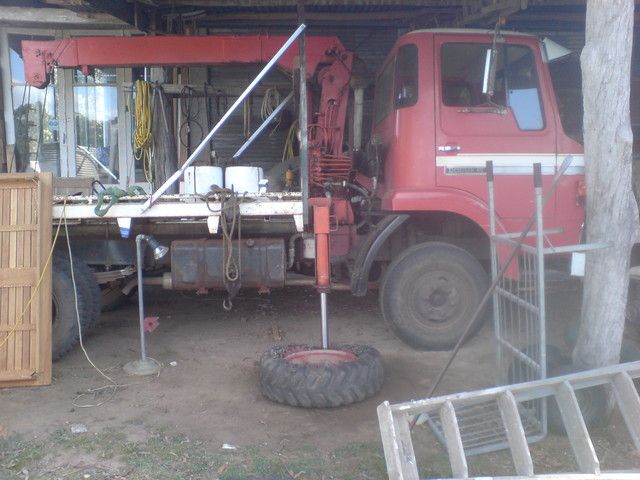
Even the expensive machine needs to be relocated every 90 degrees of the rims to effectively release the bead from the rim.
Wooden blocks of various size become very handy. Most of the retailers of bead breakers show them using a rubber lubricant in a spray bottle....could be as simple as a mild soapy water solution. Cheers
__________________
Bob Carriere....B.T.B C15a Cab 11 Hammond, Ontario Canada Last edited by Bob Carriere; 15-01-16 at 00:23. 
|
|
#32
14-01-16, 23:24
|
|||
|
|||
|
Sorry but I have only just found this thread. This is a very good tutorial on the subject but can I add that I very much agree that it makes a huge difference if the rust pitted surface is cleaned up, made as smooth as possible and painted properly before you try to get the tyre to slide over it.
Also if air pressure is used to seat the tyre bead against the rim I prefer to let the air out again once the tyre is fully seated to let the tube even out where it is stretched. It can then be reinflated with the tube in a cavity that is pretty much its final shape and size which should reduce the stress on the tube. I do this by doing the first inflation without the valve, which speeds things up, and then putting the valve in for the final inflation. David
|
|
#33
15-01-16, 00:13
|
|||
|
|||
|
The proper slow inflation of the tube is critical to avoiding creases in the tube wall.
We actually took a 900x16 tire off the rim and discovered inside an almost new, circa 1980, GoodYear tube that had a bad crease in the sole area and probably would have cause a blowout eventually. Interesting enough the Good Year tube had the following inscription...... 900x16 tires ....for 5 degree rims...... The crease had now become permanent and the rubber was showing signs of cracking. On the tube inflation we do the following ... inflate the tube to full round before inserting into the tire carcass then allow to deflate while re-inserting the valve to retain "some" air inside. Having the tube valve removed greatly speeds up this simple operation. Once the tube is inserted we add some air and manually spin adjust the tube stem with the indentation of the rim..... leftover of the "snoth" greatly facilitates moving the tube. We then deflate the tube, but not totally, to allow installation of the flap. then do the final reinflation... in slow stages..... listening for the creaking of the tube/flap/tire bead as everything falls in place. I fully agree with you and would recommend a full deflation and re-inflation of the tire to minimize the chances of any parts being out of place. Thanks for your comments/suggestions and will do a PS Edit to the slide section. Bob C
__________________
Bob Carriere....B.T.B C15a Cab 11 Hammond, Ontario Canada
|
|
#34
15-01-16, 02:05
|
|||
|
|||
|
Cheers Bob but some might think that 1980, being 35 years ago, is not that new ! Doesn't time fly !
David
|
|
#35
15-01-16, 03:32
|
|||
|
|||
|
Bob,
Thanks for taking the time and effort to share your thoughts on this subject. It's been quite enlightening. I'm almost looking forward to the challenges when I get around to the tires and wheels on the Lynx. Peter
|
|
#36
15-01-16, 04:51
|
|||
|
|||
|
You are so right David....
...in the mid 60s I had dune buggies ....by the early 70s was dirt bikes .... and by 72 was M 37 and the Outaouais 4x4 Club Sponsored by the Molson Brewery with free beers.... ...and CMPs since 96. ..... it explains why I turned 73 today!!!!!! Cheers
__________________
Bob Carriere....B.T.B C15a Cab 11 Hammond, Ontario Canada
|
|
#37
15-01-16, 05:09
|
|||
|
|||
|
Well then, you deserve this wish: HAPPY BIRTHDAY BOB!!!!!!
 from me, on the warm side (around the corner and down the hill)  (as opposed to over the hill)  73 and still fighting with 16inch tyres! Well done Bob, I hope you're still doing it in 10 years 
__________________
Bluebell Carrier Armoured O.P. No1 Mk3 W. T84991 Carrier Bren No2.Mk.I. NewZealand Railways. NZR.6. Dodge WC55. 37mm Gun Motor Carriage M6 Jeep Mb #135668 So many questions....
|
|
#38
22-01-16, 06:47
|
||||
|
||||
|
Excellent post ..lots of great info here..thank you for sharing. I picked up the esco model bead braker a little while ago and for most jobs it works well..however i initially picked it up to remove some 900-20's from some deuce wheels..i quickly found out that with the offset of the wheel center section there isnt enough rim for the tool to grab except in the hand hold areas on the lock ring side..fortunately not an issue on a CMP wheel.
For lubricating threads on pullers and other high force operations i use straight STP on the threads..its slicker than anti sieze and it doesnt have the tendency to follow you around the shop and into the house and onto the wifes finery the way a tiny amount of anti sieze will  Especially if youre doing bodywork and paint.
__________________
Stab it and steer...
|
|
#39
22-01-16, 17:02
|
|||
|
|||
|
....."for the tool to grab except in the hand hold areas on the lock ring side"......
Hi Corey We happen to have 4 deuce and a half rims/tires to work on. Are you saying that the tool must be aligned with the cutouts in the rim centre for the rim clamp tobe able to clamp properly....? And once was done it did slide the tire bead suffuciently to release the bead lock on the rim and free the tire. Thanks Bob C
__________________
Bob Carriere....B.T.B C15a Cab 11 Hammond, Ontario Canada
|
|
#40
26-01-16, 19:49
|
|||
|
|||
|
I change a lot of tires I counted over 180 tires in my yard the other day. I was 2 1/2 hrs a tire ,changing 900x16 tires on three CMPs ,I have some good tire tools including a big bead breaker hammer and a 50 ton press .How did the army do it in the battle fields ? Those run flat tires are a night mare . I'll be making one of your tools ,thanks . Another word for tire grease is GUNK
__________________
George is hooked on OD 5 window DT969 8 ton Fruehauf trailer M2A1Halftrack ,CMP #11 F15A1 #13 F15A1 RAF Fordson Tractor, 42 WLC HD No.2MK11 CT267514 center CB24713 bottom hull25701 ,No.2 MK2 parts MK1 10128 ,(2) MK1 ,Parts Hull9305 .Hull 10407 Hull plate # 7250 all have walk plate on back steps 1917 Patent modle amphibious army tank
|
|
#41
26-01-16, 21:49
|
|||
|
|||
|
Another easy to find source for the tire grease is good old Crisco. I have been using the same pound of it for about 5 years out in the shop. Gives the mice something to snack on too.
In the military we used to get michelin tire grease in a 5 pound yellow pail. It was good too.
|
|
#42
26-01-16, 23:12
|
|||
|
|||
|
Quote:
Hi George Actually the CMP rims are easy to change with only hand tools, if and it is a big if, the rims need to be smooth and clean NO rust. If the rims are clean and well painted as they would be on a new truck or one under 5 years old then it is relatively easy for one man to break them down change a tube and remount them. There are tricks to making this process easy using just the two tire irons from the tool kit. I like Number 27 as it has more leverage than Number 49. (see tool sheet and list below) What works for me best is take the two of the #27 irons and insert the tip between rim and tire and pry down on the end just leaning on the bar end, then insert the other tool in right next to it and pry down. I keep doing this until have worked my way around the rim twice. As you work around the rim the tip of the spoon on the iron will work in a little deeper. As I'm doing this it is not an effort to push down as hard as I can just leaning on the end of the bar. Generally after the 2nd time around the rim starts to really slide up out of the tire. Then use the #49 bar to finish the process sliding the hooked end in and instead of prying down on the end of the bar instead pry sideways. As I have gotten older and back weaker I've found that having the wheel assembly laying flat about two feet off the ground makes it easier to just lean on the bar end. Once one side of the rim has been pried out this way flip the wheel over and repeat on the other half of the rim. It seems to be more about pushing or prying a little way all the way around rather than prying hard on one spot. Had to pop one of the 11:00x20 of the C60L (off this summer) when I picked up a nail but didn't go flat. Wanted to be sure it had not penetrated all the way. Took me about an hour to remove wheel break it down check the tube reassemble, re-inflate, and remount the tire on the truck. Of course I had shop air for the impact wrench and to inflate the tire. Can you imagine using the foot pump in the tool kit. The ease of doing this of course is all aided by the fact that the rims on my trucks have all been cleaned and painted so I'm not fighting rust or the ruff surface inter face of rusted rim and tire. I've changed the rubber bead spacer run flats with out differently once the rims have been well cleaned and painted. Never have encountered one of the steel bead spacers. Next time I have to break a tire down I'll make a video. Would add safety caution on tire inflation. Use a lock on inflater and a pressure regulator set to the desired pressure (double check the pressure setting) then walk away from the tire while it is inflating. I like being on the other side of the truck or out side the shop. Once had a car tire sidewall fail while reinflating heck of a noise. I've noticed that once a tire has been mounted on a rim it generally will seat the next time without a lot of effort. Cheers Phil
__________________
Phil Waterman `41 C60L Pattern 12 `42 C60S Radio Pattern 13 `45 HUP http://canadianmilitarypattern.com/ New e-mail Philip@canadianmilitarypattern.com Last edited by Phil Waterman; 27-01-16 at 15:54. Reason: Add a thought added clarification
|
|
#43
27-01-16, 08:36
|
||||
|
||||
|
Quote:
__________________
One of the original Australian CMP hunters.
|
|
#44
27-01-16, 09:10
|
||||
|
||||
|
Quote:
Aussie methods: Kiwi method (presumably the guy with the beer is supervising):
__________________
One of the original Australian CMP hunters.
|
|
#45
27-01-16, 09:55
|
|||
|
|||
|
Tony, This is just a local pattern damper in the tow rope.

__________________
Bluebell Carrier Armoured O.P. No1 Mk3 W. T84991 Carrier Bren No2.Mk.I. NewZealand Railways. NZR.6. Dodge WC55. 37mm Gun Motor Carriage M6 Jeep Mb #135668 So many questions....
|
|
#46
20-06-16, 20:04
|
|||
|
|||
|
Bob,
Currently in the process of putting new tires on old rims. Took the old wheels/ tires in to a shop to get them off. No problem, no breaking off studs and even able to keep flaps. I've done a huge job of removing rust, old rubber and paint. But how far do I need to take these rims? I'm sourcing out someone to sandblast for me as the one at school is too small and tedious. So, right down to bare metal all over? Where can I get flat olive drab paint? I've got to go over the bolts to get the threads clean again but I think this job is almost half over!! Your advice is appreciated. Also, some of the bolt studs are corroded. Will this be a major problem for strength? Drew
|
|
#47
20-06-16, 20:49
|
|||
|
|||
|
Hi Drew
Once down to bare metal the rest is easy. The bare steel has to be painted with a good oil based glossy paint as it will facilitate sliding the tire's bead down the rim. I usually spray a metal prep or phosphoric acid which etches and turns the upper layer of the steel into iron phosphate. The I paint them with POR 15 Black glossy.... available at C T C. Who ever took your tire off the rims must have a pail of tire lub.... pay him a visit with an empty glass jar..... you only need about 8 ounces for a life time of fun and slippery snotty sliding. Lub the rim and the tire bead it will greatly facilitate the installation. You can try a wire wheel in a drill to clean the thread of the studs and a wire brush for cleaning shotguns on the nuts. I was lucky to find a used tap and die on Ebay for the BSF thread. How good are they???? depends.... how badly corroded...... how many of them are rusted badly??? If you have any doubts better look around on the forum for spare rims..... cheaper than a crack up at speed. Make sure you rims are bot to deeply pitted...... I have seen some with actual pin holes in the 1/4 steel.... you don't usually see them until a good sandblasting. If you use the POR 15 coating..... you can also apply it to the visible side of the rims for greater protection BUT..... the POR is so hard and slick that paint will not stick to it unless you cover the POR with a tie coat... then after 24hours for the tie coat to dry ...paint with at least 2 coats of OD...... I get my paint from Peter de Bella, the jeep parts dealer, at $38 US a gallon...... I have been pleased with the Randolph paint.... # 34087 and I usually pick it up at the Weare show on Conn. and save shipping.... Rapco parts company from Texas also sells Gillespie paint @ 34087 Lusterless "Khaki" olive drab..... Marcus at Jeep Acres North of Barry Ont. I beleive has various paint stock. Good luck and show us some pictures of your project.... Tubes..... make sure they have the proper long stem...... a bit of rim lub on them will allow them to get stretched and fall in place easier. Cheers
__________________
Bob Carriere....B.T.B C15a Cab 11 Hammond, Ontario Canada
|
|
#48
21-06-16, 00:40
|
|||
|
|||
|
Back in the day, you applied feather dust to the tubes to stop them from folding over themselves and chafing. Nowadays, as there seems to be some distaste for naked chickens, thus feather dust is hard to find, just use talcum powder. Army foot powder will do just fine.
Otherwise I second pretty much everything Bob says and I'll stress his one point: get the proper tubes. Before I worked with this museum, they would send their tires downtown. Apparently the 90° valve on center tubes are hard to get, so they used regular valve off-center tubes and would drag the valve over to the center hole. I can assure you this works for between 2 days and two years. Get the right tubes. Wallace Wade out of the US carries them and some heavily re-enforced flaps. I was able to track the tubes and flaps down to Doberman tire distribution in the US and brought up a couple dozen of each.
|
|
#49
23-06-16, 23:20
|
|||
|
|||
|
Hi Guys
Just stumbled on this on Youtube, just what you need for doing CMP wheels and tires. https://youtu.be/i-3H_hV0xBM Local big truck shop has machine line this and it really works well even on tires that have been there for a long time. He also has a bead blasting cabinet that will take big rims and auto clean them. Cheers Phil PS Can't seem to get the Youtube embed to work so that it is a picture and a link to video. Whats the trick?
__________________
Phil Waterman `41 C60L Pattern 12 `42 C60S Radio Pattern 13 `45 HUP http://canadianmilitarypattern.com/ New e-mail Philip@canadianmilitarypattern.com
|
|
#50
20-11-16, 11:44
|
||||
|
||||
|
__________________
Regards, Hanno --------------------------
|
|
#51
11-12-16, 09:49
|
|||
|
|||
|
Quote:
 bead breaker    cut a hole with a chain saw then used a cold chisel to break the bead literally  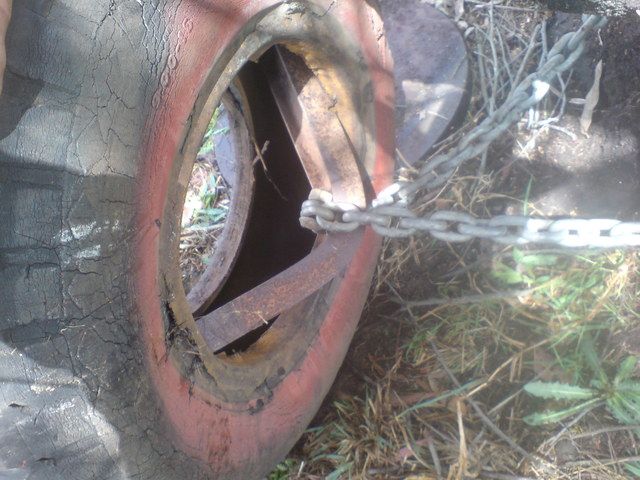 even after getting one half off they still put up a fight... 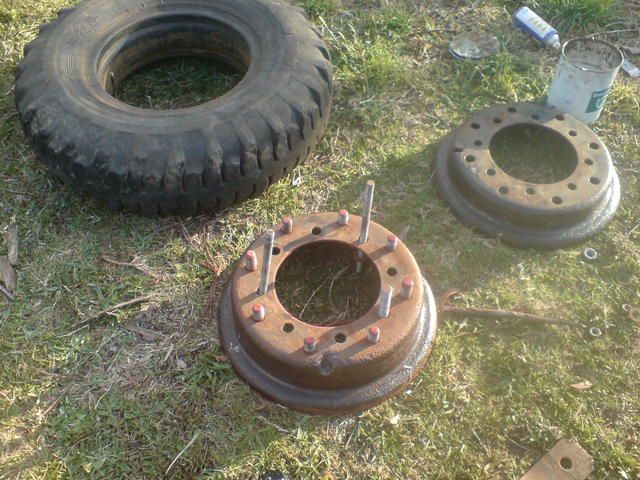 I think I was 16 at the time but not sure I'd do it too differently now...
|
|
#52
11-12-16, 18:05
|
|||
|
|||
|
I agree with you Harry...... sometimes the chainsaw and cold chisel is the ONLY way to break the rust weld bond....... actually pulling them apart with chains probably makes it worst has you are trying to roll the very stiff rusted tire bead on itself.
Caution is always required!!!! count your fingers before and after. Cheers Bob C
__________________
Bob Carriere....B.T.B C15a Cab 11 Hammond, Ontario Canada
|
|
#53
12-12-16, 00:34
|
|||
|
|||
|
and there I was thinking it was me and my uncle that came up with that method! They sure can have a tight hold... I think you do need a combo though to get proper access to the bead while the rims are pulled apart a bit
|
|
#54
13-12-16, 23:39
|
|||
|
|||
|
I use to let the air mostly out and then drive in a circle and that would sure make it easier to get them off
__________________
George is hooked on OD 5 window DT969 8 ton Fruehauf trailer M2A1Halftrack ,CMP #11 F15A1 #13 F15A1 RAF Fordson Tractor, 42 WLC HD No.2MK11 CT267514 center CB24713 bottom hull25701 ,No.2 MK2 parts MK1 10128 ,(2) MK1 ,Parts Hull9305 .Hull 10407 Hull plate # 7250 all have walk plate on back steps 1917 Patent modle amphibious army tank
|
|
#55
03-01-17, 03:44
|
|||
|
|||
|
I had the tires removed from my 16 inch CMP rims today.Despite using extreme measures ( backhoe, torches etc) in the past and a generous offer from a fellow enthusiast to use his 50 ton press to push off the tires,I used a different method.
A friend of a mobile tractor mechanic and tire repair guy. He used a one inch air ratchet gun on the nuts and a heavy duty hydraulic bead breaker on the tires. Had all four off in about 1.5 - 2 hours. Cost $100 what a deal!! Will sandblast and then maybe turn them to clean smooth metal before painting.
|
|
#56
03-01-17, 05:32
|
|||
|
|||
|
Hi Bob
A wise expenditure...... and saves the old body!!!! ONce they are sandblasted make sure that none of the pits are holes or too pitted too deep............ hang the rim section with a soft rope and hit it with a wrench...... ......................if it rings there should be no cracks. I use a phosphoric acid spray on the bare metal to create an iron phosphate barrier than coat with POR...... or you may want to use a good epoxy primer.....make sure that the finished product is nice smooth and glossy. Then call you tire guy again and borrow a small coffee can of tire lub ....we call snoot....... your tube and tires will just slip on.....well almost. I f you were closer I would say come and borrow our device. Do not forget to clean or chase the threads on the studs and on the nuts. I use never seize on all the nuts when installing. Cheers
__________________
Bob Carriere....B.T.B C15a Cab 11 Hammond, Ontario Canada
|
 |
|
|
 Similar Threads
|
||||
| Thread | Thread Starter | Forum | Replies | Last Post |
| For Sale: Supacat avon tredlite 31 x 15.5 - 15 tires + wheels | Robin Craig | For Sale Or Wanted | 0 | 30-03-15 00:51 |
| 12 bolt HMMWV wheels/tires | chris vickery | Post-war Military Vehicles | 2 | 09-02-13 03:01 |
| Trade tires for tires | DanJahn | For Sale Or Wanted | 0 | 22-06-12 04:21 |
| Options for wheels and tires for a 42 GPW | nelson84 | The Softskin Forum | 4 | 23-10-10 21:39 |
| tires.... again | Paul Heise | The Restoration Forum | 12 | 24-03-06 04:00 |


 Linear Mode

