|
#181
 30-10-11, 11:25
|
||||
|
||||
|
Hi Andrew, The bearing keep/valve packing I used was 7/16" square, Its graphite lubricated, It does not spill out grease when it gets hot, it's nuclear grade and has a max temp of something like 450 dergrees C, 20 m/s speed and I was told it cost £150 a metre by my freindly storekeeper. I think it sounds as if your packings is too tight, On a universal carrier with the track removed, the hub should spin freely with very little effort to spin them, I would remove your hubs to check the seal and perhaps take a 'rasp file' to it to profile it down.
Like Jordan says, run the carrier on a hard surface to free the tracks. kevin.
__________________
2pdr Tank Hunter Universal Carrier 1942 registered 11/11/2008. 3" Mortar Universal Carrier 1943 registered 06/06/2009. 1941 Standard Mk1 stowage Carrier, Caunter camo. 1941 Standard Mk1 stowage Carrier, light stone. 10 cwt wartime mortar trailer. 1943 Mk2 Daimler Dingo. 1943 Willys MB. 1936 Vickers MG carrier No1 Mk1 CMM 985. 
|
|
#182
30-10-11, 11:42
|
|||
|
|||
|
hi Kevin thanks for the intel. The gland material i used was tight when first fitted but I reasoned that it would have to be or else it was not going to do its job. Of course, I did not bank on it dumping graphite grease everywhere. Boring! Nothing else for it in my view but to get the hubs off again and put it right.
|
|
#183
30-10-11, 12:07
|
||||
|
||||
|
I was going to leave the asbestos packing out... based on the theory that i dont intend to go through many deep rivers etc etc. plus any water that gets in could drain quicker. i appreciate that any water in with the pads can have an effect on braking efficiency but i never encountered any issues when rallying (and those hubs had no rear seals on)
just a thought if its easier until something better (seal wise) comes along
__________________
is mos redintegro __5th Div___46th Div__ 1942 Ford Universal Carrier No.3 MkI* Lower Hull No. 10131 War Department CT54508 (SOLD) 1944 Ford Universal Carrier MkII* (under restoration). 1944 Morris C8 radio body (under restoration).
|
|
#184
30-10-11, 12:30
|
||||
|
||||
|
Old land rovers never had any sealing material fitted and neither did the Loyd Carrier.
A job well done Andrew. Do you intend to take the T16 to any shows when you are happy with it?
__________________
Alastair Lincoln, UK. Under Restoration: 1944 No2 MK2 Loyd Carrier - Tracked Towing 1944 Ford WOT6 Lorry The Loyd on Facebook
|
|
#185
30-10-11, 14:44
|
|||
|
|||
|
I will take it to a few shows without doubt. I am fortunate in that the War and Peace is only 18 miles away, and the IMPS new show, which is great, Combined Operations is less than 1.5 miles away!!
I have quite a lot to do to get it as I want, so although its driving and doing all the right stuff, as you will all know, the devil is in the detail. losened off the left rear brake adjustment and what a difference that made! Took it for about 1 mile round trip this morning, and it is freeing up very nicely. I reckon the tracks are well on their way to being normal. I did apply a little duck oil this morning. Anyway, back to the grind stone,Loads to do 
|
|
#186
30-10-11, 17:30
|
|||
|
|||
|
shaun gave me a good tip on brake adjustment leaving the tracks on, just get someone to bounce the top run of track up and down, this will move the drum/sprocket back and forth which will enable you adjust the brakes, personally i adjust them tight then slacken them off until the drum starts to move and then give it one more 1/4 turn to be sure then take it for a spin and see if the drums getting overly hot. as for the tracks i'd leave them just for a while and see if they settle in on their own.
rick
__________________
_______________________ 1941 mk1 mortar Carrier 1941 Mk1* Carrier 1942 Mk1* Carrier 1943 T16 Carrier 1945 Mk3 Dingo 1941 Mk3 Covenanter 1941 Mk4 Churchill AVRE (now sold) 1944 Mk6 Cromwell (now sold) 1952 Mk3 Centurion 1952 ARV Centurion 1952 ARV Centurion 1953 Mk3 Centurion (breaking)
|
|
#187
30-10-11, 19:49
|
|||
|
|||
|
sounds like a good plan. I reckon half of the reason that the graphite seals were misbehaving was because the drum was hot, or they were just bedding in, as I did not detect anymore leakage. probably all over my brake shoes!
Noticed a bit of fuel starvation at low to medium throttle which cleared if you floored it. Bit of pain, as it didnt do that before. I wonder whether its one of the jets playing up , although its a new carb, which gets augmented by the accelerator pump? It could have also been a very simple shortage of fuel caused by me not having the vent tap on my temporary fuel can open. Although that wouldnt have explained the fuel being there when you floored it. Anyway, I will try it next time with the vent open.....I reckon it will be that.
|
|
#189
26-11-11, 10:31
|
|||
|
|||
|
not much to report in terms of progress. I am awaiting some instruments being sent from the US, and some tin work for the engine covers to be manufactured. I did however, manage to get it charging, or at least, my local expert managed to get it charging. Pretty chuffed with that, a few well aimed tweeks in the control box and hey presto, eureka.
I had noticed that on a couple of the new head studs I put in place I have a little weep up through the nut on the cylinder head. I have put some K Seal in the water and hope that it encourages it to seal. Has anyone else experienced this with the V8 engines? Last edited by andrew honychurch; 27-11-11 at 09:48.
|
|
#190
26-11-11, 12:36
|
||||
|
||||
|
Andrew my problems with head studs snapping arose as a result that for some absurd reason they drilled the the head studs into the block right into the water jacket ! so with a bit of water pressure voila you get water weeping up through the threads... my advice would be is if the studs can come out without sheering off like mine i would take them out clean the threads and put some thread lock/sealer on the studs and wind them back in, job is a goodun.
i have no doubt there will be other fixes for this issue... perhaps nipping up the stud a bit more will do the trick...i would worry about threads pulling or the stud letting go though.
__________________
is mos redintegro __5th Div___46th Div__ 1942 Ford Universal Carrier No.3 MkI* Lower Hull No. 10131 War Department CT54508 (SOLD) 1944 Ford Universal Carrier MkII* (under restoration). 1944 Morris C8 radio body (under restoration).
|
|
#191
26-11-11, 23:30
|
||||
|
||||
|
A tip from the hot rodders is to fit dowty washers.
__________________
Alastair Lincoln, UK. Under Restoration: 1944 No2 MK2 Loyd Carrier - Tracked Towing 1944 Ford WOT6 Lorry The Loyd on Facebook
|
|
#192
27-11-11, 09:55
|
|||
|
|||
|
thanks Guys. I had to fit about 15 new studs, and its only on two of these that I am getting a weep. What I need to do is a compression test at some stage just to make sure that I dont have a head gasket problem, but I am sure I dont. Am trying to work out where the water will be coming from. I guess it must be through the thread at the bottom of the stud and all the way up, as long as the head gasket is holding the only place for it to get out is through the top. Having started with two leaking water pumps I now only have one, but it just wont stop. I have bought a couple of NOS pumps but am reluctant to fit it as I am hoping the dripper will stop soon. Its just a bit of a bore as I havent filled it with anti-freeze yet in case I have to drain it down to do the pump and lose all the solution. Sadly my engine does not have the correct taps in the block for draining only plugs so the water will go all over the centre engine bay unless one of you has a cunning plan. I feel the need for some more on track testing
|
|
#193
27-11-11, 11:04
|
||||
|
||||
|
you could drill and tap the fixed plug then perhaps put the brass tap on ? or put a T piece on the lower hose with a take off which you could use as a draining siphon type affair.. the latter would be much easier methinks
__________________
is mos redintegro __5th Div___46th Div__ 1942 Ford Universal Carrier No.3 MkI* Lower Hull No. 10131 War Department CT54508 (SOLD) 1944 Ford Universal Carrier MkII* (under restoration). 1944 Morris C8 radio body (under restoration).
|
|
#194
27-11-11, 11:27
|
|||
|
|||
|
Put some plastic over the rad filler to slow down the flow when you pull the plug.
I have read that leaking from the studs is a common fault on rebuild. Go to Redsheaders.com, and have a read. Adding antifreeze will most likely increase the leaks!
__________________
Bluebell Carrier Armoured O.P. No1 Mk3 W. T84991 Carrier Bren No2.Mk.I. NewZealand Railways. NZR.6. Dodge WC55. 37mm Gun Motor Carriage M6 Jeep Mb #135668 So many questions.... Last edited by Lynn Eades; 27-11-11 at 11:34.
|
|
#195
27-11-11, 12:50
|
|||
|
|||
|
what I really need is a right angle adapter that fits into the block where the current square headed plug is and then a Jeep type drain plug which will direct the water out through the hole in the floor. So anyone with some US pipe threaded taper male ended right angle convertors please let me know. I can get the threads if there is a serious chance of having some. thx
|
|
#196
18-02-12, 15:14
|
|||
|
|||
|
the weather has cleared a bit here in Kent, and I have taken the opportunity to get cracking on the T16 again. Received my nice new reproduction seats and cushions from Allied Forces Canvas. A superb job will post up some photos soon.
I have decided against remanufacturing my petrol tanks as they are very solid indeed but pretty nasty inside. I have just cut the ends out of one and was planning on sandblasting it and rewelding the ends up. The other tank is much better and I wonder whether anyone can advise on how to clean the inside out so its fit for petrol? I guess when I sandblast the bad one, I cannot paint it so it will have to be left au naturel. Any ideas how to stop it rusting up again? Photos to follow.
|
|
#197
18-02-12, 16:05
|
|||
|
|||
|
Hi Andrew
I've been looking at the same issue of fuel tanks on on of my CMPs and I'm seriously looking at leaving the tank as a shell in putting a fuel cell inside. Part of the reason is that a smaller tank may actually be a blessing in this world of changing gasoline that does not have the shelf life (here in the states) of what we grew up with. Just a thought. Cheers Phil
__________________
Phil Waterman `41 C60L Pattern 12 `42 C60S Radio Pattern 13 `45 HUP http://canadianmilitarypattern.com/ New e-mail Philip@canadianmilitarypattern.com
|
|
#198
18-02-12, 22:27
|
|||
|
|||
|
Quote:
|
|
#199
18-02-12, 23:41
|
|||
|
|||
|
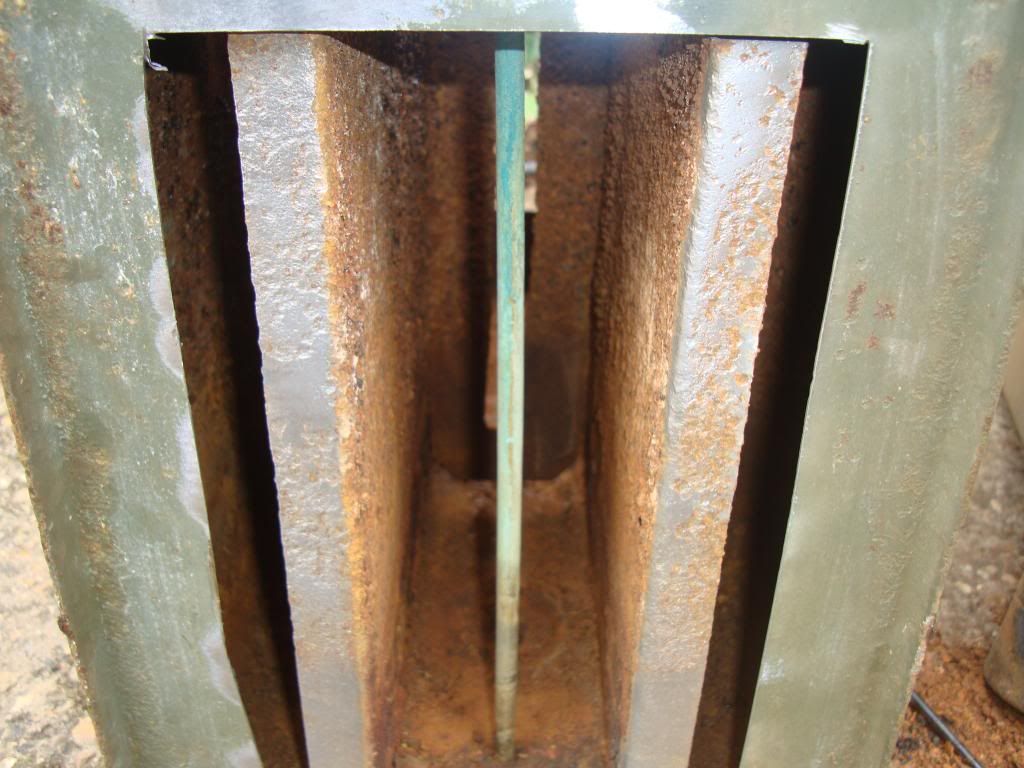
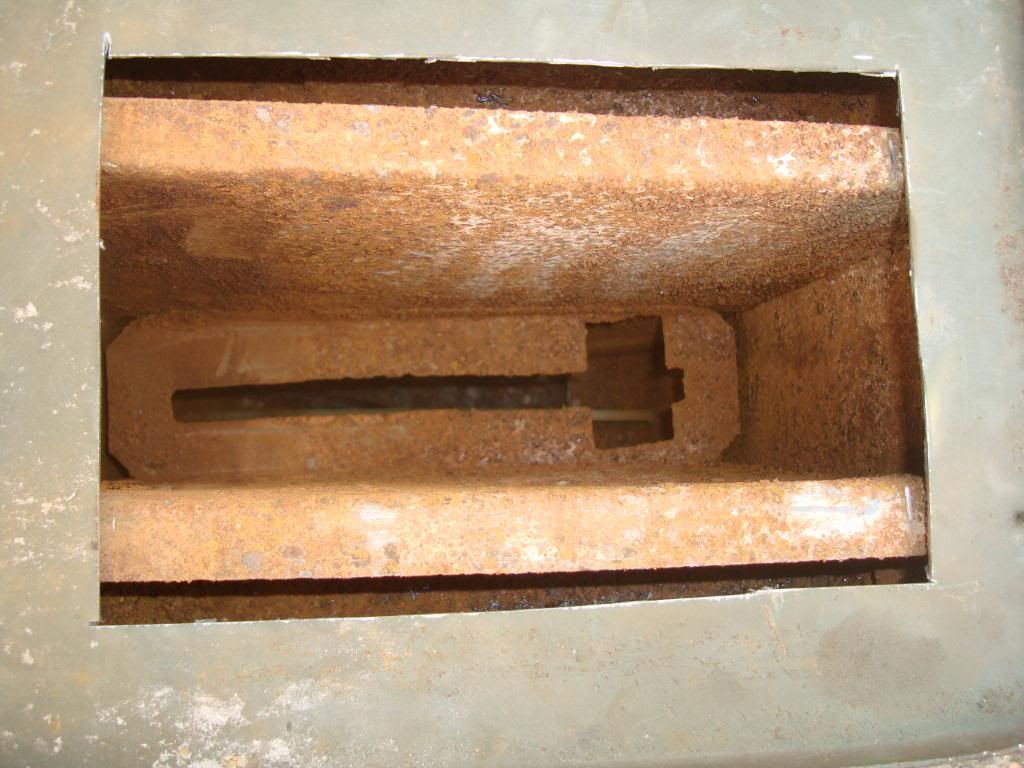
some good ideas guys, thanks. I am thinking of either sandblasting the worse of the two tanks or if I can find someone who acid dips them locally maybe that. There is a lot of solder around the seams though, so unsure how the acid will affect that. Anyway here are some photos of the tanks. All pretty solid, one small how, just pretty grotty inside.
|
|
#200
19-02-12, 05:02
|
||||
|
||||
|
If you have the tanks dipped, talk with the staff first to find out if their chemicals will cause the solder joints to let go. I know the place I used here in the USA had chemicals that would dissolve the rust on steel with no adverse affects but it also dissolved pot-metal and some other things which was a bad surprise for me with one T-16 part.
__________________
David Gordon - MVPA # 15292 '41 Willys MB British Airborne Jeep '42 Excelsior Welbike Mark I '43 BSA Folding Military Bicycle '44 Orme-Evans Airborne Trailer No. 1 Mk. II '44 Airborne 100-Gallon Water Bowser Trailer '44 Jowett Cars 4.2-Inch Towed Mortar '44 Daimler Scout Car Mark II '45 Studebaker M29C Weasel
|
|
#201
19-02-12, 14:33
|
|||
|
|||
|
Soft solder,which is an alloy of tin and lead, is completely impervious to any of the acids normally used for de-rusting steel. This includes spirits of salts which is very evil stuff made up of a mixture of sulphuric and hydrochloric acids.
David
__________________
Hell no! I'm not that old!
|
|
#202
19-02-12, 16:47
|
||||
|
||||
|
interesting that the baffles on a T16 tank run lengthways rather than width ways like earlier universals
__________________
is mos redintegro __5th Div___46th Div__ 1942 Ford Universal Carrier No.3 MkI* Lower Hull No. 10131 War Department CT54508 (SOLD) 1944 Ford Universal Carrier MkII* (under restoration). 1944 Morris C8 radio body (under restoration).
|
|
#203
19-02-12, 23:46
|
|||
|
|||
|
the slot in the baffle is for guiding the sender arm. ( sorry if thats obvious). Not sure why they would be set the other way around, other than the fact the T16 climbs better than a U/C and spends less time on its side !

|
|
#204
20-02-12, 01:41
|
||||
|
||||
|
hahaha.. no idea.. but mine are width ways rather than length

__________________
is mos redintegro __5th Div___46th Div__ 1942 Ford Universal Carrier No.3 MkI* Lower Hull No. 10131 War Department CT54508 (SOLD) 1944 Ford Universal Carrier MkII* (under restoration). 1944 Morris C8 radio body (under restoration).
|
|
#205
20-02-12, 09:33
|
|||
|
|||
|
Does anyone know what sort of acid dip I should go for if i can find someone locally? I had heard that the guys that do furniture stripping can do this sort of thing. My nearest specialist company I know about is 240 miles away, so really looking for someone near Kent.
|
|
#206
20-02-12, 10:30
|
||||
|
||||
|
if it was me i would sink the tank in mollassas... gets rid of the rust will take a fortnight but its not as invasive as acid and will get the metal pristine, then re seal it with POR solution
__________________
is mos redintegro __5th Div___46th Div__ 1942 Ford Universal Carrier No.3 MkI* Lower Hull No. 10131 War Department CT54508 (SOLD) 1944 Ford Universal Carrier MkII* (under restoration). 1944 Morris C8 radio body (under restoration).
|
|
#207
20-02-12, 10:33
|
|||
|
|||
|
thanks Richard, but where do you get Molasses from? A
|
|
#208
20-02-12, 11:08
|
||||
|
||||
|
any animal feed or horse feed shop. you can get it online too... comes in liquid form
molasses in action link: http://www.youtube.com/watch?v=8-gBAjEga1s shops near kent link: http://www.equi-therapy.net/equi-the...eed-kent.shtml Molasses specialist (they can do blends for different uses including rust removal): http://www.molassesfeed.com/mainliquidfeedpage.aspx
__________________
is mos redintegro __5th Div___46th Div__ 1942 Ford Universal Carrier No.3 MkI* Lower Hull No. 10131 War Department CT54508 (SOLD) 1944 Ford Universal Carrier MkII* (under restoration). 1944 Morris C8 radio body (under restoration).
|
|
#209
20-02-12, 11:39
|
|||
|
|||
|
thanks Richard, very kind of you. I will look into this in a bit more detail. I guess I can jet wash off the open fuel tank, but the other one may be more of a problem to clean out. Anyway some good intel here. cheers
|
|
#210
20-02-12, 12:50
|
||||
|
||||
|
if you know someone with a large enough ultrasonic bath you could bathe the tanks in molasses then use the ultrasonic bath to agitate the scum residue off without having to cut the tank open. just a thought (may not work)
__________________
is mos redintegro __5th Div___46th Div__ 1942 Ford Universal Carrier No.3 MkI* Lower Hull No. 10131 War Department CT54508 (SOLD) 1944 Ford Universal Carrier MkII* (under restoration). 1944 Morris C8 radio body (under restoration).
|
 |
| Thread Tools | |
| Display Modes | |
|
|


 Linear Mode

