|
#61
 11-01-10, 11:48
|
||||
|
||||
|
excelent, i had a few emails from MLU members looking for rivet specialists so at least there are two knowns to use hahaha.
well its been a while since i put up any pictures and i promised after new year i would post up, I have got the front armour back on and what a job it was, i recall Martyn saying that the front armour forms quite a substantial portion of the carriers regidity and when removed and used over uneven ground etc the chassis can twist. well i can vouch for this for sure, George when you do yours dont take anything as being square on the carrier as i found the track guards have appeared to dropped on mine and dispite appearing square they were not. i have done what martyn did and made my front armour up knowing that the peice was correct and square then jigged my tub back to shape and ensured everything lined up as it should. I need a Mk1 canadian steering box armour cover so i can finish the lower frame rail. After Thursday (Payday) i can pay and collect my rear and sides. I have noticed that the rear armour appears thinner than the sides ? anyone heard of this ? the sides are 8mm and the rear is just shy of 7mm. anyway here is a fairly recent shot of my carrier. 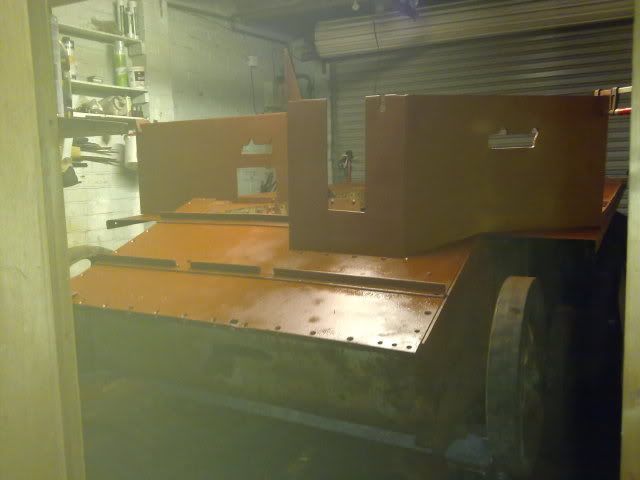 Richie
__________________
is mos redintegro __5th Div___46th Div__ 1942 Ford Universal Carrier No.3 MkI* Lower Hull No. 10131 War Department CT54508 (SOLD) 1944 Ford Universal Carrier MkII* (under restoration). 1944 Morris C8 radio body (under restoration). 
|
|
#62
11-01-10, 12:08
|
||||
|
||||
|
Hi Richard, I will post a front steering box armour up to you complete, its off a british carrier but will fit exact, when you rivet that rear armour on remember the rivets have the bigger head on the outside of the carrier.
let me know when the dash arrives. kevin.
__________________
2pdr Tank Hunter Universal Carrier 1942 registered 11/11/2008. 3" Mortar Universal Carrier 1943 registered 06/06/2009. 1941 Standard Mk1 stowage Carrier, Caunter camo. 1941 Standard Mk1 stowage Carrier, light stone. 10 cwt wartime mortar trailer. 1943 Mk2 Daimler Dingo. 1943 Willys MB. 1936 Vickers MG carrier No1 Mk1 CMM 985.
|
|
#63
11-01-10, 12:13
|
||||
|
||||
|
am i right in thinking then that the finished head goes outside and the head to be compressed goes inside ?
__________________
is mos redintegro __5th Div___46th Div__ 1942 Ford Universal Carrier No.3 MkI* Lower Hull No. 10131 War Department CT54508 (SOLD) 1944 Ford Universal Carrier MkII* (under restoration). 1944 Morris C8 radio body (under restoration).
|
|
#64
11-01-10, 15:00
|
||||
|
||||
|
kevin your package arrived buddy many thanks.
__________________
is mos redintegro __5th Div___46th Div__ 1942 Ford Universal Carrier No.3 MkI* Lower Hull No. 10131 War Department CT54508 (SOLD) 1944 Ford Universal Carrier MkII* (under restoration). 1944 Morris C8 radio body (under restoration).
|
|
#65
11-01-10, 21:38
|
||||
|
||||
|
Richard, just checked my mk1 carrier, the rear plate rivets up the side are put in from the outside and finished on the inside with a round head, this would mean the rear plate on a carrier would be put on first then the sides, ie round head both sides. The rear plate rivets along the bottom (which pass through the big angle iron with the hull number on) are put in from inside and finished on the outside with the usual mushroom head ie round head on the inside, mushroom on the outside.
I posted the steering hull plate today, will take 48 hrs to get to you, will need to be signed for, put in a dash top plate also. kevin.
__________________
2pdr Tank Hunter Universal Carrier 1942 registered 11/11/2008. 3" Mortar Universal Carrier 1943 registered 06/06/2009. 1941 Standard Mk1 stowage Carrier, Caunter camo. 1941 Standard Mk1 stowage Carrier, light stone. 10 cwt wartime mortar trailer. 1943 Mk2 Daimler Dingo. 1943 Willys MB. 1936 Vickers MG carrier No1 Mk1 CMM 985.
|
|
#66
12-01-10, 12:18
|
||||
|
||||
|
cheers Kevin, rear fenders are in progress as we speak hahahaha. The Mk2 guage you sent, does it have the reset trip for it ? and do you know where i could get a new bezzel ring for the dash itself as the hole appears to large for the gauge... on pictures of dashes there appears to be a bezzel ring with screws in.
__________________
is mos redintegro __5th Div___46th Div__ 1942 Ford Universal Carrier No.3 MkI* Lower Hull No. 10131 War Department CT54508 (SOLD) 1944 Ford Universal Carrier MkII* (under restoration). 1944 Morris C8 radio body (under restoration).
|
|
#67
12-01-10, 12:38
|
||||
|
||||
|
hi, sorry I havent got a trip cable, there is a bezal ring which goes on the inside with jacking screw holes in it, i will have a look for it, on the outside there is another ring, this is something you will have to make, if you doing a dash with a british smiths gauge you would not need this ring.
kevin
__________________
2pdr Tank Hunter Universal Carrier 1942 registered 11/11/2008. 3" Mortar Universal Carrier 1943 registered 06/06/2009. 1941 Standard Mk1 stowage Carrier, Caunter camo. 1941 Standard Mk1 stowage Carrier, light stone. 10 cwt wartime mortar trailer. 1943 Mk2 Daimler Dingo. 1943 Willys MB. 1936 Vickers MG carrier No1 Mk1 CMM 985.
|
|
#68
14-01-10, 00:44
|
|||
|
|||
|
Hi mate
ref your question to Kevin about what direction to put rivets in. I think when they were built the rivet were put in from the inside out and domed over into the counter sink how ever i found doing them the other way round worked best? if your not going to c/s you r holes i dont think it matters. but looking good mate I have mine at home in the garage now drove it home last sunday in the snow she went well and top speed was 35mph. can do the last few jobs now and just tinker with her 
|
|
#69
14-01-10, 12:56
|
||||
|
||||
|
gerat stuff Martyn... Kevin the front steering box arrived mate so cheers for that. on the rivet front i dont want the outside to appear like boiler rivets if you know what i mean, so will need to have a think on what shape to make the form.
__________________
is mos redintegro __5th Div___46th Div__ 1942 Ford Universal Carrier No.3 MkI* Lower Hull No. 10131 War Department CT54508 (SOLD) 1944 Ford Universal Carrier MkII* (under restoration). 1944 Morris C8 radio body (under restoration).
|
|
#70
14-01-10, 21:46
|
|||
|
|||
|
Hi mate you will just have to try a few on a srcap bit of plate and see how they look we went for the uniformed look it works well.
how ever just make sure you fold them over enough and rember if your not sure if there holding just try and remove one hahaha
|
|
#71
02-02-10, 16:15
|
||||
|
||||
|
any special reg that i nede for doing this ? i rigged up a butane bottle to a farfiers forge but just could not get the rivets white hot ? i know that Propane burns at 10 deg more than Butane but is there a special flow rate that i should use ?
__________________
is mos redintegro __5th Div___46th Div__ 1942 Ford Universal Carrier No.3 MkI* Lower Hull No. 10131 War Department CT54508 (SOLD) 1944 Ford Universal Carrier MkII* (under restoration). 1944 Morris C8 radio body (under restoration).
|
|
#73
03-02-10, 12:50
|
|||
|
|||
|
Is the blower working on the forge?
__________________
Bluebell Carrier Armoured O.P. No1 Mk3 W. T84991 Carrier Bren No2.Mk.I. NewZealand Railways. NZR.6. Dodge WC55. 37mm Gun Motor Carriage M6 Jeep Mb #135668 So many questions....
|
|
#74
04-02-10, 21:41
|
||||
|
||||
|
did not have a blower matey. i have contacted the farrier, it eems that butane does not poperate at the same preasure as ropane, so he has got em a large propane bottle and an adjustable reg. i will keep you all posted on how i progress with this.
cheers guys.
__________________
is mos redintegro __5th Div___46th Div__ 1942 Ford Universal Carrier No.3 MkI* Lower Hull No. 10131 War Department CT54508 (SOLD) 1944 Ford Universal Carrier MkII* (under restoration). 1944 Morris C8 radio body (under restoration).
|
|
#75
12-02-10, 19:36
|
||||
|
||||
|
christ i need a new keyboard hahahahaha my reply above is insanity typing......
have confirmed (on a side note) that the cammo style i am going with as per the model was also used on BEF vehicles during Scicily this is from an actual mod document so happy days i can rest easierish in the knowlege that the scheme will be correct to my grandfatehrs timeline. http://www.ww2talk.com/forum/weapons...-sicily-4.html
__________________
is mos redintegro __5th Div___46th Div__ 1942 Ford Universal Carrier No.3 MkI* Lower Hull No. 10131 War Department CT54508 (SOLD) 1944 Ford Universal Carrier MkII* (under restoration). 1944 Morris C8 radio body (under restoration).
|
|
#76
13-02-10, 01:27
|
|||
|
|||
|
Hi mate iam off to collect my furness nxt week end you can borrow that and it just need a compresser plugging to it hahaha makes life so much easyer
you start a fire fill it with boiler coal and after 30mins you should have enough heat to melt your arms as you pull your rivets out.... gas works ok but its slow and gets expensive when your doing a lot of rivets
|
|
#77
16-02-10, 03:30
|
|||
|
|||
|
At last I have time to catch up on the MLU, I have been looking for a Universal carrier and may have found one . I heard it's a T16 and was at Camp meade in Vermont or NH? and was shipped down on Cape Cod a few years back. Going to check it out this weekend. Hopefully I can be apart of the Universal Carrier Crowd. Rich your Carrier is coming along, You have anymore pics of her? Thanks
Aidan
|
|
#78
09-03-10, 14:14
|
||||
|
||||
|
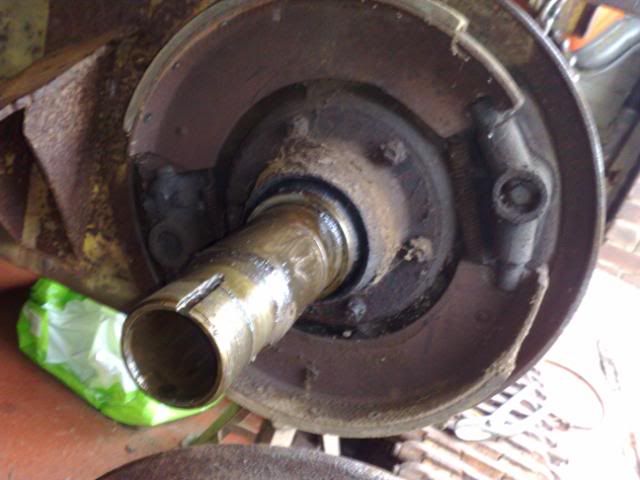
Yes but only of the rear axle har har. i have stripped and rebuilt the brake assemblies which were shall we say mega seized ! if you remember when i managed to finally get the drums off they looked like this
 other than the pads being good the internals were a bit caput..... i pulled them apart and moseyed back to the clean workshop aka Kitchen and began the strip down (of the components that is) carefully teasing the spreader to bits i managed to free up the stuck pistons without damaging the castings, luckily for me my fingers are small so could get them right into the housing, once stripped down i initially washed them with cellulose thinners then popped them into the sink and sprayed them down with oven cleaner and left for a while. returned and rinsed off to have nice clean and dry bits to work with. 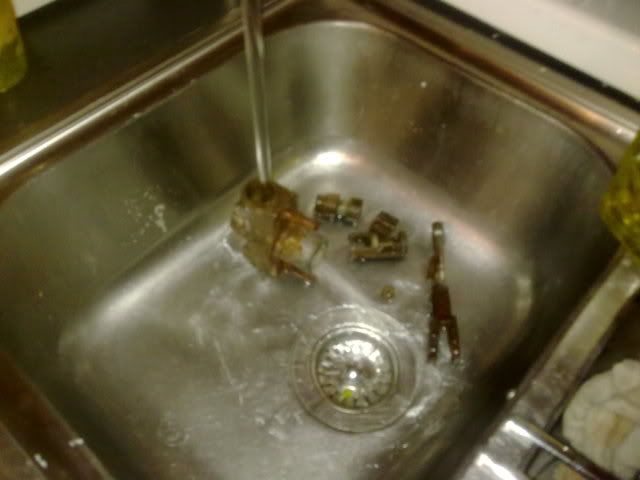  next i attacked the cast housing (the outside) with 80 grit pads rubbing away all of the oxidised materials and loose paint, finishing it off with a 350 grit pad to make it smooth (but keyed), i used some 1200 grit wet and dry on the chambers and removed the pitting. then placed the housing into the oven to gently heat through. once warm or slightly hot to the touch i added a coat of spray, resulting in a quick drying nice satin coat finish. 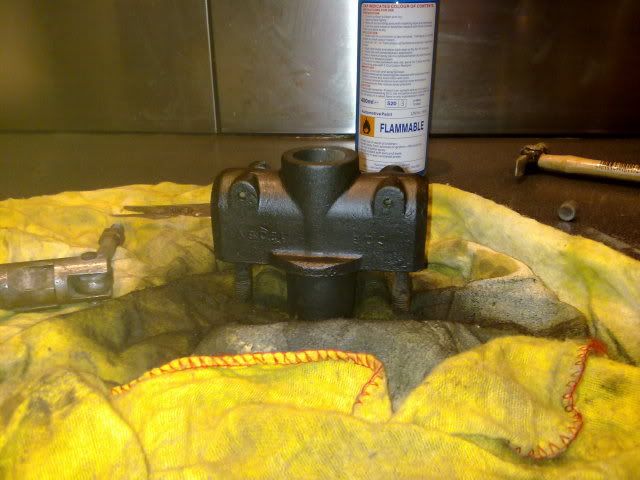 finally after pollishing and cleaning the internals i added some grease and rebuilt the spreader unit like so. 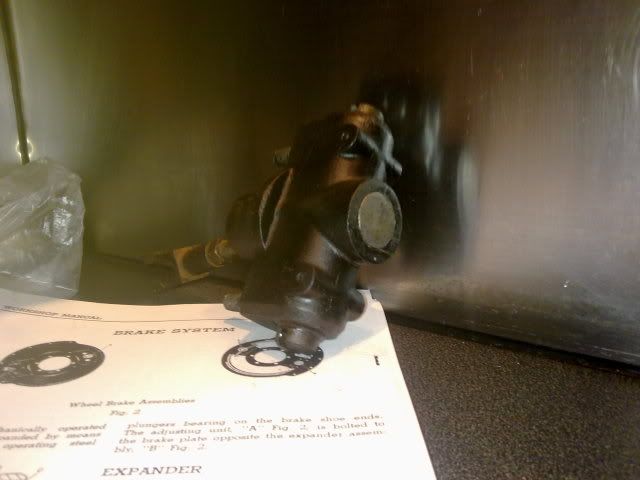 i noticed the retaining pins were missing... rotted away perhaps or removed for greater travel, none the less UC-F1 says they should be there so i replaced them. i wire brushed and red oxided the back plate and metal sections of the shoes so they were nice and clean then rebuilt the assembly  i have replaced the old ruined leather gaiter with a rubber equivalent... i used a 1970 vauxhall viva one cut down and it looks a good finish, plus it wont let any water in so happy days I am going to take a gamble and not rebuild the diff, i have justified this by looking at the oil condition that came out and the fact when spun it is perfectly smooth and everything works...........remember this post if in future i blow out a diff har har har ! strangely i have anjoyed rebuilding the brakes, normally it is the most painfull and mundane task on a vehicle, but in comparisson to my other tasks this one has been nice and straight from the book  i have also stripped and rebuilt the drivers side bell crank that mounts onto the rear pannel so that is working great, just got to do the gunners side and the axel can go back on. unfortunately the grease nipple is missing from the drivers side one so i will have to go on the hunt.
__________________
is mos redintegro __5th Div___46th Div__ 1942 Ford Universal Carrier No.3 MkI* Lower Hull No. 10131 War Department CT54508 (SOLD) 1944 Ford Universal Carrier MkII* (under restoration). 1944 Morris C8 radio body (under restoration). Last edited by RichardT10829; 09-03-10 at 14:29.
|
|
#79
01-04-10, 15:02
|
||||
|
||||
|
Well thought i would pop up a few more pictures just to maintain peoples interest (if there is any) i have started to mount the front fenders and the odd bits and bobs, i got a large quantity of base paint which i spent ages with period swatches at the Chromadex factory in Gateshead, luckily for me the girl who served me is severely hot ! needless to say it took just over an hour, got her number too shame i cant ring it though
 the paint code nearest (ie one tint off) to the 1943 "Light Stone" is RAL1002 in 10% matt, the new NATO version of Light Stone is miles away from the 1940's version. the paint costs £30 for 5 ltrs and they do it whilst you are there. i have quickly flashed over the front of the hull then i pushed it out into the sun to make sure i was happy, and it is very vry close indeed. i have ni on finished my dash pannel which has its NOS speedo in, i was the first person to look into the gauge since 1943 as the box had been sealed, almost a shame to open it ! same goes for the switch pannel which had been sealled up in 1942 at the ford factory to be opened by me over 60 years later. the paint code nearest (ie one tint off) to the 1943 "Light Stone" is RAL1002 in 10% matt, the new NATO version of Light Stone is miles away from the 1940's version. the paint costs £30 for 5 ltrs and they do it whilst you are there. i have quickly flashed over the front of the hull then i pushed it out into the sun to make sure i was happy, and it is very vry close indeed. i have ni on finished my dash pannel which has its NOS speedo in, i was the first person to look into the gauge since 1943 as the box had been sealed, almost a shame to open it ! same goes for the switch pannel which had been sealled up in 1942 at the ford factory to be opened by me over 60 years later.still got the visors to put onto the plates but will do this with a mag drill once it is all buttoned up. center bulkhead is back in and sides are on, going to make the rear plate removeable i think for ease of engine removal, not fully decided on it yet though. 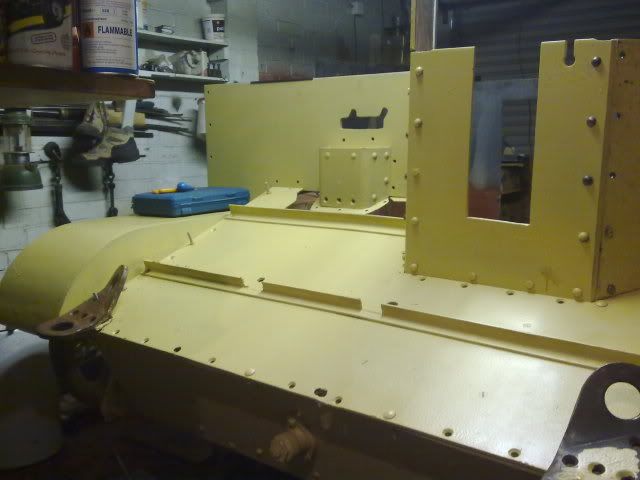     
__________________
is mos redintegro __5th Div___46th Div__ 1942 Ford Universal Carrier No.3 MkI* Lower Hull No. 10131 War Department CT54508 (SOLD) 1944 Ford Universal Carrier MkII* (under restoration). 1944 Morris C8 radio body (under restoration).
|
|
#80
29-05-10, 16:02
|
||||
|
||||
|
just a little update...
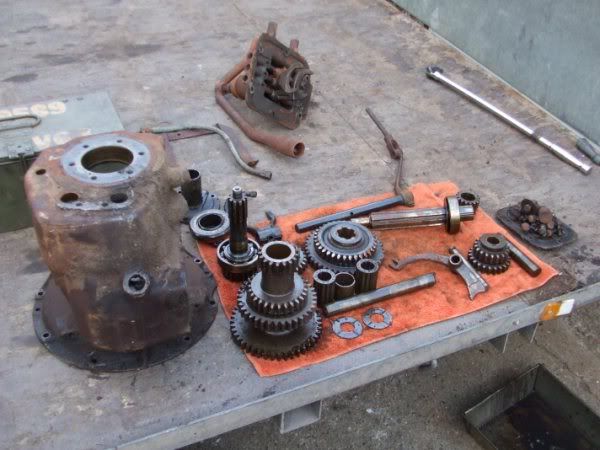
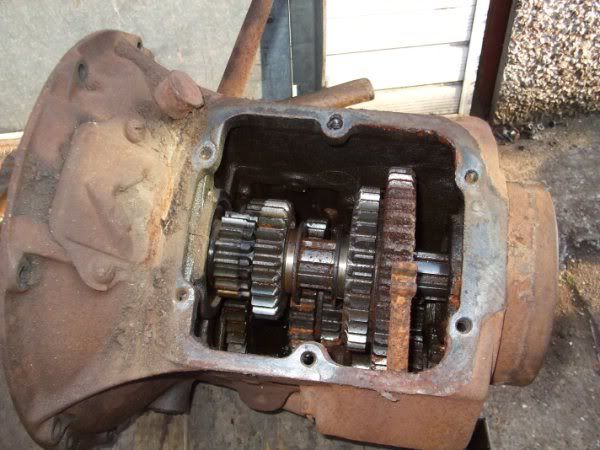
slowly getting there with the armour, found a retired Rivetter who is showing me how to do it.... he is also going to lend me a big rivet hammer and snaps.... sent my engine away to get built... got some photo's back got a phone call from Belcher Engineering who wanted to charge me £400 for a set of +20 thou big end shells and +30 thou mains !!!!!!!! went online 30 sec later found a set of shells for $90 (£65ish) from the US 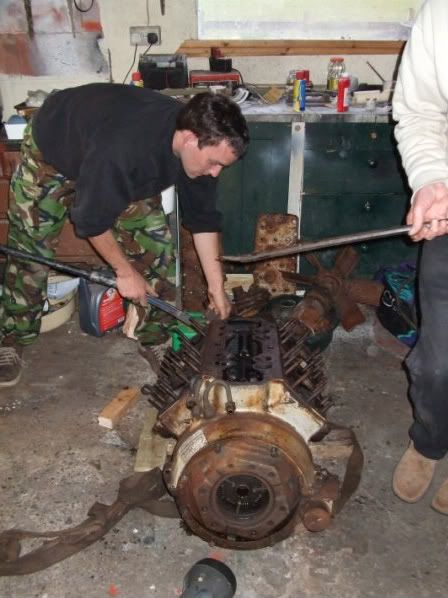 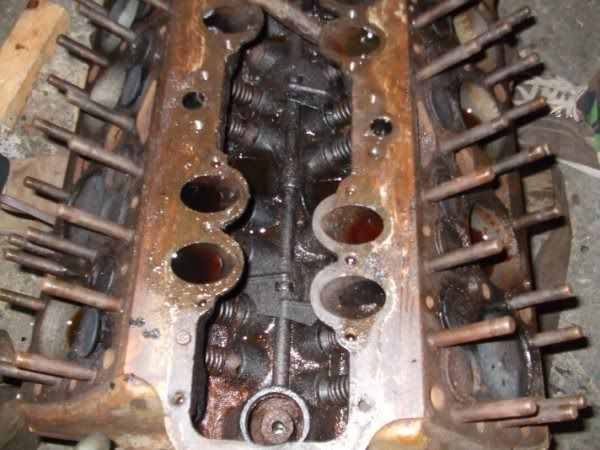 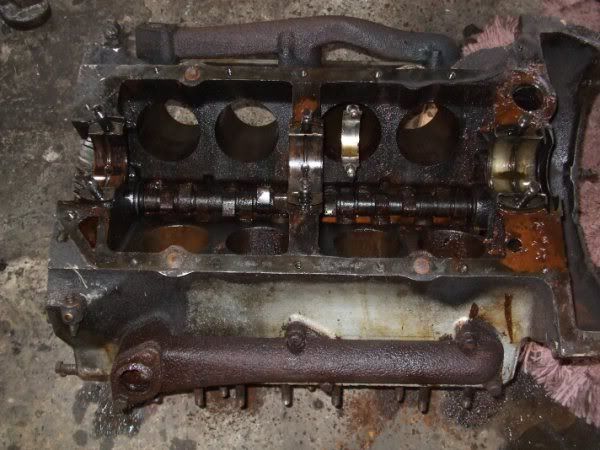 stuck piston was removed with the application of coke (pop not the narcotic) poured down the bore and left over night next day....voila ! 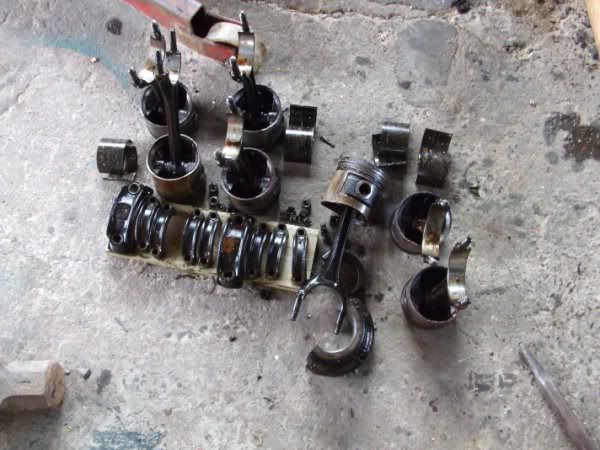 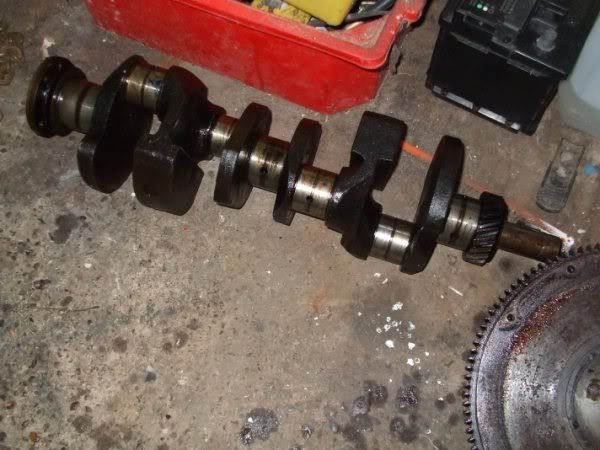 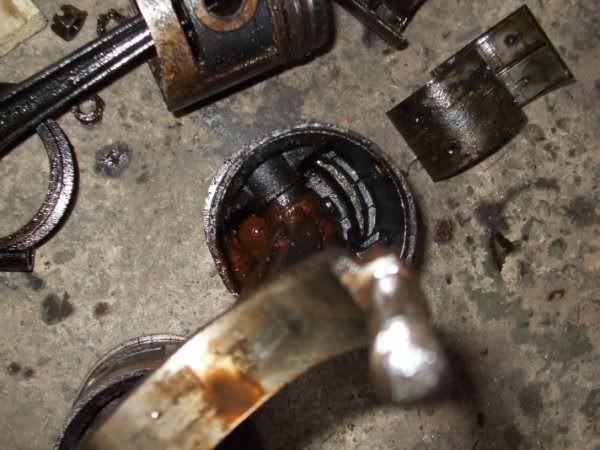 the sump as removed.. i poured a shed load of AT fluid down the pots when i got the engine back to the UK and it has dragged all the crap out the engine into the sump..... YAK ! 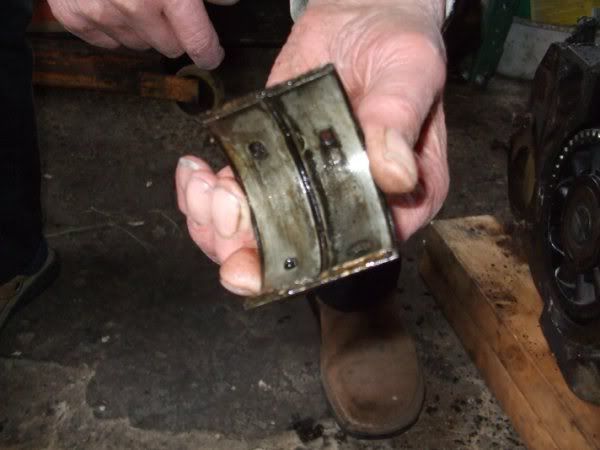 big end shells... i dont think they look too bad to be fair ! engine was last built in march 1945 (when it was recond) 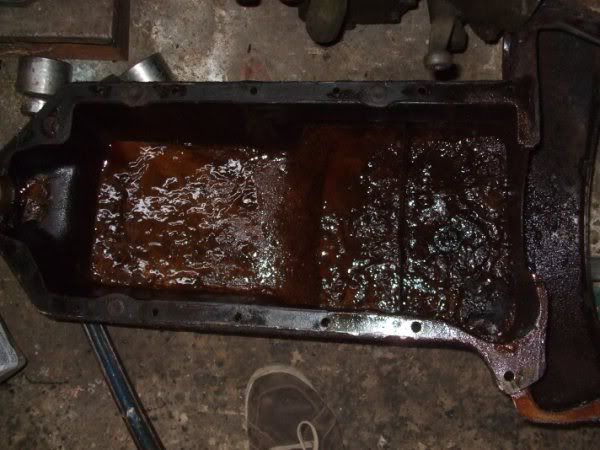 gearbox.... first and second look pretty chewed up... no syncro's here guys its a "bang it in" jobby.. 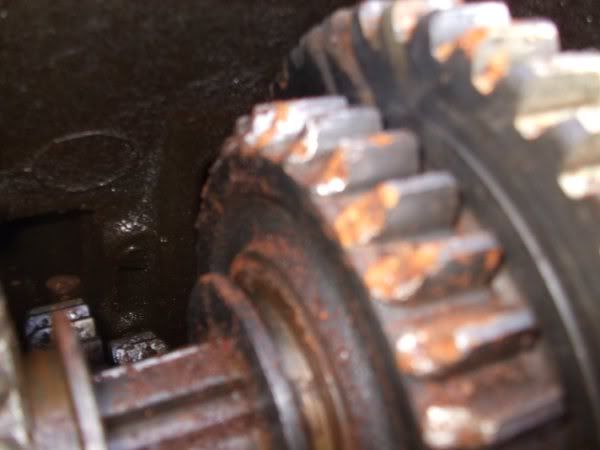
__________________
is mos redintegro __5th Div___46th Div__ 1942 Ford Universal Carrier No.3 MkI* Lower Hull No. 10131 War Department CT54508 (SOLD) 1944 Ford Universal Carrier MkII* (under restoration). 1944 Morris C8 radio body (under restoration).
|
|
#81
29-05-10, 16:04
|
||||
|
||||
__________________
is mos redintegro __5th Div___46th Div__ 1942 Ford Universal Carrier No.3 MkI* Lower Hull No. 10131 War Department CT54508 (SOLD) 1944 Ford Universal Carrier MkII* (under restoration). 1944 Morris C8 radio body (under restoration).
|
|
#82
30-05-10, 00:05
|
|||
|
|||
|
When you are looking for g/box bits, the WWII Dodge (wc) uses the same components, apart from the input and output shafts. Input, and output bearings are the same, pins, cluster, 1st, 2nd,3rd, rev idler,selector forks, and shafts, cluster bearings, and intermediate bearing (hyatt 99000)are all the same.
Are you going to leave your hubs off until you have the axle bolted back in?
__________________
Bluebell Carrier Armoured O.P. No1 Mk3 W. T84991 Carrier Bren No2.Mk.I. NewZealand Railways. NZR.6. Dodge WC55. 37mm Gun Motor Carriage M6 Jeep Mb #135668 So many questions....
|
|
#83
30-05-10, 03:09
|
||||
|
||||
|
yes buddy, the axle is now bolted back onto the hull solid was easier than i expectd to get it back on, did it myself shims and all........ The hubs are still off for now though.... I have a full new set of wheel bearings to go back in, just making the billet shims to take up the difference from 40mm to 50mm ID... I have a spare gunners side armour sheet (repro) in 8mm steel if anyone is interested in it. i have not yet drilled it so its good to go onto any British or Canadian pattern carrier that might need one.
__________________
is mos redintegro __5th Div___46th Div__ 1942 Ford Universal Carrier No.3 MkI* Lower Hull No. 10131 War Department CT54508 (SOLD) 1944 Ford Universal Carrier MkII* (under restoration). 1944 Morris C8 radio body (under restoration).
|
|
#84
01-06-10, 06:46
|
||||
|
||||
|
Terrific posts Richard, please keep them coming. On the subject of hull paint colours, I always asumed the Mk1's would have been painted deep bronze green semi-gloss but now that I have started taking bits off I am finding plain old olive drab lustreless with a light stone camo sprayed over the top - a bit of a surprise I must say but definately factory original (the OD that is)
Cheers Phill
__________________
Ford GPW Jeep USMC Ambulance Willys MB Jeep Daimler Ferret Mk 1 Daimler Ferret Mk 2 Land Rover S2A Field Workshop Land Rover S3 FItted For Radio x2 Land Rover Perentie GS (SASR) International No 1 Mk 3 2.5 Ton 4x4 International No 1 Mk 4 2.5 Ton 4x4
|
|
#85
01-06-10, 11:09
|
||||
|
||||
|
phil. yours is very likely to have been in the desert mate so it is no suprise that there is evidence of light stone beign used on it...... most likey lif you were to go around the carrier you would find traces of slate grey and sky blue too.
__________________
is mos redintegro __5th Div___46th Div__ 1942 Ford Universal Carrier No.3 MkI* Lower Hull No. 10131 War Department CT54508 (SOLD) 1944 Ford Universal Carrier MkII* (under restoration). 1944 Morris C8 radio body (under restoration).
|
|
#86
01-06-10, 11:34
|
|||
|
|||
|
Which Desert? The Great Sandy desert? The Little Sandy Desert?, The Tanami Desert? I reckon theres a chance this carrier came to Australia before 1939. What say the Aussie historians? (The word oxymoron comes to mind, but its only a thought)
__________________
Bluebell Carrier Armoured O.P. No1 Mk3 W. T84991 Carrier Bren No2.Mk.I. NewZealand Railways. NZR.6. Dodge WC55. 37mm Gun Motor Carriage M6 Jeep Mb #135668 So many questions....
|
|
#87
01-06-10, 13:18
|
||||
|
||||
|
Well you know the romantic in me would hope that it had been in the North African Desert.... many did actually go there
and then onto Italy (not being a desert of course) not sure that they would have wasted resources bringing it back though (plus if it had been an english carrier with an English Regiment most likely it would have been given to the Russians on the lend Lease programme like many of the carriers we had...) (Nigel I hope you dont mind me taking a pic from your book please dont prosecute me) the phrase "Open Mind" comes to mind but its only a thought remember the desert war started off in 1940 when italy made its declaration of war...some time in june that year  not sure when mass production of the Brens and later UC's were kicked into gear, but many of the regiments may still have had their scout carriers... who know's not sure when mass production of the Brens and later UC's were kicked into gear, but many of the regiments may still have had their scout carriers... who know's
__________________
is mos redintegro __5th Div___46th Div__ 1942 Ford Universal Carrier No.3 MkI* Lower Hull No. 10131 War Department CT54508 (SOLD) 1944 Ford Universal Carrier MkII* (under restoration). 1944 Morris C8 radio body (under restoration). Last edited by RichardT10829; 01-06-10 at 13:28.
|
|
#88
01-06-10, 13:40
|
|||
|
|||
|
On a recent thread , it was shown that there were Universals at Dunkirk. I'm sure, had it been sent to Aust. as a demo, it would have been recorded in the Australian media/ military archives. If it had been pulled back to Aussie from North Africa,What time frame would that have been in?
This should be in Phillips thead.
__________________
Bluebell Carrier Armoured O.P. No1 Mk3 W. T84991 Carrier Bren No2.Mk.I. NewZealand Railways. NZR.6. Dodge WC55. 37mm Gun Motor Carriage M6 Jeep Mb #135668 So many questions....
|
|
#89
01-06-10, 13:56
|
||||
|
||||
|
yeah i know was thinking that before.... should get Geoff to transfer the posts over to Phills thread. Did you guys keep a decent archive on vehicles ? i know us Brits kept a rubbish record, same with the Canadians (well ford's archives)
If it had come back from North Africa it would be in a period circa 43 or..... after the desert war concluded in 43 we used Tunisia as a launching platform for Op Husky (Scicily) then later Op Avalanche (italy) Many carriers landed in scicily and Italy with desert type schemes, Caunter was phased out after El alamein and the Light stone / brown disruptive was adopted (along with a plethera of other schemes) so If my romantic imagination was to run wild once again it could potentially have gone North Africa, then returned in 43...or gone on to Scicily, Italy.....returned to Oz in 45/46....... Or........ could have been bought up by the Aussie govt as an ex demo or training vehicle in 39ish... I know that the early Brens were used by alot of the coalition regiments during the desert campaign so i wonder if they serviced the older vehicles longer to perhaps save money for other things....meaning that the Scouts and brens were kept for longer... this i have no idea,
__________________
is mos redintegro __5th Div___46th Div__ 1942 Ford Universal Carrier No.3 MkI* Lower Hull No. 10131 War Department CT54508 (SOLD) 1944 Ford Universal Carrier MkII* (under restoration). 1944 Morris C8 radio body (under restoration).
|
|
#90
02-06-10, 05:07
|
||||
|
||||
|
Really sorry to have hijacked this post Richard.
Re the Scout there are a number of possibilities, 1/ obtained direct from britain brand new and erroneously described on official documentation as a Bren carrier, or 2/ issued in North Africa to Australian Forces and simply kept and returned to Australia with other unit equipment, or 3/ Brought to Fremantle with other refugee British cargo after the fall of Singapore (unlikely) As for the olive drab and light stone camouflage - it matches exactly that used on many General Grant and Stuart Tanks and Local Pattern carriers which were based here in WA Add this to the fitting of modified Australian LP Carrier roadwheels and the evidence seems to point to it having been fully rebuilt here at 5 Base Ordnance Depot Nungarin, who'se core business was rebuilding Tanks and Armoured vehicles during ww2. The son of the first civilian owner assured me it was in good condition when they bought it at disposal Auction in 1947 Cheers Phill
__________________
Ford GPW Jeep USMC Ambulance Willys MB Jeep Daimler Ferret Mk 1 Daimler Ferret Mk 2 Land Rover S2A Field Workshop Land Rover S3 FItted For Radio x2 Land Rover Perentie GS (SASR) International No 1 Mk 3 2.5 Ton 4x4 International No 1 Mk 4 2.5 Ton 4x4
|
 |
|
|


 Linear Mode

