Please
click on the photos at left (as applicable) to jump to large-scale copies
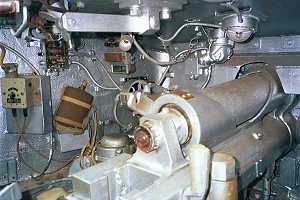 |
This
view looks across the breech and recoil cylinder of the main gun from the
loader's position. Visible is the intercom switch box at left, and a standard
British canteen. The horizontal bar in the turret ceiling is a rotating
travelling lock for the gun. Forward of that is a dome light. The cramped
interior of most WW2 tanks permit no inside storage space for personal
effects, which were generally strapped on the exterior of the turret and
subject to the vagaries of weather and enemy action. |
|
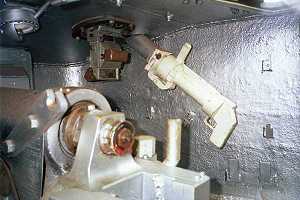 |
Looking
to the right side of the turret from the commander's position, we see the
smoke discharger mounted to the discharge tube, the opening of which is
visible on the top of the turret forward of the loader's hatch. Note the
bright silver interior of this tank; this was the standard colour for all
British armoured vehicles, in contrast to the white of North American vehicles.
In the left foreground, connected to the recoil cylinder of the gun, we
see the latch for the travelling lock as above. Forward of the smoke discharger
is the loader's padded view port. |
|
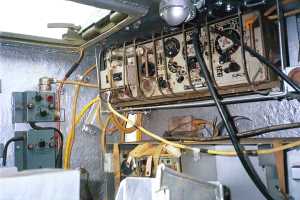 |
At
the rear of the turret is the standard No.19 wireless set, complete
with protective grate and lit here by the open loader's hatch. This radio
had A- and B-sets, for communication with other tanks and headquarters
respectively, as well as an intercom function. I should mention that while
this particular Churchill is run almost daily, restoration is not yet complete,
as evidenced by the tangle of wires and cables. It all takes time... |
|
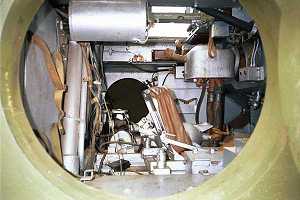 |
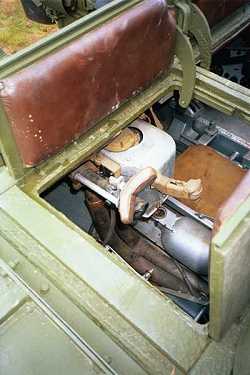
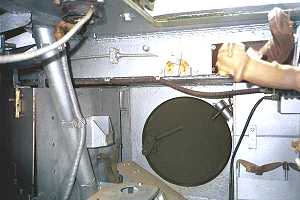
Moving
down, we now look through the open escape hatch on the driver's (right)
side. Visible is the driver's seat back, and beyond, the flame gun apparatus
(top right). The gunner's escape hatch is the round khaki green disc to
the left of the seat. The two large hoses descending vertically at the
right of the seat are the pipes for the flame mixture (in a standard Mk.VII
infantry tank, this whole unit would be replaced by a BESA 7.92mm machine
gun for close support). The Crocodile was the most effective of all Allied
flame weapons. It was an ugly job, but a very necessary one. Wilson writes
passionately about the effects on both targets and users. |
|
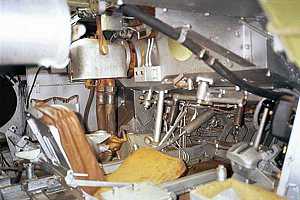 |
A
different angle from the same vantage point shows us the driver's position
(top pic). There is a surprising amount of room in the driving compartment
as a whole. The upside down 'U'-shaped tiller bar is shown connected to
the horizontal surface immediately underneath the driver's view port. Forward
visibility from this position is limited by the track horns on each side,
but with the view port open, one gains an immediate sense of security from
seeing the 152mm of armour in front of one's face. The driving position
is comfortable and nowhere near as claustrophobic as that in the Valentine.
One's legs are extended almost horizontally to reach the clutch, brake
and accelerator pedals.
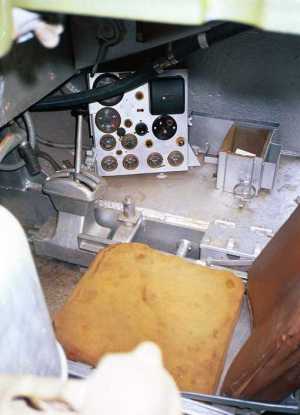
As can
be seen in the lower picture, the transmission shifter and instrument panel
are on the driver's front left. The transmission/drive unit in the Churchill
had one tricky characteristic in that even in neutral, pressure on the
tiller in either direction would turn the tank to the appropriate side.
Apparently, this was a function of the neutral drive, which permitted one
track to reverse while the other was driven forward, thereby ensuring a
tight turning radius. While visiting this tank, I was unfortunately unable
to corner the principal driver for a more complete explanation of this
phenomenon, but hope to provide more information shortly. In the interim,
should anyone have such an understanding, please contact
me so that I can add to this explanation!
Another
superb book about Churchills - albeit fiction - is THE
KILLING GROUND, by Elleston Trevor. It too
is out of print but available through the used book circuit. This story
covers a British Churchill troop from the approach to the beach on D-Day,
through a nameless battle in a dusty town somewhere in the Caen-Falaise
sector. The characterizations are excellent, and there is much information
on what it was like to live inside this tank at this time. Highly recommended!
|
|
 |
|
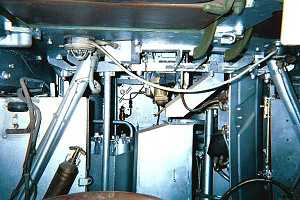 |
Looking
to the rear from the driver's position. Note that the handles for
his hatches (on the ceiling, top) are painted the same khaki drab as the
outside of the tank. This view gives some idea of the space restriction
and clutter, even without bodies and kit loaded in! Going to war in a tank
such as this took a very special kind of individual - one, I suspect, with
a rather inhibited sense of imagination. Veterans I have met who served
in armour slough it off, but they won't deny the same daily quotient of
fear which also drove their infantry brethren. The infanteers, however,
will almost universally claim that the tanks were 'artillery-magnets'.
Such men... |
|
 |
A
close shot of the gunner's (left side) closed escape hatch. Upper right
is the control handle and headrest for the flame gun. This vehicle is still
under restoration, but is remarkable nonetheless. |
|
|
|
Looking
through the gunner's padded hatch to a good view of the flame gun assembly.
The handle protruding to the rear is the control, and to its left one can
see the headrest immediately above
the
sight. The hoses below are for the flame medium and nitrogen propellant;
they run through the interior of the tank right to the rear, where they
connect through to the armoured trailer through heavy-duty couplings. In
an infantry version of this tank, this gun would be a standard 7.92mm BESA
machine gun for close support. |
|
| Interior
stowage diagrams, courtesy of Chris Shillito of Armour
in Focus : |
| |
|
|
|
For
previous Churchill views, please click here!
|
|
 12 Feb 00
 |
Back
to Canadian Armoured Corps |
|
Back
to Vehicles |
|
Back
to Valentine |
|
| Copyright ©
Geoff
Winnington-Ball , 1999 - All Rights Reserved |
|