|
#61
 19-02-12, 15:21
|
|||
|
|||
|
For carburetors, you will find some people who love any given carb and aome who hate it.
For the Rochester "B", the most common complaint is that at least some of them are vulnerable to the castings warping leading to leakage. I believe there may be some with a more sloped top to the upper casting that are more stable but am not sure of this. The "B" are also not designed for high angle off road work (more likely for economical production), there must be an open topped well within the casting because fuel can spill at high angles. You will find a variety of opinions expressed at stovebolt.com: http://www.stovebolt.com/ubbthreads/...s.php/ubb/cfrm I find the posts on carburetion by "Carbking" to be particularly valuable. He is opinionated (who in the hobby isn't?) but I believe his opinions are based on wider experience of carburetors than most as he does carburetor rebuild/restoration http://www.thecarburetorshop.com/ and has a page on the W-1 http://www.thecarburetorshop.com/CarterChevroletW1.htm 
|
|
#62
20-02-12, 04:25
|
|||
|
|||
|
I would trust "CarbKing" as he has been in the business for a long time.
The W-1 is not a bad carburator and it is the original for the 216....... it might not have sufficient CFM for a high reving 235 or 261 but would still run the engine quite well. I ran a totally rebuilt Rochester "B" and it ran well........ I changed because of th tendency to flow raw gasoline off the top of the carburator at anything over 25 to 30 degrees of hill climb........ apparently the W -1 did not have that nasty habit...... the Rochester B was after all intended for civilian application. For ther ecord my Roch. B did not leak form the top casket cover but leaked from some undetected factory vent hole..... which is part of its design. I am now running a Carter YF which is flawless ( suggested by Carb King) and do intend to try on a rebuilt Zenith 28 228 formerly used on the GMC 270 cu. in C60x engine. Bob
__________________
Bob Carriere....B.T.B C15a Cab 11 Hammond, Ontario Canada
|
|
#63
17-03-12, 01:33
|
|||
|
|||
|
Dont forget to polarise your field coil magnets before you turn on the key.
__________________
Bluebell Carrier Armoured O.P. No1 Mk3 W. T84991 Carrier Bren No2.Mk.I. NewZealand Railways. NZR.6. Dodge WC55. 37mm Gun Motor Carriage M6 Jeep Mb #135668 So many questions....
|
|
#64
17-03-12, 01:35
|
|||
|
|||
|
Hi Scott
Just took a quick look at both the HUP and 3 Ton Chevy CMP parts books and they both show three different types of generator one with a tail bushing, a front ball bearing and no air filter. The next has a tail bushing, a front ball bearing and air filter. The last showing tail ball bearing, a front ball bearing and air filter. If you want I can post the parts diagram and the detail pages if you don't have them. I just rebuilt the generator for my HUP which has ball bearings at both ends but strangely it doesn't have the air cleaner. Bearings were good so I cleaned and re-lubricated them and reinstalled. Only other work was new brushes and brush springs. It is now back on the engine running on the test stand. Cheers Phil
__________________
Phil Waterman `41 C60L Pattern 12 `42 C60S Radio Pattern 13 `45 HUP http://canadianmilitarypattern.com/ New e-mail Philip@canadianmilitarypattern.com
|
|
#65
17-03-12, 08:18
|
||||
|
||||
|
Quote:
The field coils are wound around a hunk of cast iron . The iron needs an amount of residual magnetism in order for the generator to " start up" , once it gets going . This magnetism is polarised in either of two ways . If you have a NEG ground system, the coils need to be polarised for a NEG ground . You normally just touch a wire from the battery HOT SIDE to the field coil terminal , this is enough to polarise the coils MIKE
__________________
1940 cab 11 C8 1940 Morris-Commercial PU 1941 Morris-Commercial CS8 1940 Chev. 15cwt GS Van ( Aust.) 1942-45 Jeep salad
|
|
#66
17-03-12, 15:26
|
|||
|
|||
|
Hi Scott
Below is the parts break out view, and the link to the parts pages that go with it. Hope this helps. My experience is that the generators have to energized as Mike describes, the manual also describes a number of test for the generator including a motor test. I have found that the energizing step should be the last and if the generator sits around not connected for a long time may have to be repeated. I've ended up doing it after the generator is installed on the engine and fails to charge when the is running.  http://canadianmilitarypattern.com/M...0Up%20Link.htm This page is where I've started storing photos I want to up load at larger size or higher resolution to present on MLU. If the size is a problem for your browser or web connection please let me know. Cheers Phil
__________________
Phil Waterman `41 C60L Pattern 12 `42 C60S Radio Pattern 13 `45 HUP http://canadianmilitarypattern.com/ New e-mail Philip@canadianmilitarypattern.com
|
|
#67
18-03-12, 11:04
|
|||
|
|||
|
It would probably be o.k., But.....
It would be better to polarize a generator every time one is fitted to a vehicle. This way it has to be right. If it is not done, and is wrong,(50%chance) what happens is that when the engine stops the cut out contacts in the regulator stay closed.The current from the battery back feeds to the geny which tries to "motor". The geny cannot motor, being held by the fan belt. The net result is that the geny burns out, along with the cut contacts, essentially wrecking the regulator. For the sake of connecting the live terminal of the battery with a wire, and making it spark on the small terminal (field terminal) of the fitted geny, it saves all the grief. This is the case when your vehicle is earthed either positive or negative.
__________________
Bluebell Carrier Armoured O.P. No1 Mk3 W. T84991 Carrier Bren No2.Mk.I. NewZealand Railways. NZR.6. Dodge WC55. 37mm Gun Motor Carriage M6 Jeep Mb #135668 So many questions....
|
|
#68
18-03-12, 16:06
|
|||
|
|||
|
Hi Scott
I agree with Lynn on polarizing the generator after it is installed on the truck. I've found that the that doing it before it is installed doesn't always work or hold the field. Lynn is also correct about the very brief contact necessary to accomplish the polarizing just a quick spark. The caution about making sure that the regulator is functioning correctly when the engine is turned off, read the section in the manual and be sure that the cut out points in the regulator are actually opening. Which manual are you working from? Cheers Phil
__________________
Phil Waterman `41 C60L Pattern 12 `42 C60S Radio Pattern 13 `45 HUP http://canadianmilitarypattern.com/ New e-mail Philip@canadianmilitarypattern.com
|
|
#71
04-04-12, 15:13
|
|||
|
|||
|
i have been reading the above posts about polarising generators. one thing you have to be aware is that there are TWO different ways to connect the field windings in a gene.
Autolite and Ford connect the winding between the terminal and ground. Delco R . and Bosch connect the winding between the LIVE brush holder and the field terminal. Applieng power to the field terminal on a delco gene will cause the current flow through the field winding in the reverse direction to normal. it is ok to " flash " the field term. on a ford gene as this is the normal direction of current flow. the way i was tought to test a gene was to "motorise " it. On a Delco. gene apply 6 volts to the output tern. and earth the field terminal as well as the case . on a Ford gene. connect 6 volts to both the armature and field terminals earthing the case. In both cases the polarity has to be the same as you want to use The gene should rotate at about 600 rpm and draw about 6 amps. Gently load up the gene with a small pice of wood . the gene should not show any signs of jerking and the amps will increase to about 15 . watch out for excessive current or heating. the gene is also polarised to the way the batery was hooked up. I hope this solves some of the mysterys, John.
__________________
John Mackie (Snr) VK2ZDM Ford GPW- script #3A Ford Trailer M3A1 White Scout Car -Under restoration- 1941 Ford Truck (Tex Morton) F15A Blitz Radio sets- #19, #122, #62, ART13, and Command
|
|
#72
05-04-12, 05:04
|
|||
|
|||
|
...... she is not gone as long as you have memories of her.
Bob
__________________
Bob Carriere....B.T.B C15a Cab 11 Hammond, Ontario Canada
|
|
#73
29-04-12, 11:11
|
||||
|
||||
|
Hi Peter
Bit hard to tell from the pics, was the chassis a C60S or C60L? I see it has the winch and rear fairleads although it is missing the rear spring and pintle hook which go above the roller. Nice to hear you've had your first ride in a blitz, a wonderful experience for sure! 
__________________
Film maker 42 FGT No8 (Aust) remains 42 FGT No9 (Aust) 42 F15 Keith Webb Macleod, Victoria Australia Also Canadian Military Pattern Vehicles group on Facebook https://www.facebook.com/groups/canadianmilitarypattern
|
|
#74
30-04-12, 01:02
|
|||
|
|||
|
Hi Scott
First Rides In CMPs are memorable, nice looking C60L for your first ride. The long wheelbase 158" do ride different than the short C60S 134" or 101" wheelbase. The long wheelbase is much more stable on the road but have a huge turning radius, while the 134" has a much smaller turning radius but is squirely on the road above 40 MPH. Guess what I'm trying to say is that each one is distinctive. First time I drove one was when over to look at my HUP and take it for a test drive. The kid I bought/trade from had never been able to shift it so he was surprised to be taken for a drive and have it go through all the gears. I had to wait another 6 years before I saw another CMP and got to ride in one with somebody else driving. Cheers Phil
__________________
Phil Waterman `41 C60L Pattern 12 `42 C60S Radio Pattern 13 `45 HUP http://canadianmilitarypattern.com/ New e-mail Philip@canadianmilitarypattern.com
|
|
#75
30-05-12, 12:55
|
||||
|
||||
|
Hi Scott,
Looks like a good find! Have you checked that 20" wheel/tyres fit in that tyre carrier? Seeing yours got me wondering whether mine (orig.) is big enough for 20" too. I will need to look tomorrow. Your first pic of a tool box looks exactly same as mine, so I HOPE it is original  . It is even the same color. Mine has several rust holes though. Yours looks to be better than that. . It is even the same color. Mine has several rust holes though. Yours looks to be better than that.
__________________
Ford CMP, 115" WB,1942 (Under Restoration...still) Medium sized, half fake, artillery piece project. (The 1/4 Pounder)
|
|
#76
18-08-12, 17:29
|
|||
|
|||
|
Hi Scott
You may have invented a new MLU game Name that hole? Looking at your photos some of the holes are obvious like the groups of 5 holes fore and aft of the transfer-case mounts are for the gas tank as are the large single hole forward of those is the fuel line. Are there any in particular that you are curious about then we see who can name them? Interesting the layout for the winch is different than my Pat 12 C60L. Keep up the good work. Cheers Phil
__________________
Phil Waterman `41 C60L Pattern 12 `42 C60S Radio Pattern 13 `45 HUP http://canadianmilitarypattern.com/ New e-mail Philip@canadianmilitarypattern.com
|
|
#77
25-08-12, 12:01
|
|||
|
|||
|
simply bolts on the rear, same as front output. Where in this wide brown land is your patch as postage may be more than the bits worth. Dubbo swap on tomorrow.
__________________
macca C15 C15A
|
|
#79
25-08-12, 17:23
|
|||
|
|||
|
Quote:
I think that the button and all the parts associated with it are the same as used on the CCKWs. Probably an off the shelf part off some truck of the period, but I have not found it in listed online with any of the Chevy Parts suppliers. Bob check my memory those NOS horn assemblies we found at Weare a few years ago were CCKW weren't they? Cheers Phil
__________________
Phil Waterman `41 C60L Pattern 12 `42 C60S Radio Pattern 13 `45 HUP http://canadianmilitarypattern.com/ New e-mail Philip@canadianmilitarypattern.com Last edited by Hanno Spoelstra; 25-08-12 at 23:20. Reason: Formatting
|
|
#80
25-08-12, 23:27
|
|||
|
|||
|
Hi Scott
First here is the information on the horn button Found these a couple of years ago as NOS sorry only bought the one which I used on my HUP. But it hopefully will give you some part numbers. Now to your question about the sender units for the M35 my volt-ohm meter started giving funky readings about that time so I didn't get to check the resistance of these units. So after your reminder I send an e-mail to an electrical engineer who happens to collect M35s so hopefully he will get back to me with an answer soon. Now the M35 sender looks like it would fit 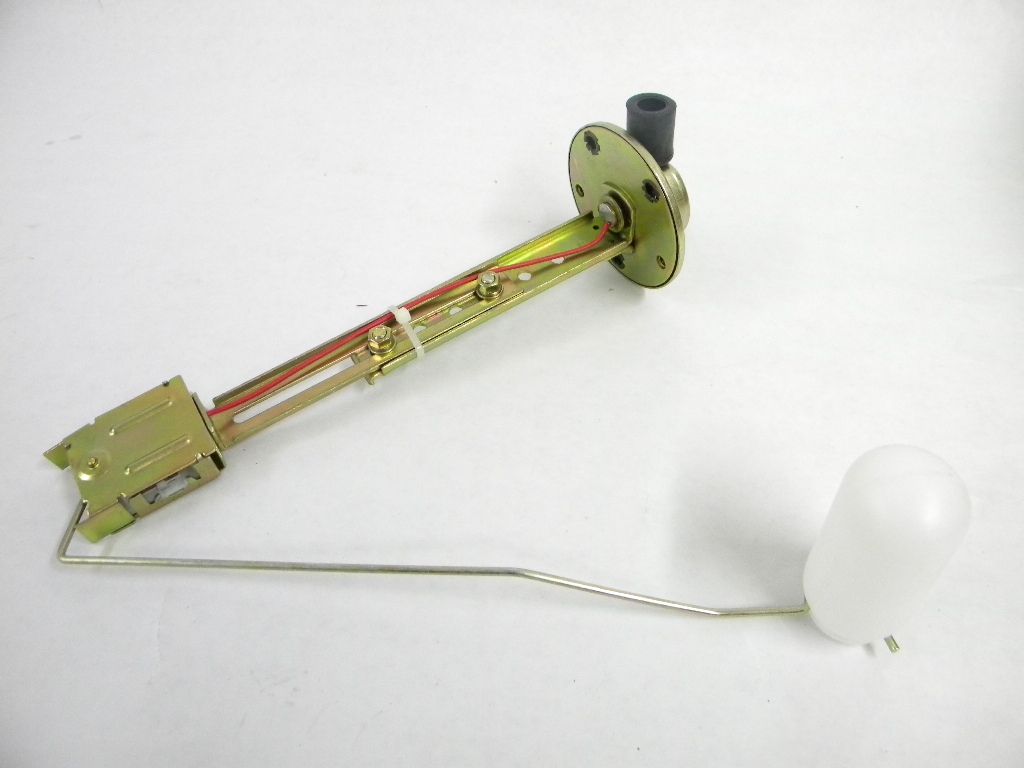 Can someone confirm what the senders range was in Ohms for CMP? Strange you should mention the fuel gauge sender today as I was working on one of the senders in my HUP today that has not worked since getting the truck back on the road last month. Turned out the cork float had sunk. Cheers Phil
__________________
Phil Waterman `41 C60L Pattern 12 `42 C60S Radio Pattern 13 `45 HUP http://canadianmilitarypattern.com/ New e-mail Philip@canadianmilitarypattern.com
|
|
#82
28-08-12, 03:18
|
|||
|
|||
|
Yes Phil..... the CCKW horn button kit will fit the CMP steering wheel.....
Peter De Bella has them in stock ....... he is primarily a Jeep dealer but has interesting associated CCKW, half track and Dodge NOS parts. Peter also has new rubbing block that screws into the steering shaft for CMP. CMP fuel filters are also common to early jeeps and peter as them in stock. Scott...... best bet for reproduction of a CMP steering wheel would be someone in boat restorations...... they do fabricate interesting wooden steering wheels and the skills might be applicable to a CMP wheel...... but I expect the custom "one of" would be expensive. Bob
__________________
Bob Carriere....B.T.B C15a Cab 11 Hammond, Ontario Canada
|
|
#83
28-08-12, 10:07
|
||||
|
||||
|
Scott is there anyone in your area restoring horse drawn carages etc. or even ask questions at a mens shed they may point you in the right direction.
__________________
Robert Pearce.
|
|
#84
28-08-12, 10:38
|
||||
|
||||
|
Quote:
Yes I know, a wooden wheel looks better when varnished, but during manufacture everything was painted in the top coat colour of the vehicle....
__________________
Regards, Hanno --------------------------
|
|
#85
28-08-12, 19:28
|
|||
|
|||
|
Hi Bob
Thanks for reminding me who had them here is the link to Peters web site http://www.debellajeepparts.com/index.htm http://www.debellajeepparts.com/CCKW2.htm page with kits 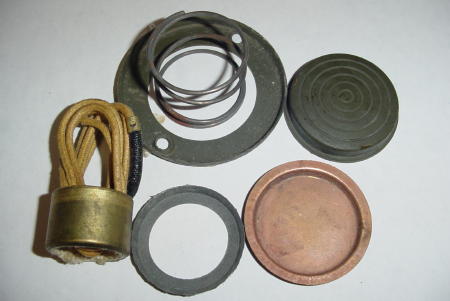 Cheers Phil
__________________
Phil Waterman `41 C60L Pattern 12 `42 C60S Radio Pattern 13 `45 HUP http://canadianmilitarypattern.com/ New e-mail Philip@canadianmilitarypattern.com
|
|
#86
29-08-12, 03:59
|
|||
|
|||
|
Track down some wood turners....... they would know of suppliers that sells very thick crazy glue which they use to strengthen wood fibers in partly decayed wood ........ the also use a very thin formula to fasten the bark on edge of bowls........ may seem crazy but it is very artsy fartsy. I would be tempted to let some crazy glue seep in into every finger joint.
In Canada Lee Valley is the major suppliers...... the crazy glue will turn a punky piece of wood into hard plastic..... needs to be sanded down with 400+ grit for the green OD to stick properly. Bob Former wood turner now spins yarns !!!!!
__________________
Bob Carriere....B.T.B C15a Cab 11 Hammond, Ontario Canada
|
|
#87
29-08-12, 04:02
|
|||
|
|||
|
Phil
Peter also has the rubbing block that fits on the outside of the steering shaft tube.... held inplace by two screws......rubbing block contact that brass ring on the LH side of the picture. Bob
__________________
Bob Carriere....B.T.B C15a Cab 11 Hammond, Ontario Canada
|
|
#88
29-08-12, 18:09
|
|||
|
|||
|
Hi Bob
What I really would be interested in seeing is a video of how the wood steering wheels were actually made. Some CMPs seem to be made from 4 sections while some seem to have 2 sections, my HUP has only 2 sections. I would suspect that it is a combination of steam bending and some kind of machine duplicator system like used making rifle stocks. The wood penetrating stuff works wonders in some applications, I used polyurethane sealer on all the wood frame blocks and spacers on the HUP overhaul. Basically submerged all the wood parts and let them sit submerged for about 12 hours. Thanks for the reminder on the source for the horn contacter down on the column. One of the common problem I have seen with these units is the terminal end gets loose from the shaft which can some times be fixed with a solder. Cheers Phil
__________________
Phil Waterman `41 C60L Pattern 12 `42 C60S Radio Pattern 13 `45 HUP http://canadianmilitarypattern.com/ New e-mail Philip@canadianmilitarypattern.com
|
|
#89
06-09-12, 16:34
|
|||
|
|||
|
Hi Scott
Good job, we can all now add the M35 fuel gauge sender to our flea market parts hunt list as one of those spare parts to grab when we see it. Cheers Phil
__________________
Phil Waterman `41 C60L Pattern 12 `42 C60S Radio Pattern 13 `45 HUP http://canadianmilitarypattern.com/ New e-mail Philip@canadianmilitarypattern.com
|
|
#90
29-09-12, 08:48
|
||||
|
||||
|
Quote:
 Mike Mike
__________________
1940 cab 11 C8 1940 Morris-Commercial PU 1941 Morris-Commercial CS8 1940 Chev. 15cwt GS Van ( Aust.) 1942-45 Jeep salad
|
 |
|
|


 Linear Mode

