|
#1
 18-03-16, 02:00
|
|||
|
|||
|
A slight change of pace for week 5. In previous and future wireless set posts I have given, and will give, a set's effective range in yards or miles. This is of course dependent on conditions, but in most cases what is reported is based on a typical or commonly used aerial. As any good signaler knows, range can be enhanced by location and type and configuration of the aerial, more correctly called the 'radiating element'. This week will look at various aerial systems used on WW2 British and Canadian radio sets. If this disappoints those looking for a radio I apologized and promise something nice for next week.
Generally speaking, the taller the antenna the greater the range. The problem with this is that the taller the antenna the greater the risk the enemy will see it or that it will be broken off if attached to the roof of a moving vehicle. The first picture shows devices that help the wireless operator get better range without compromising tactical advantage. Aerial 'F' Sections used on sets such as the 19, 22, 38 and 52 come in four 4' sections, two bottoms, a middle and a top. In vehicles, usually the middle and top are used providing an 8 foot 'whip'. Anything taller (and therefore providing better range) would also be more visible to an observer and not practical on a moving vehicle. On the left is a single 'F' section in an aerial base No.10 and to the right of it a V Laporte splitter on a No.8 base that allowed two 8 foot aerials approximating the output of a single 16 foot one without additional height. Between the two is another wireless trick. A ‘dummy load’ inserted in the aerial base instead of an antenna allowed the operator to tune his set without radiating a signal for the enemy to detect. Beside that is a regular No.9 aerial base with a ‘G Section’ (as used with No.19 ‘B’ sets) and then the same on a clamping system that could be located higher for better performance or in cover to conceal it. Where the risk of detection could be mitigated or when operating from a parked truck, taller aerials could be used. Photo two is of the Canadian 20' & 34' telescoping masts (or rather the bottom ends of them) with the ground spikes, insulators and guy ropes. Also shown are the leather carrying bag and two types of bases to mount these masts on vehicle roofs or running boards. The 20 foot mast had a fitting on the top for 'F' Sections which, when used, brought it up to the equivalent of a 32 foot aerial. To further enhance performance operating from ground stations, horizontal aerials were used. These relied on the ability of AM frequencies in the low, and therefore very long wavelength bands to cover great distances when the aerial equipment was horizontal and matched to the wavelength of the frequency being used (think of high school geometry sin/cosine waves). For this type of aerial, the same 20' and 34' masts were used but in this role they were for supporting the horizontal antennas and not radiating signals themselves so the insulators could be omitted. Once the masts were erected and supported by guy ropes, horizontal wire aerials were attached to the tops of the masts creating a horizontal dipole antenna. The good is that they were very efficient, the bad is that they took a great deal of time to erect and dismantle. The third picture shows two types of horizontal aerials (plus the tops of the 20' and 34' masts): the "AERIALS 250' No.1" allowing for frequencies between 2 and 2.65 megacycles (megahertz) and an "AERIALS HORIZONTAL 4 SECTION" which could be used for a range of frequencies depending on how many of the four sections you connected together. The forth picture is the full set of "AERIALS HORIZONTAL No.1 ranging from 2 to 8 megahertz in six individual aerials each with a different length. The black plastic chain sections were to insulate the wire ‘radiating elements’ from the supporting masts. Last edited by Bruce Parker (RIP); 18-03-16 at 03:25. Reason: spelling 
|
|
#2
18-03-16, 02:23
|
||||
|
||||
|
Wow, just wow.
Bruce, do you have any "modern" radios to showcase in the near future? I am thinking C-42, RT-524, PRC-25/77 etc??? (the extent of my radio collection)
__________________
3RD Echelon Wksp 1968 M274A5 Mule Baifield USMC 1966 M274A2 Mule BMY USMC 1966 M274A2 Mule BMY USMC 1958 M274 Mule Willys US Army 1970 M38A1 CDN3 70-08715 1 CSR 1943 Converto Airborne Trailer 1983 M1009 CUCV 1957 Triumph TRW 500cc RT-524, PRC-77s, and trucks and stuff and more stuff and and....... OMVA, MVPA, G503, Steel Soldiers
|
|
#3
18-03-16, 02:30
|
||||
|
||||
|
This is all pretty interesting stuff. I'm waiting for the 11 set.
__________________
1940 Cab 11 C8 Wireless with 1A2 box & 11 set 1940 Cab 11 C8 cab and chassis 1940 Cab 11 C15 with 2A1 & Motley mount & Lewis gun 1940 Cab 11 F15A w/ Chev rear ends 1941 Cab 12 F15A 1942-44 Cab 13 F15A x 5 1942 cab 13 F15A with 2B1 box 1943 cab 13 F15A with 2H1 box 1943 Cab 13 C8A HUP 1944 Cab 13 C15A with 2C1 box 1943 Cletrac M2 High Speed Tractor MkII Bren gun carrier chassis x 2
|
|
#4
18-03-16, 03:18
|
|||
|
|||
|
Quote:
|
|
#5
18-03-16, 04:54
|
||||
|
||||
|
Well done Bruce, well done.
__________________
44 GPW / 44 C-15-A Cab 13 Wireless 5 with 2K1 box X 2 / 44 U.C. No-2 MKII* / 10 Cwt Cdn Brantford Coach & Body trailer / 94 LSVW / 84 Iltis
|
|
#6
22-03-16, 02:39
|
|||
|
|||
|
Great work as always Bruce.
Have a few odd items to add. 'G' Rod Bird Cage 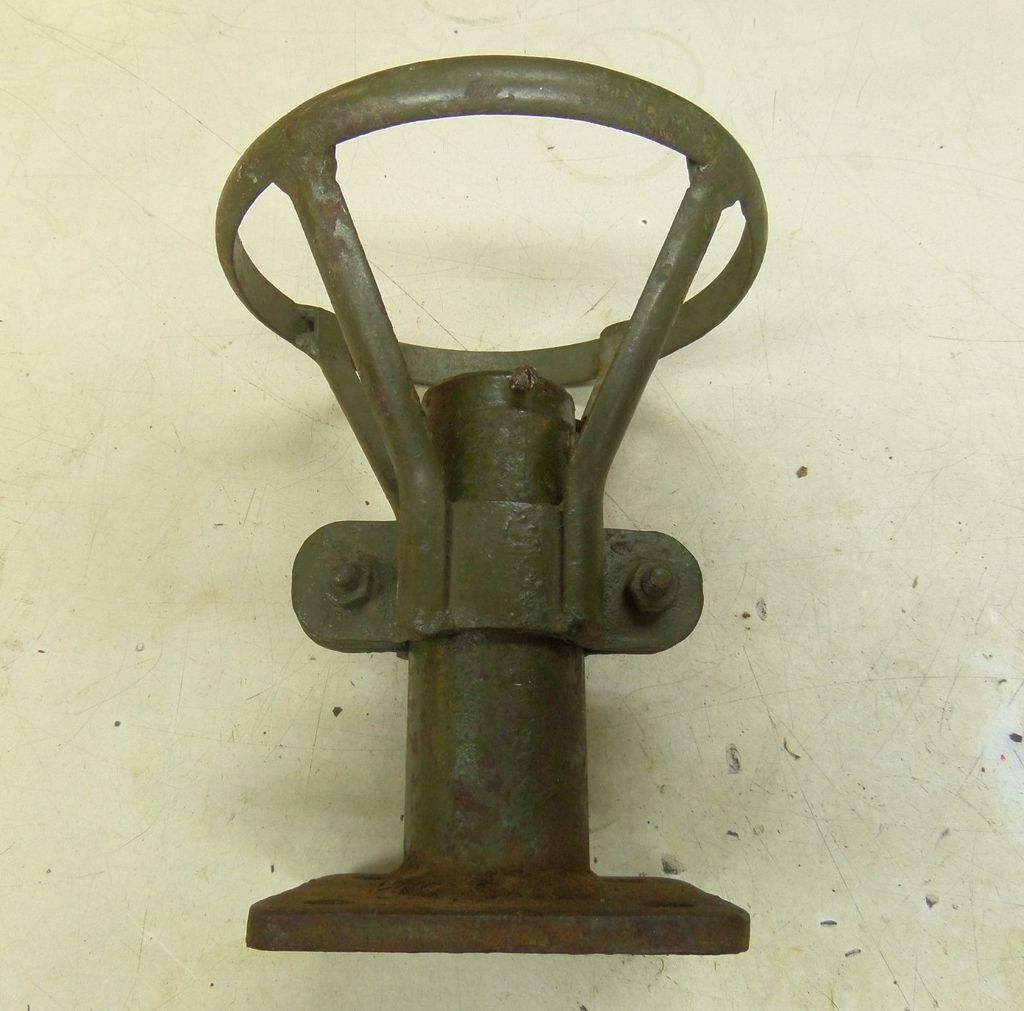 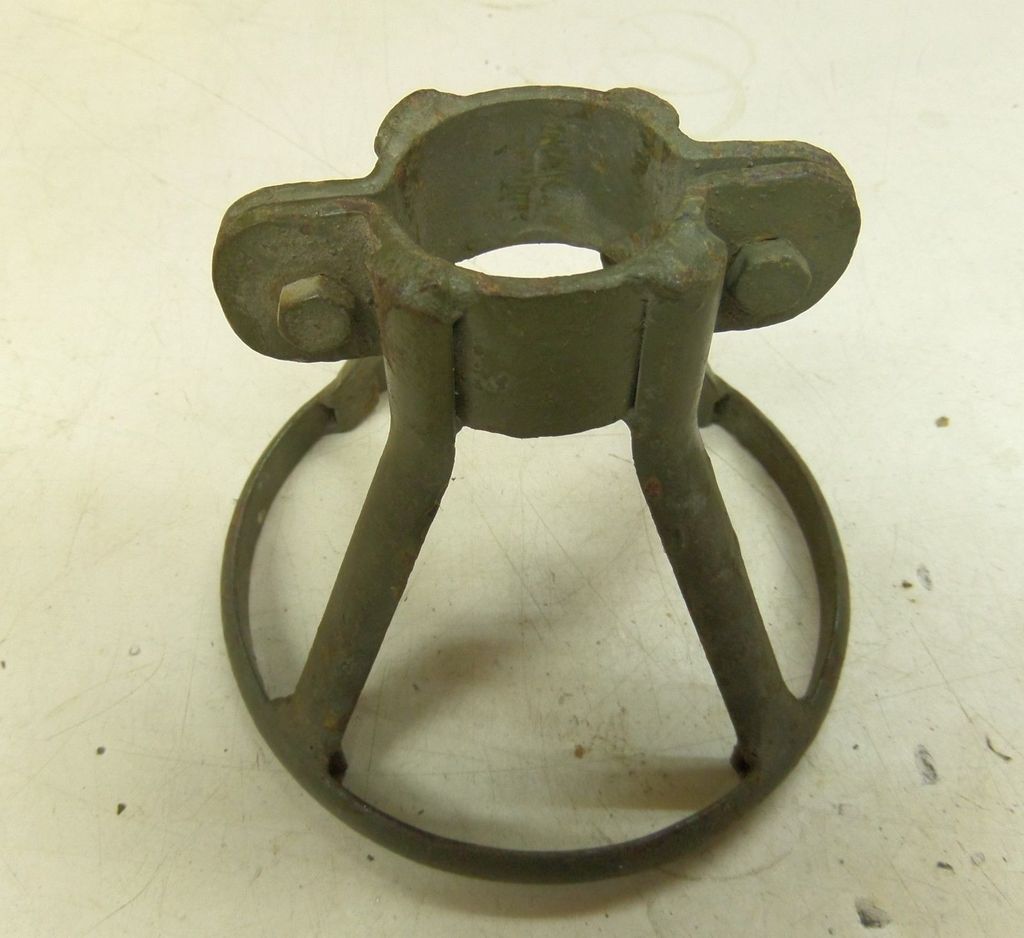 British 'D' Rod Aerial Set the predecessor to the Canadian 34' Antenna Set 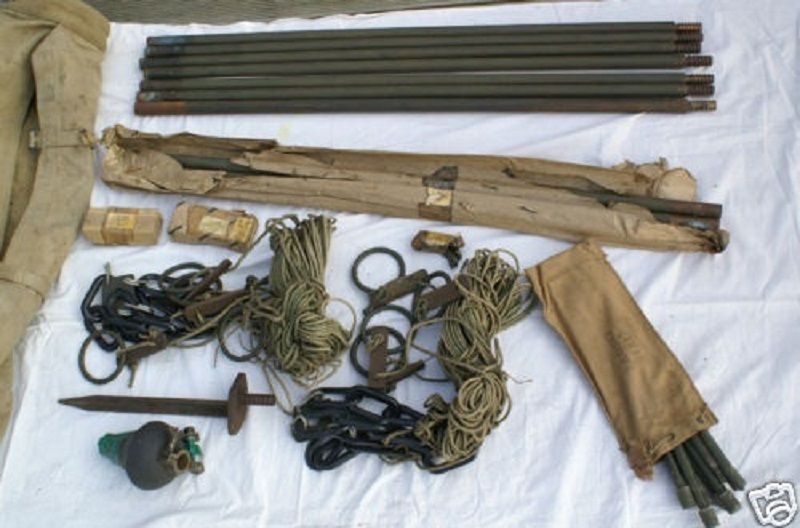 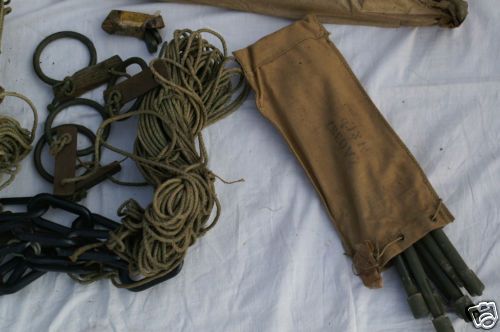 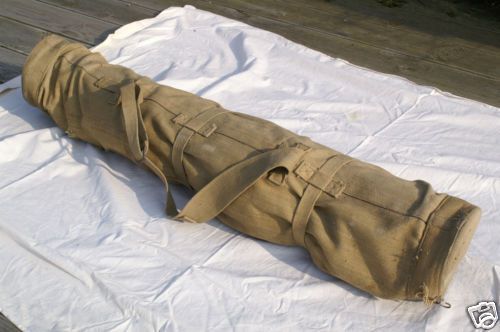 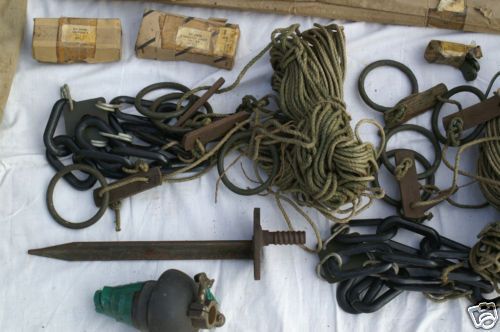 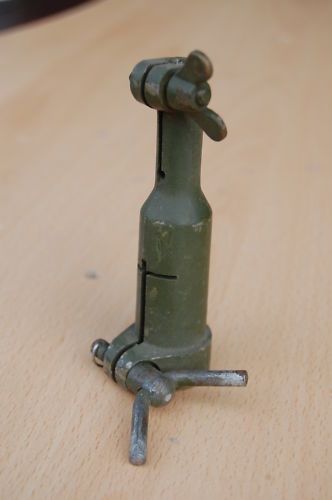 'D' Rod stabilizer used on vehicle installations. 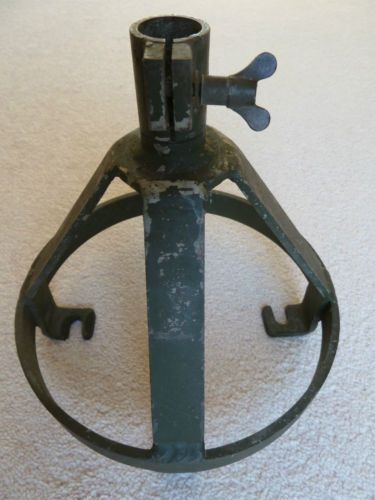 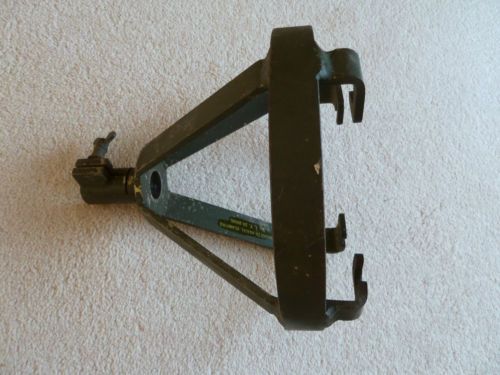 Geoff
|
|
#7
22-03-16, 03:25
|
|||
|
|||
|
Thanks Geoff, it's great to see other stuff added to the overall knowledge mix...kind of why I'm doing this.
Interesting B 'birdcage' brush guard. I'm fairly certain its British. The Canadian ones had an entirely different clamping system onto the aerial base and were made from rectangular instead of half round metal stock.
|
|
#8
23-03-16, 01:47
|
|||
|
|||
|
The "Protector, Aerial Base" for Base No.9 was a late addition to prevent the base being destroyed by low branches, etc. A large number of them would have been made up "in theatre" out of materials in hand, so the actual construction could vary considerably.
I think the "BRACKETS AERIAL CLAMPING No.1 T. ZA29558" is for fitting an elevated aerial base to the top of a 'D' rod, since it looks very similar to the "F" rod adapter for the the British 34-ft mast. It's odd in that it has four slotted lugs, which would not appear to match up with the usual aerial bases, and is quite late from its stores code - late 1944-ish. It looks as though it's intended to be rotated onto some studs for clamping, but I don't really see why. It certainly won't fit any of the usual bases, though possibly the No.3/No.16 combination for radio trucks - but the reason for it escapes me at the moment. Chris.
|
|
#9
23-03-16, 07:49
|
|||
|
|||
|
Hello Chris
The BRACKETS AERIAL CLAMPING No.1 T. ZA29558 is for the top of a vehicle roof, I think??, only reference I've seen for it is in WFTW. Appears to have been used in LCV's and ACV's 4x4 HP RCA/19, one of the aerial connections on the Wireless Sender RCA ET 4332 B includes the following, Connector Single No.46, Insulator W.T. AE Lead-in No.16, Adaptors No.2, 4 or 5, Main Rod Aerials as required. I'm assuming they are referring to 'D' Rods, as the other aerial connection on the RCA set is for a Dipole No.9 which requires something heavier than an 'F' Rod set-up. The above parts are listed in WFTW as being for ACV's & LCV's, also 'D' Rods were originally used for WS 1, 2, 3, 7, 9, and 11; all old school, later the WS22 used 'D' Rods as a 34' antenna/dipole mast set-up for Ground Stations. There is also a reference in the WS53 chapter, picture is poor, ZA number is different ZA.24136 and "it is mounted with 'F' and 'D' Rods to the insulator fitted to the roof'" It also states in WFTW that anything over 18' (6 'D' sections) required stays, 18' is a lot of torque and the Brackets Aerial Clamping would have stabilized the 'D' Rod antenna base/insulator, keeping it from ripping the roof mounting plate out in anything stronger than a light breeze.(Used only when vehicle was stationary) I set up the pieces roughly to give an idea of how they might have worked. The Mounting would have had to be insulated from the vehicle as it is clamped directly to the 'D' Rod. Also the 'F' Rod adaptor would have had to be installed at least one length of rod above the stay plate; as you can not turn the thumb screw on the adaptor when the stay plate is directly under the adaptor. Anyways sort of like this, diameter of bracket is 8 5/16". 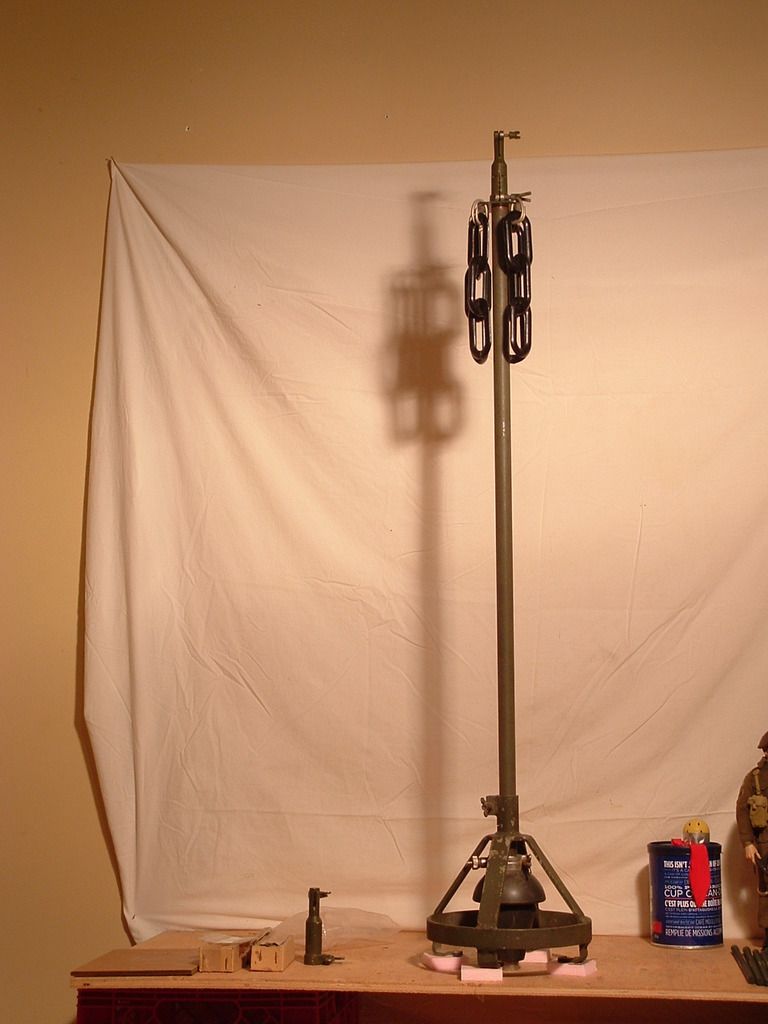  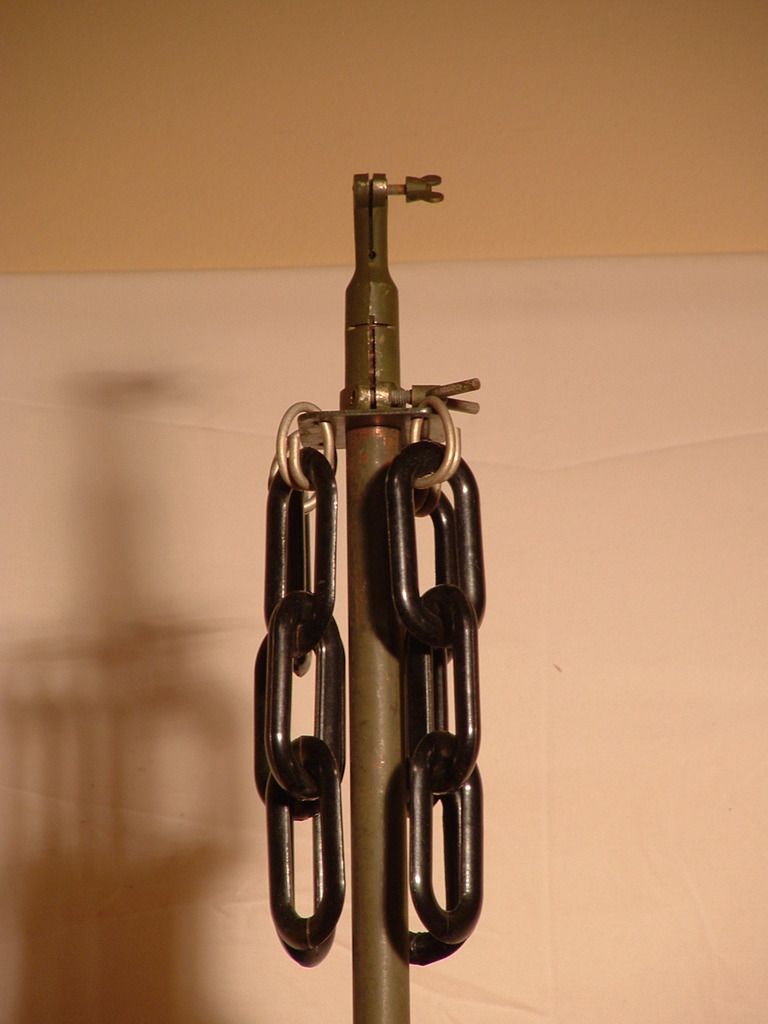 Geoff Last edited by Johnny Canuck; 23-03-16 at 07:55.
|
|
#10
24-03-16, 22:42
|
|||
|
|||
|
Riiiiiiiight.... all becomes clear.
It fits on Aerial Base No.16, which consists of a (modified?) Aerial Base No.3 on top of Insulator W/T "H" (which is a substantial ceramic piece). This was intended for (relatively) high power sets (WS19HP, WS12, WS53, etc) and the Aerial Base No.3 was not up to the job of insulating that much voltage. So: the ceramic (W/T 'H') provides the insulation and feed-through into the vehicle, and the No.3 is bypassed by four braid straps and just acts as a vibration mounting. This is fine for a few 'F' rods, but once you start stacking 'D' rods, the hollow rubber Base No.3 will collapse, so you need that bracket to support the weight of the vertical aerial. Obviously you can't use it on the move, and since it's only supporting the weight of the rods, it doesn't need to be fastened on (certainly not bolted down, anyway). I'm currently cleaning up a Base No.16, and noticed it has four large flat-headed studs on the clamp ring, so that's obviously what the slotted lugs on the bracket mate with. (Drop it on top, rotate into place, feed your first 'D' rod in and tighten the clamps on base and bracket, then add more rods as required. (Or fit the bracket to the assembled vertical before lifting it into position, then slide down, rotate, and clamp in place.)) Once I've got it cleaned up I will see about some photographs of it. Chris. (And that bracket is something else to look for on this side of the pond.) 
|
|
#11
28-03-16, 01:14
|
|||
|
|||
|
Aha! I seem to have two variants of Aerial Lead-in No.16, plus the mounting hardware for both types.
The first type is for "15cwt 4 wheeled Wireless Truck Mk.III" and fits on a bracket over the cab. Feed is via a "blackout box" on the end wall and an "Insulator W/T lead in No.12" (two glass dome insulators in a square panel). The four braid straps that bypass the rubber insulator on Base No.3 are fitted to the top clamping ring. See WftW Vol.2 Page WS19-74 which is for a (British) WS19HP install. The second type is for "House Type Body" wireless trucks (15 cwt Mk.II), LCV and ACVs, and the post-WW2 Austin K9. This fits to a paxolin plate in the centre of the roof and is fed directly through the base. (It allows the safe use of rather higher powered transmitters like the WS53 and RCA 4332 and BC-610, where the feeder can go straight up from the set to the base and be protected by an earthed metal guard.) For this version, the braid straps are fitted to the plate that the Base No.3 is clamped to, and the clamping ring has gained the studs that the "Bracket, Aerial Clamping" fits onto. (It has to rotate anticlockwise (viewed from above) because the studs for the (now unused) braid connections are next to the new ones for the aerial bracket.) Photographs of all this stuff once I get the camera sorted out and the "first type" of base unearthed and cleaned up! Chris.
|
|
#12
28-03-16, 18:53
|
||||
|
||||
|
Quote:
A great addition to a fantastic series of wireless threads. One thing I would like to ask you is to attach pictures to your posts rather than using links to Photobucket - we have learned the hard way that one day sooner rather than later they will disappear making this thread worthless. Here is how you learn how to post images - let me know if you have any further questions. Thanks! Hanno
__________________
Regards, Hanno --------------------------
|
|
#13
28-03-16, 21:37
|
|||
|
|||
|
Quote:
Chris.
|
|
#14
12-12-17, 05:38
|
||||
|
||||
|
Just had these arrive in the mail.
The left one I've seen before but the right one I've never seen. It looks to be a manufacturers instruction booklet. Comparing the two there are a number of different diagrams for setting of the antenna.
__________________
Jordan Baker RHLI Museum, Otter LRC C15A-Wire3, 1944 Willys MB, 1942 10cwt Canadian trailer
|
|
#15
12-12-17, 20:33
|
|||
|
|||
|
Quote:
I think it refers to an earlier version of the mast, since although they are both described as P.C. 84295C they have a different -nnn suffix. I'd be interested in a scan of the component list because I have a cast alloy/ceramic insulator with that PC number on it that is neither the ebonite base insulator nor the ceramic type that replaced the ebonite one for use with the WS52 - I suspect it was the original insulator and turned out to be insufficiently soldier-resistant. (The later Mast, Telescopic, 27-ft for the Larkspur range has a very similar design but a more substantial ceramic insulator in the middle. Chris.
|
|
#16
23-12-19, 11:31
|
|||
|
|||
|
In August I purchased a Lynx I MkIII*. This came complete with a 19 set. I have now got the vehicle in a state ready for the road and am looking at the ancillary equipment.
The vehicle has one section of an antenna fitted to the base on the near (left hand) side. With the vehicle came two more sections of an antenna. I have two questions. Is the complete antenna composed of 3 sections? How do I separate these two sections? I have attached a picture of the join. There seems to be a rolled thread just below the join. Does the solid top section just unscrew or should it telescope inside the lower section? Thank you Alastair F60S LynxI MkIII*
|
|
#17
23-12-19, 13:21
|
|||
|
|||
|
Quote:
It should just pull out, but if it's rusted in place you may have difficulty extracting it without soaking it in oil and possibly applying heat. The to section can be clamped in a vice, but you can't do much about the lower section as it's thin wall steel tube and quite fragile. (The rolled-in thread was a WW2 Canadian improvement to the British aerial rods which were just a push fit and tended work loose and fall out when bounced around.) The first (bottom) rod has a solid butt end and no threaded portion because it clamps into the aerial base (or adapter) and needs to be un-crushable, the other rods have a threaded portion at the butt end and a rolled-in thread (for retention on the move) at the top. The threaded ones are 49.5 inches long rather than the original 48-inch specification. Chris.
|
|
#18
23-12-19, 13:28
|
|||
|
|||
|
Quote:
 The usual mobile aerial was 2 sections (less danger of being damaged by low branches), but 3 could be used if extra range was required. Maximum (sensible) length is 4 sections (base, two middles and a top), but that is strictly for stationary use - it's too fragile for driving around with and might damage the aerial base with the extra leverage applied. Chris.
|
|
#19
23-12-19, 13:53
|
|||
|
|||
|
Quote:
1) soak the joint with penetrating oil for a while. 2) remove the bottom aerial section from the aerial base on your vehicle. 3) fit that to the other two sections (assuming it's the type with the rolled-in thread and a solid butt), and screw it together (hand tight only). 4) clamp the top (stiff wire part) in a vice. 5) If you have an old aerial base or one of the adapters, clamp the bottom section in that (or use a clamp and wooden blocks), then pull on the bottom section and tap the clamp (or whatever) gently with a hammer towards the bottom of the aerial. (What you really need is a slide-hammer with a collet that will take the aerial, but no such animal exists.) With luck it will separate the push-fitted top section. Best regards, Chris.
|
|
#20
24-12-19, 12:33
|
|||
|
|||
|
Thanks, Chris. I will give it a go.
Regards, Alastair
|
|
#21
26-12-19, 23:39
|
|||
|
|||
|
Quote:
(Though shipping them to Chelmsford might prove to be "interesting.cn"!) Chris.
|
 |
|
|
 Similar Threads
|
||||
| Thread | Thread Starter | Forum | Replies | Last Post |
| Wireless of the Week - week 1 | Bruce Parker (RIP) | The Wireless Forum | 4 | 17-07-16 00:45 |
| Wireless of theWeek - week 4 | Bruce Parker (RIP) | The Wireless Forum | 5 | 12-03-16 15:45 |
| Wireless of the Week - week 3 | Bruce Parker (RIP) | The Wireless Forum | 11 | 07-03-16 02:16 |
| Wireless of the Week - week 2 | Bruce Parker (RIP) | The Wireless Forum | 5 | 28-02-16 16:54 |
| How Far Did You Drive Your CMP This Week | Phil Waterman | The Restoration Forum | 6 | 23-05-07 03:37 |


 Linear Mode

