|
#91
 29-09-12, 12:26
|
|||
|
|||
|
$600 holy smokes!!
Look around for a better one and polish it up. Acetone is good for smoothing over cracks and dings. You can even use it to melt down a piece of plastic off a stuffed wheel to fill large cracks. Practice on a old one. Cheers Jeff
__________________
42WLA HD 41 BSA WM20 42 GPW 42 C15A 43 969A Diamond T wrecker Type 2,3 & 4 Ausssie jeep trailers 
|
|
#92
30-09-12, 03:13
|
|||
|
|||
|
Quote:
Use spar varnish.. It is a different varnish for outdoor applications. Any wood stored outside is going to be exposed to a wide range of temperatures and weather, as well as a good dose of damaging UV rays. These elements serve to break down the finish over time. Furthermore, changes in humidity cause the wood to expand and contract, and a standard indoor finish would simply crack and deteriorate under these conditions. Spar varnishes are typically designed to not only protect the wood, but also give it the flexibility and UV protection it needs to last for years. And the name spar varnish comes from the boating world, where the long wooden poles that support the sails are know as spars. So a spar varnish needs to be one that can withstand the rigorous conditions of seafaring life.
__________________
Alex Blair :remember :support :drunk:
|
|
#93
21-10-12, 13:53
|
||||
|
||||
|
Scott,
I really enjoyed Canungra, but I would happily forgoe (? spelling) the pleasure to take delivery of that vehicle too  Cooooooool! Wanna swap 
__________________
Ford CMP, 115" WB,1942 (Under Restoration...still) Medium sized, half fake, artillery piece project. (The 1/4 Pounder) Last edited by Private_collector; 21-10-12 at 14:04.
|
|
#94
21-10-12, 14:01
|
|||
|
|||
|
Hi Scott, that half track looks familiar!
Great stuff! Shame you were not at Canungra there was an awesome DiamontT White Half track there. Cheers Jeff
__________________
42WLA HD 41 BSA WM20 42 GPW 42 C15A 43 969A Diamond T wrecker Type 2,3 & 4 Ausssie jeep trailers Last edited by Jeff Gordon; 21-10-12 at 14:03. Reason: Word missing
|
|
#96
25-04-13, 07:15
|
||||
|
||||
 
__________________
Ford CMP, 115" WB,1942 (Under Restoration...still) Medium sized, half fake, artillery piece project. (The 1/4 Pounder)
|
|
#97
06-07-13, 03:28
|
|||
|
|||
|
Scott,
Before you put ANYTHING on that lovely concrete, consider waiting till its cured then proof coat it with a penetrating concrete sealant. I used liquid Perspex in a previous shed and it worked a treat. Concrete dust was nil, sweeping up and removing oil drops was easy. Gave it two coats to leave a slick slightly gloss finish, so had to take a little care if it got wet, but ended in a much tidier and dust-free shed/work environment. The shed after that was coated with a so-called concrete paint by the building contractor: it was rubbish, and stripped off just running wheels across it, but too late to give the floor a coat of something better, so I had to live with it. The most recent shed got a coat of a satin finish water repelling sealant, and that works fine, too. Mike C
|
|
#98
06-07-13, 06:48
|
|||
|
|||
|
How many sheds does it take to make a village?
 David
|
|
#99
06-07-13, 17:10
|
|||
|
|||
|
My wife dubbed the last one at Gunning, NSW, 'The Shed Complex'.... a 40' x 25', a 40' x 20' skillion, and a 40' x 20' shed, all adjacent and with concrete floors and with aprons front and back (to run the forklift around and work outside).
Then we moved to the USA..... So now I have a modest 30' x 25'. Always believed that acquiring MVs was one thing, but housing them properly to prevent deterioration while they waited in the resto line was a top priority. But that's just my view.... Mike C
|
|
#100
24-08-13, 05:35
|
|||
|
|||
|
Scott try baring the motor over now.
__________________
Bluebell Carrier Armoured O.P. No1 Mk3 W. T84991 Carrier Bren No2.Mk.I. NewZealand Railways. NZR.6. Dodge WC55. 37mm Gun Motor Carriage M6 Jeep Mb #135668 So many questions....
|
|
#102
24-08-13, 09:53
|
|||
|
|||
|
Scott have you tried turning it against normal rotation?
Has the gearbox had water in it? Is it the gear box that's stopping it? What happens if you try with the clutch depressed? Will the chassis roll with the gearbox in neutral?(main shaft still turns) Will it roll with the clutch depressed (clutch is free and the gearbox is all turning) If it turns out that the motor is seized, put a little diesel in the cylinders, with a bit of rag. Light it and let it burn for quite a while. The thermal expansion will help free it up. (probably better out side) It only needs to be a small flame. I assume this is a 216 and has cast iron pistons? Try a small hydraulic jack with a block of wood under the exhaust studs. be careful. you might get enough purchase by hand with no lever fitted.
__________________
Bluebell Carrier Armoured O.P. No1 Mk3 W. T84991 Carrier Bren No2.Mk.I. NewZealand Railways. NZR.6. Dodge WC55. 37mm Gun Motor Carriage M6 Jeep Mb #135668 So many questions....
|
|
#103
24-08-13, 19:47
|
|||
|
|||
|
Hi Scott
Silly question but are you sure you got all the head bolts? Your pictures shows the rocker arm assembly in place and there is one head bolt dead center under it. You should have 15 head bolts out on the bench. If they are all out then you are probably just dealing with some really good gasket cement. I would go with the air compressor route, the screw in fitting for compression gauge can generally be fitted to an air line. Try a couple of different cylinders hopefully you will fine one that will hold pressure. If you remove the rocker are assembly all the valves should be closed. Depending on if you find cylinders that will hold air, you may want to put a couple of the head bolts back in loosely two control how hard the head comes off. Once you get it apart, remember the witches brew of acetone and ATF, I've had really good luck getting engines unstuck after letting them soak for a couple of weeks. Keep us posted on what you find. Cheers Phil
__________________
Phil Waterman `41 C60L Pattern 12 `42 C60S Radio Pattern 13 `45 HUP http://canadianmilitarypattern.com/ New e-mail Philip@canadianmilitarypattern.com
|
|
#104
25-08-13, 01:28
|
|||
|
|||
|
Definitely remove the rocker gear as it seems that you may not have removed all the head bolts and it's easier see and do without the rockers. There is also the oil line to the rockers to disconnect and removal of the rockers allows the push rods to be removed. As my dad used to say,"Clear the area and let the dog see the rabbit".
Head removal will allow inspection of the bores and if they look ok (no rust) I would remove the lower flywheel pan and using a pinch bar (pry bar) carefully lever from the edge of the bell housing and the teeth of the ring gear. This can be done in either or both directions. If there is heavy rust in the bores then - Engine removal, crankshaft removal then individual piston removal. David
__________________
Hell no! I'm not that old! Last edited by motto (RIP); 25-08-13 at 01:37.
|
|
#105
25-08-13, 01:40
|
|||
|
|||
|
Hi Scott
Was the one you missed the center one? Glad you got it off anyway. I've been amazed over the years how ugly cylinders can look with rust and how much cleans up. Now a couple of things to check take a look at http://canadianmilitarypattern.com/H...May%20Work.htm some of my pictures of working on my HUP engine, first check the valve seats for cracks. 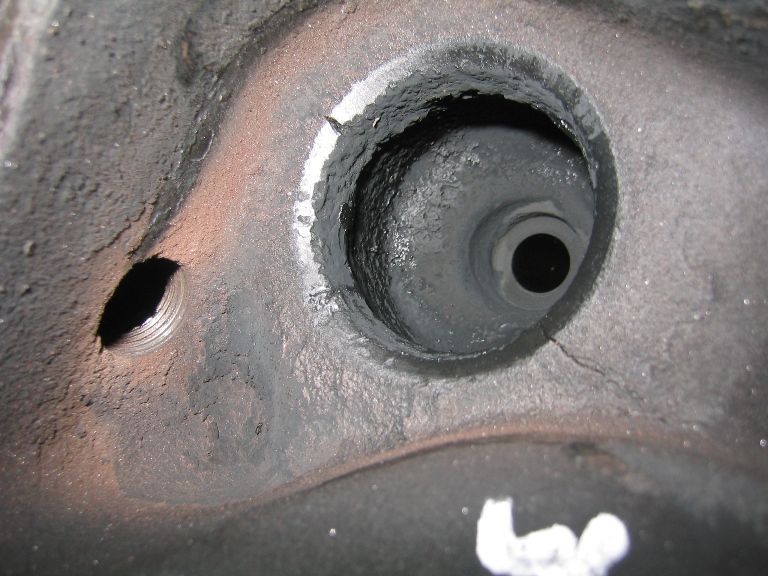 It may be worth having the whole engine magnifluxed before you do any machine work. Still going to cost you to have it hot dipped and cleaned along with the magnifluxing but it is far better to find the cracks before you start spending money on machine work. Concerning the pistons, remember that CMPs like yours and mine use domed pistons and domed pistons will not work on the head designed for flat topped pistons. The domed heads will work with flat topped pistons but you loose a lot of compression/power. Flattop vs Domed heads: 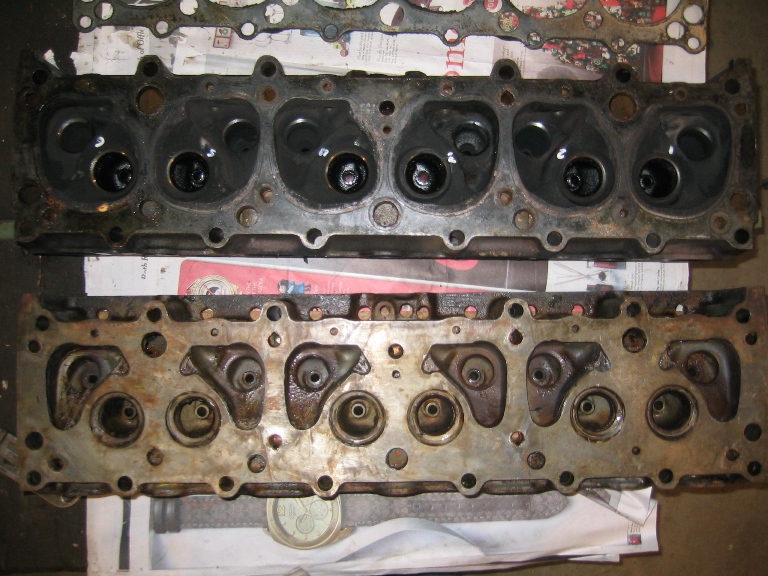 When I rebuilt my HUP engine the head had numerous cracks in the valve seats and as the only NOS head I could get was flat topped, when they bored the cylinders went over to flat top pistons. Cheers Phil PS all the photos and more are over on my website, still need to do some work on the Overhaul pages and index the page better.
__________________
Phil Waterman `41 C60L Pattern 12 `42 C60S Radio Pattern 13 `45 HUP http://canadianmilitarypattern.com/ New e-mail Philip@canadianmilitarypattern.com Last edited by Phil Waterman; 25-08-13 at 01:42. Reason: Add info on location of photos
|
|
#106
25-08-13, 02:47
|
|||
|
|||
|
Nice pictures of your new shed, always good to get our treasures in out of the weather. The Gantry that you have in one of the photos is just what I am after, is it possible for you to pass on a name, supplier etc or even point me in the right direction.
Cheers, Dave.
__________________
1 x 1955 Austin Champ WN1(restored) 2 x 1956 Austin Champ WN1(restored) 1 x 1955 Humber 4 x 4 GS (restored) 1 x 1945 FMC 1/4 Ton Trailer (restored) 1 x 1942 Bantam 1/4 Ton Trailer (restored)
|
|
#107
25-08-13, 03:55
|
|||
|
|||
|
Hi Scott
In regards to rust. It can be very deceptive as it takes up several times the volume of the original metal so often looks far worse than it is. I had a 230 cubic inch Dodge side valve engine that had water in the cylinders for years when I got it and the rust so bad it was like someone had poured corn flakes into it. There were stalactites in the cylinders and I pulled a sleeve in half when driving out a piston (it had been rebuilt at one time) After reconditioning, that engine now powers my 6x6 Weapons Carrier. Phil seems to be on top of the stovebolt six stuff so I won't butt in again. Like many others I will be very interested to follow your progress so keep the updates coming. Cheers David
__________________
Hell no! I'm not that old!
|
|
#108
25-08-13, 10:52
|
|||
|
|||
|
Quote:
Thanks Scott have done a lot of dealing with Hare & Forbes just overseen $900,000 worth of machinery purchased from them. Will contact Steve tomorrow, thanks for the heads up. Dave.
__________________
1 x 1955 Austin Champ WN1(restored) 2 x 1956 Austin Champ WN1(restored) 1 x 1955 Humber 4 x 4 GS (restored) 1 x 1945 FMC 1/4 Ton Trailer (restored) 1 x 1942 Bantam 1/4 Ton Trailer (restored)
|
|
#109
01-09-13, 19:02
|
|||
|
|||
|
Hi Scott
Have faith and let the engine really soak for a while. Have you dropped the pan to look up at the conditions of the cylinder bores? Watch out when you drop the pan even after you have drained it there may well be two or so quarts of oil up in the dipper troughs. 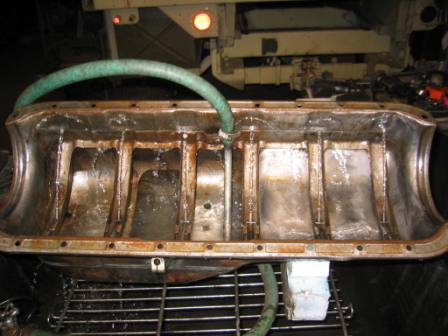 Picture is of testing the nozzle aim on one of my engines but you can see the troughs hold oil. These troughs are also a surprise when you turn an engine over on an engine rotisserie think the engine is drained, only to have it pour out on your feet. When you drained the transmission was there a layer of water? Or really milky looking gear lube? As to the layer of sludge to be expected if the transmission has sat without gears turning for any length of time. Looks good though can you spin the gears yet to see if all the teeth are there? All the transmission bearings are available. Keep us posted Cheers Phil
__________________
Phil Waterman `41 C60L Pattern 12 `42 C60S Radio Pattern 13 `45 HUP http://canadianmilitarypattern.com/ New e-mail Philip@canadianmilitarypattern.com
|
|
#110
08-09-13, 05:15
|
|||
|
|||
|
But the engine now turns free?
__________________
Bluebell Carrier Armoured O.P. No1 Mk3 W. T84991 Carrier Bren No2.Mk.I. NewZealand Railways. NZR.6. Dodge WC55. 37mm Gun Motor Carriage M6 Jeep Mb #135668 So many questions....
|
|
#111
09-09-13, 00:53
|
|||
|
|||
|
Hi Scott
You have added another thing to list of things to check on stuck engine, think this one falls under check the simple stuff first, but who would have thunk of engine won't turn because the transmission or flywheel is stuck. Yes the critters love to climb into the bellhousing and build nests. Years ago my HUPs clutch suddenly started slipping, one weekend to the next, pull the transmission and discovered evidence of a mouse nest splattered all over the inside of the housing, but the real problem was there was mouse nest material wedged in at the fulcrum of the clutch fingers. What I surmise was that when I pushed the clutch in to start the engine the mouse nest was thrown outward and some of it wedged there, causing the clutch to slip. Which type of engine stand were you thinking about? I made test stand for the Chev engine that has proved so useful that I now have 4 or 5 of them sitting around with engines on them. If your interested take a look at evolution of the test stand at http://canadianmilitarypattern.com/EngineTesting.htm I made the stand so it could also handle flat head V8s. Keep us posted on your progress, great to hear the engine is free and turning. Cheers Phil
__________________
Phil Waterman `41 C60L Pattern 12 `42 C60S Radio Pattern 13 `45 HUP http://canadianmilitarypattern.com/ New e-mail Philip@canadianmilitarypattern.com
|
|
#112
05-10-13, 12:10
|
||||
|
||||
|
Quote:
__________________
Blitz books.
|
|
#113
05-10-13, 13:17
|
|||
|
|||
|
Scott, recently had a 216 rebuilt and Parry,s in Sydney did the job. remetalled the rods, fitted semi finished Main Brgs [supplied by Ross Prince ] and tunnel bored to suit 0.020 grind on shaft, bored and sleeved as required to 0.020 to suit my supplied cast pistons [ flat top ] shimmed rods and mains to original specs [ 3 shims each side ] Balanced. cost $6,000. Reason for going back to original was, previous engine lasted 16 MILES following rebuild by reputable firm. problem con rods machined off centre and different lengths [ by 1/8" ] not tunnel bored forced crankshaft to flex, then we found shaft they fitted was not for that year model. They no longer trade and we never found original shaft. only the block and pistons are recoverable. $3,600 wasted
__________________
macca C15 C15A
|
|
#114
27-10-13, 01:40
|
|||
|
|||
|
Hi Scott
While your waiting for some to walk out the shop and try some bolts to get the size and thread count to pulling the harmonic & pulley assembly. Take some time to carefully clean the threads in the pulley. As many of these have a rubber cushion I would not use solvent or penetrating oil. I used a small spiral wire brush in a drill to clean the threads then chased it with tread tap. Also be careful when reinstalling don't hammer on the crank hooks they will bend down and you will not be able to use the crank or the crank will not release when the engine starts. I made a tool for reinstalling the pulley that I will photograph (once my camera is repaired). When you get the pulley assembly off you will probably find that their is a grove worn where it seals. There are Speedy Sleeves just for fixing this issue. Cheap $6.32 US NAPA Part # 600-2016. See photo to confirm we are talking about same bolts and assembly. Cheers Phil PS- Just checked the pulley damper pulling thread - ones on mine are 3/8" x 16 thread.
__________________
Phil Waterman `41 C60L Pattern 12 `42 C60S Radio Pattern 13 `45 HUP http://canadianmilitarypattern.com/ New e-mail Philip@canadianmilitarypattern.com Last edited by Phil Waterman; 27-10-13 at 19:58. Reason: Add Information
|
|
#115
09-11-13, 00:05
|
|||
|
|||
|
Hi Scott
Thanks for the progress update. When you install the new or old throttle pivot shaft remember that it goes through into the water jacket so you want to use a good hard set sealant and a star type lock washer. After a rebuild on my C60S years ago I had the pivot unscrew itself and fall out first sign of the problem was the engine went to idle I pulled over and the truck was peeing antifreeze on the ground. The bolts that hold the camshaft retainer should come out with a fairly small force small socket on a 1/4 drive should do it. My HUP shocks were like yours when got it back in 1978 every now and then I have checked them to see if like your they have resistance in both directions through the full sweep. Back then I had an old timer tell me that if they didn't get sloppy or weak at the end of the stroke don't do anything. Modern hydraulic shock fluid may not be compatible with the seals. So I have left mine alone and they still work. They work enough that the only problem I've ever had is eventually braking the welds on the shock links. In each case remove the link reground the weld and rewelded them. Luckily mine are the all metal ends on the links. Cheers Phil
__________________
Phil Waterman `41 C60L Pattern 12 `42 C60S Radio Pattern 13 `45 HUP http://canadianmilitarypattern.com/ New e-mail Philip@canadianmilitarypattern.com
|
|
#116
09-11-13, 02:44
|
||||
|
||||
|
Quote:
__________________
Robert Pearce.
|
|
#117
16-11-13, 06:16
|
|||
|
|||
|
Hi Scott, you can borrow my engine stand if you like. I haven't used it in 10 years so I won't miss it.
Jeff
__________________
42WLA HD 41 BSA WM20 42 GPW 42 C15A 43 969A Diamond T wrecker Type 2,3 & 4 Ausssie jeep trailers
|
|
#118
16-11-13, 07:37
|
|||
|
|||
|
Hi Scott
The shocker links on your truck appear to be the late war standard US type and as such the ball ends should be interchangeable with Studebaker 6x6 ball ends. These can be pressed out of the eye end and replaced or alternately some people cut and join the Stude links to make them the right length. I have NOS ball ends here $7.50 ea David
__________________
Hell no! I'm not that old!
|
|
#119
21-04-14, 04:34
|
|||
|
|||
|
What shop are you considering??
|
|
#120
21-04-14, 10:28
|
|||
|
|||
|
I would recommend PARRY,s in Sydney if your close. They do a great job AND welcome car clubs to visit.
__________________
macca C15 C15A
|
 |
|
|


 Linear Mode

